Move Close
Welcome to zx14ninjaform.com!

You are not logged in.
New Topic Reply
Next Page

Page: 1

Previous Page

Thread: Install v fairing

Created on: 04/28/15 11:15 PM

Replies: 9

miket


miket's Gravatar

Location: Connecticut

Joined: 12/31/14

Posts: 48

Install v fairing
04/28/15 11:15 PM

Ok bought all parts for v failing plus bracket v fairing is 2 pcs bike s lowered with wide fat lowering links not adjustable links . Soupy sells links claiming v fairing cnot be installed with certin links
How o 2 pcs go together can't even Igure out t to attach to bracket
Where are ya rook?


09 zx14 2000 miles black new to me
02 zrx 1200 r red way too much invested but I love this Bike!
83 gs 1100 red with es fairing again way too much$$$ Cleanist one I've seen

Link | Top | Bottom

Rook


Rook's Gravatar

Joined: 03/28/09

Posts: 20577

RE: Install v fairing
04/29/15 3:16 AM

If by the "V fairing" you mean the side fairing with the V shaped hole, look at this thread about 1/3 of the way down the page. The bracket bolts onto the outside of the air box. Look for the heading, "Middle Fairings (Side Fairings)".

GEN1 FAIRINGS REMOVAL

If that doesn't help, I'm sure we can answer your question if you provide a few more details.


* Last updated by: Rook on 4/29/2015 @ 3:17 AM *


'08 MIDNIGHT SAPPHIRE BLUE Now Deceased

Link | Top | Bottom

miket


miket's Gravatar

Location: Connecticut

Joined: 12/31/14

Posts: 48

RE: Install v fairing
04/29/15 6:12 AM

Small fairing front of f rear tire
55028-0059 rh
55028 _0060 lh
Too many holes won't line up wit bracket wrong part I think


09 zx14 2000 miles black new to me
02 zrx 1200 r red way too much invested but I love this Bike!
83 gs 1100 red with es fairing again way too much$$$ Cleanist one I've seen

Link | Top | Bottom

Rook


Rook's Gravatar

Joined: 03/28/09

Posts: 20577

RE: Install v fairing
04/29/15 8:55 AM

OOOOOO--the belly pan??? shit that's easy.

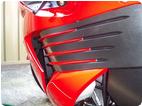
Here's the belly pan with bracket attached and all hardware attached all in position as it should be when installed.

First install the bracket.

You see the two bolts at the top/front of the bracket? They each have a silver spacer. The spacers insert into the holes in the frame you see here. I am wiping them off with the cloth.

Insert the spacers into the frame holes with the flange on the spacer facing to the outside of the frame (just like you see them positioned in the first pic).

...next put your bolts in. The longer hex head bolts go through the spacers first with the head of the bolt facing outward (like in pic #1 above). Position the bracket with it's threaded screw hole on the inside of the frame hole. Thread screws into the bracket. Do this on both left and right.

You will notice there are two empty frame holes on the inside. See the pic? There are 4 frame holes hanging down. Don't worry about it. The inner holes are just left empty. Kawi had something in mind for those holes and decided not to do it. It was probably a second spacer and a longer bolt but Kaw must have decided that was not necessary. Just leave the inner holes empty, that's how it's supposed to be.

There is a shorter hex head bolt only on the right hand side of the bracket. See it with the blue tape on it in my first pic? IDK where that one goes but if you pivot the bracket up after loosely installing the the first two screws, that smaller one will line right up to whatever it threads into on the frame.

Got your three bracket bolts in? I would suggest using some blue LokTite or torque them. There is no torque spec for the bolts and there is no thread locking agent spec either. These are M6 bolts. The basic torque spec for an M6 bolt is 52~69 inch pounds.

Now your bracket is installed.


There's 4 dome head screws that hold the belly pan to the bracket. Each of the 4 screws has a wellnut. The wellnuts need to be inserted into the holes at the bottom of the bracket. The flange on the wellnut should face down at the ground. If you have brand new wellnuts, they will probably seem too small for the holes in the bracket but the wellnuts will expand and fit tight once you snug the screws up into them. There is supposed to be a plastic washer between the head of the screw and the belly pan. This so that the paint does not scratch. DO NO USE LOKTITE OR TORQUE THESE 4 SCREWS! Never use lockTote on a well nut. Never torque a wellnut. Just snug so the rubber squashes down enough to keep the well nut snug in the hole. You might have to tighten these a bit more if the the wellnut is brand new but if it is used, gently snug is fine. I have lost a belly pan screw so maybe go a bit more than gently snug.


You see ?

Personally, I like to leave the belly pan off but suit yourself!


* Last updated by: Rook on 4/29/2015 @ 9:00 AM *


'08 MIDNIGHT SAPPHIRE BLUE Now Deceased

Link | Top | Bottom

miket


miket's Gravatar

Location: Connecticut

Joined: 12/31/14

Posts: 48

RE: Install v fairing
04/29/15 3:27 PM

So much easier if I did not order wrong parts
Ordered plastic pcs for under front fairing


09 zx14 2000 miles black new to me
02 zrx 1200 r red way too much invested but I love this Bike!
83 gs 1100 red with es fairing again way too much$$$ Cleanist one I've seen

Link | Top | Bottom

Rook


Rook's Gravatar

Joined: 03/28/09

Posts: 20577

RE: Install v fairing
04/29/15 7:28 PM

Looks kind of the same as the belly pan but definitely not the right part.

The fuel tank fairing sort of looks like a belly pan too! LOL I don't think it will fit though!

If you need a belly pan, you might pick up a used one cheap off of Ebay. They tend to get pitted up from being so low to the ground. scuff sand and clearcoat and good as new.

If you buy from a private seller off of Ebay, I would only buy if dirt cheap. Too many scammers on Ebay selling damaged fairings. I bet a new one will run about $70.


* Last updated by: Rook on 4/29/2015 @ 7:30 PM *


'08 MIDNIGHT SAPPHIRE BLUE Now Deceased

Link | Top | Bottom

VicThing


VicThing's Gravatar

Joined: 07/17/14

Posts: 2361

RE: Install v fairing
04/30/15 4:23 AM

Personally, I like to leave the belly pan off but suit yourself!

Same. I removed mine just for that purpose. Think overall gives the bike a sportier look. LOL I was pretty shocked the whole thing only weighed 1.5 lbs though! That nearly blew my mind!


* Last updated by: VicThing on 4/30/2015 @ 4:24 AM *

Link | Top | Bottom

Rook


Rook's Gravatar

Joined: 03/28/09

Posts: 20577

RE: Install v fairing
04/30/15 5:12 AM

Actually, 1 1/4 lb if you were referring at my pic above. I'd ditch the rear fender too. That's a pound and 3/4. The bike looks good with the fender on though. As rear fenders go, the 14's is pretty nice looking.


'08 MIDNIGHT SAPPHIRE BLUE Now Deceased

Link | Top | Bottom

Maddevill


Maddevill's Gravatar

Location: Hayward, CA

Joined: 04/23/11

Posts: 2654

RE: Install v fairing
04/30/15 9:23 AM

Those extra holes under the frame are for the center stand. Can't use with the belly fairing.

Mad


Owner of KNGKAW.

Link | Top | Bottom

Rook


Rook's Gravatar

Joined: 03/28/09

Posts: 20577

RE: Install v fairing
04/30/15 12:17 PM

Thanks, MD and thanks for reading that post. Seems it will be of no help with miket's problem. All he needs is a new belly pan. Hope the return of the inner fairings goes ok.


'08 MIDNIGHT SAPPHIRE BLUE Now Deceased

Link | Top | Bottom


Welcome to zx14ninjaform.com!
 
New Topic Reply
Next Page

Page: 1

Previous Page

New Post

Please login to post a response.