Move Close
Welcome to zx14ninjaform.com!

You are not logged in.
New Topic Reply
Next Page

Page: 1 2

Previous Page

Thread: How to - Install an on/off switch for angel eyes?

Created on: 08/31/21 12:38 PM

Replies: 25

ThePowster


ThePowster's Gravatar

Location:

Nottinghamshire, UK

Joined: 08/31/21

Posts: 20

How to - Install an on/off switch for angel eyes?
08/31/21 12:38 PM

Hey guys.

First real question.

I have recently installed some Angel Eyes on my ZX-14, but I now need to wire in an on / off switch for them and I don't know how to proceed.

This is the switch I have bought:

I did see a video on YouTube where the guy says to simply cut the negative wire and join the switch in line with it to create an on/off switch. Is this sound advice for this application?

I can't have this rigged to the battery permanently as it's going to have a constant draw with the bluetooth option for the lights so I need it on a switch you see.

Hope someone can help outline what I need to do.

Thanks in advance :)


Kawasaki ZZR 1400 - Black Widow 200mm 3k Carbon Silencers (blue tip) - Colour Angel Eyes - CNC Preload Adjusters - Valtermoto Exhaust Brackets - Single Seat Cowl - Rearsets - ZX14 Heel Plates - Stubby Levers - Renthal Grips - Goodridge Hoses - Brembo Pads - Puig Short Bar Ends

Link | Top | Bottom

Rook


Rook's Gravatar

Joined: 03/28/09

Posts: 20579

RE: How to - Install an on/off switch for angel eyes?
08/31/21 4:51 PM

The diagram in your second pic would work fine. I don't think it makes a lot of difference but I'd prefer to put the switch in the positive wire so there was no power to the light waiting to make ground by accident. The inline fuse is a wise choice. I'd put the switch between it and the light.

I assume you have an angle eye on the opposite side as well. Will the angle eyes be hooked in series or parallel? I would go with parallel so you don't have a dimming effect caused by a series circuit.

There are members on here that know a lot more about electricity than me. I normally ask them..


'08 MIDNIGHT SAPPHIRE BLUE Now Deceased

Link | Top | Bottom

Rook


Rook's Gravatar

Joined: 03/28/09

Posts: 20579

RE: How to - Install an on/off switch for angel eyes?
08/31/21 4:58 PM

You might also consider using the license plate light wire for power instead of the battery. If you have eliminated the rear fender, that circuit is now useable, it already has an OEM fuse and it's located right in the tail of the bike. If the license plate light circuit is already in use for an aftermarket LED to light your plate, there's still gotta be plenty of juice for angle eyes. If you check the service manual you can find out how many amp fuse that circuit has. Think it was 5 amps on my Gen2. I had one LED and Autotune powered off of that wire and never had a problem. If interested I could post a link to my Autotune tutorial showing how I hooked it up to the tag light wire.


'08 MIDNIGHT SAPPHIRE BLUE Now Deceased

Link | Top | Bottom

Hub


Hub's Gravatar

Joined: 02/05/09

Posts: 13710

RE: How to - Install an on/off switch for angel eyes?
08/31/21 11:40 PM

Goop glue if they have it in the UK. just glue the switch anyplace you want.
Temporary wise, I already have my battery tender harness on the battery. Why don't I buy that jack, run my fuse on the one wire. I have two options. One I can toggle on, or two, I can disconnect and plug in the bluetooth. That means I run another jack and fuse for the bluetooth setup.

The tender jack to switch to bulb goes something like this:

Jack(+) red wire fused as you see off the battery.
Then fuse(+) wire to one side of the light as shown.
Wire(-) out of the angle eye bulb goes to toggle switch.
Jack(-) wire goes to the other prong of the toggle switch.

It just makes the wiring diagram clean with one line creating a square. You just don't see the toggle wired up disrupting the flow of the one wire.


Tormenting the motorcycling community one post at a time

Link | Top | Bottom

ThePowster


ThePowster's Gravatar

Location:

Nottinghamshire, UK

Joined: 08/31/21

Posts: 20

RE: How to - Install an on/off switch for angel eyes?
09/01/21 1:41 AM

Good morning guys.

Thanks soooo much for the posts and info! It's really useful to me.

Rook - You may have touched up on something there. I have another dilemma. I have 2 of these switches. 1 switch I am going to install on the plastic panel around the brake lever area to put power to the angel eyes, when I press the switch I want it then to glow red.

On the other side I will have another switch the same but I will want that to power off the low beam lights, because having low beam on will detract from the angel eyes and I want that switch to light up when there is power off.

I have been wondering how to get the switch halo to light on one side when power is off and on the other side when power is on, and I wonder if this is achieved by whether you splice it into the positive feed or negative?

The angel eyes came as a kit, I have all 4 installed which go to a small box and a simple positive and negative wire out of it. At the moment they are loose on the bike and it can be powered directly off the battery fine but its a constant draw hence the need for a switch.

If you could post that link to the Autotune tutorial that would be most helpful, thanks :)

Thanks Hub, not heard of goop glue here in the UK, maybe Amazon have it. My plan was to drill this infill panel around the levers and the switch has a lock nut so install it in there. Have to be careful on space because directly under those panels is the ram air pipes.

Again with the explanation of wiring it up, lets say I put the switch positive side instead of negative side, do you think that would result in the switch halo light being on when on and on when off? As the low beam switch I want the switch to light when off and the angel eye switch I want to light when on.

Ideally I'll hit both switches, they will both light up and visually tell me I have killed the low beam and activated the angel eyes. When I hit the switches again, both switches don't illuminate and it's back to normal riding conditions.


* Last updated by: ThePowster on 9/1/2021 @ 1:42 AM *


Kawasaki ZZR 1400 - Black Widow 200mm 3k Carbon Silencers (blue tip) - Colour Angel Eyes - CNC Preload Adjusters - Valtermoto Exhaust Brackets - Single Seat Cowl - Rearsets - ZX14 Heel Plates - Stubby Levers - Renthal Grips - Goodridge Hoses - Brembo Pads - Puig Short Bar Ends

Link | Top | Bottom

david5525


david5525's Gravatar

Location: Kirkland WA PNW

Joined: 05/04/15

Posts: 509

RE: How to - Install an on/off switch for angel eyes?
09/01/21 6:53 AM

Powster,
Use one switch and a 12V 5 pin relay. The power wire going to your low beams connects to pin 30 on the relay, pin 87A on the relay continues your low beam circuit to the low beams. As long as the relay is not energised your low beam work normal. Connect power wire for Halo to pin 87 on relay, pin 85 on relay goes to ground. Wire your new switch from any power source to pin 86 on the relay. The ground wire for the Halos goes to frame with the relay ground. Relay takes very little power so you could tie it in with your bluetooth or any other convenient power source. The relay switches the power between the two lights. When your switch is off, not illuminated the relay is passing the low beam power to pin 87A. When you turn on the switch, it illuminates and energises the relay which switches the power from pin 87A to pin 87. Low beams turn off and Halos turn on. You can get relays with mounting tabs if you like or just bundle it in with the wire harness in the front faring area.

Dave

Link | Top | Bottom

ThePowster


ThePowster's Gravatar

Location:

Nottinghamshire, UK

Joined: 08/31/21

Posts: 20

RE: How to - Install an on/off switch for angel eyes?
09/01/21 7:37 AM

Hi Dave.

Wow thanks so much for taking the time to detail that for me.

Unfortunately I am a total newbie when it comes to electrics. I ain't even sure what a relay is :( or what these pins are :( You'll have to imagine you are talking to a toddler lol.

It's a steep learning curve for me, but I will try and fathom this out and do some research later on relays and try and put a little shopping list together. I'll need an inline fuse also for the power which I don't currently have as well as the correct gauge wire, which again I will have to research.

Ah having read what you have said a few times I may be able to simplify things, let me see if I can do a mock up image.

Let's try this one step at a time, could you detail me a list of items to do the angel eyes first? So at the moment they are installed in the headlights, everything back on the bike and I have a negative and a positive wire coming from a small box from the angel eyes. When I connect this to the battery the angel eyes work as they should. These work off a remote control and an app on your phone.

So my dilemma is, how can I wire the switch, right hand side of the bike so that when I press it, it then illuminates to provide a visual sign to me in case I leave them on by accident, and this provides the angel eyes power, and when I press it again it cuts power to them so there is no draw from the battery and that they are not always on - phew.

Sorry for my lack of knowledge, trying to absorb all this like a sponge :)

Thanks again for everyones help so far.


Kawasaki ZZR 1400 - Black Widow 200mm 3k Carbon Silencers (blue tip) - Colour Angel Eyes - CNC Preload Adjusters - Valtermoto Exhaust Brackets - Single Seat Cowl - Rearsets - ZX14 Heel Plates - Stubby Levers - Renthal Grips - Goodridge Hoses - Brembo Pads - Puig Short Bar Ends

Link | Top | Bottom

david5525


david5525's Gravatar

Location: Kirkland WA PNW

Joined: 05/04/15

Posts: 509

RE: How to - Install an on/off switch for angel eyes?
09/01/21 9:09 AM

Powster,
Totally understand, electronics can be daunting. Start with a relay. Think of it as a switch used for moving power from the battery to the lights. They are typically rated for 15, 20 or 30 amps. Your low beam lights already have a fuse so you don't need another fuse for the wire going to pin 30 on the relay. The headlight fuse will also protect the Halos when they are energised. A relay is typically 1 inch cube shape, with or without mounting tab. The mounting tab can be used if you want to use a screw to secure it. Google image relays and you will also see the pins I refer to. The pins are flat tabs also called spade connections. If you power your illuminated switch off of your license plate or tail light power, those are also already protected by a fuse and the relay requires very little power to energise. Think about it for a while. You can do this with one switch, save cutting two holes in your fairing. No fuse as you are using circuits that are already protected. Typical circuits up to 15amp use 18ga wire. Not sure what the amp fuse is for the headlights are, may be higher requiring 16ga wire. The switch wire only needs to be 18ga.
Keep asking questions, that's why we are all here.

Dave


* Last updated by: david5525 on 9/1/2021 @ 9:11 AM *

Link | Top | Bottom

Hub


Hub's Gravatar

Joined: 02/05/09

Posts: 13710

RE: How to - Install an on/off switch for angel eyes?
09/01/21 1:27 PM

What Dave said. And he will yea/nay this 5 pin or use a 4 pin? Plus explain if I have a little electrical theory correct.

5 Pin style:

4 pin style:
https://www.chanish.org/four-pin-relay/

https://www.revzilla.com/motorcycle/battery-tender-quick-disconnect-harness?sku_id=177705
You buy a few of these and one is off the battery, the other is the sacrificial male/female plug for the hot and ground wires. That's one option finding a direct +/- and no tampering with any bike wiring. That's your direct battery to angle box w/fuse, switch in the middle of the (-) wire.
____________________________________________________
With Dave's relay setup, you want to find the piggy kind of spade connector and use the hot side of the horn wire and run that (+) wire to the (+)prong on the relay. That is going to be the bridge to the angle box and that built wire harness. Zip-tie the relay using the hole in the case cover, then use goop [or called 6000 is same stuff, same company] to cover the spades from arcing off of something.

Think of the relay an electrical switch mimicking a mechanical switch. The toggle magnetizes the coil, the arm is now pulled to the coil's prong going out as hot(+). So really, or relay, you are using two toggle switches... one mechanical and the other magnetically switched. Horn hot wire has its own fuse.

As far as the toggle switch mount, you snake the two wires up to the end of the switch. Meaning, where see frame at the neck? That's where you goop the switch and all panels can be removed. Something like that.

https://www.youtube.com/watch?v=Igvranck1MA


Tormenting the motorcycling community one post at a time

Link | Top | Bottom

david5525


david5525's Gravatar

Location: Kirkland WA PNW

Joined: 05/04/15

Posts: 509

RE: How to - Install an on/off switch for angel eyes?
09/01/21 2:06 PM

The reason behind using a relay is that it can handle current or power that you might not want to run through a switch. The reason I suggest a 5 pin relay is that when your switch is off power flows from pin 30 to pin 87A. When you turn on your switch sending power to pin 86, the relay switches power from 87A to 87. A 4 pin relay would only be used to switch a high current circuit on and off with a low current switch.

Not knowing how you were planning to switch your low beams on and off, I made the assumption that you were going to cut the wire and integrate a switch. That is why I suggest using that power to power both the lights through a relay. Think of the 5 pin relay as a 3 way switch. if the switch is up/on your halos are on. If the switch is down/off the power goes someplace else low beams are on. If you want to use Hub's suggestion of the horn power, that would be going to the illuminated switch not the relay. I don't believe the horn fuse will handle the power needed for the lights.

I wish I could explain it better. Google image relay circuit so you can visualise what I am trying to say.

Dave

Link | Top | Bottom

ThePowster


ThePowster's Gravatar

Location:

Nottinghamshire, UK

Joined: 08/31/21

Posts: 20

How to - Install an on/off switch for angel eyes?
09/02/21 5:39 AM

Good morning guys.

Thanks soooooo much for taking the time to share your knowledge with me on this, I really appreciate it.

There is a cool saying I like.. "Give a man a fish, feed him for a day. Teach a man to fish, feed him for a lifetime". Here you guys are basically teaching me how to fish! Not only passing on your knowledge but also allowing me to pass this on too helping others, excellent!

OK so my switches came this morning, v.excited and I have taken a picture to show you.

Right I am just reading and learning as I go along. Thanks for the image Hub and explanation David, I now know what a relay looks like, I have seen these in my car and replaced one once for heated windscreen.

With regards to the relationship between halos and low beam, I will want control of these two switches independently because I want the choice whether to switch the low beam on / off as well as the choice whether I want the halos on or off too, as sometimes I may prefer to have both on if it looks good with some fresh bulbs in.

So with regards to the type of relay now needed as my desire is to have control of both halos and low beam independently of one another, am I right in thinking it reads that I would need a 4 pin relay?

So if we can just concentrating on one side at a time and sorting the halo side of things first.

Shopping list, let's see if I have this right....

1. Relay (4-pin 12v): Click here.

2. 18ga wire: Click here.

3. Battery harness: Click here.

Theory: Battery harness goes directly from the battery to the relay, which then goes from the relay directly to the halo-switch which is also connected to the angel eyes, which then powers the angel eyes correctly?

Question:

a) Am I going to need additional coloured 18g wire as there are 5 connectors on the switch, so after my red and black 18g I guess I am going to need some other wires too from the halo-switch to the relay? Any suggestion on this or will any 18ga wires / colours do?

b) Connection. I have a soldering iron. Do I need some spade connections for connecting wires? Heat shrink tubing etc? Not even sure what I need lol told you I am new :)

c) ok mind starting to melt down now as I'm overloaded... Lets say the shopping list is right, I then have the dilemma of, what leg of the relay is to connect to which leg of the 5-leg halo-switch *mind just blown lol*.

Feeling close now and excited, also getting expensive now just to wire a switch lol but I would rather this be done properly so I don't mind.

If you guys get any time later to confirm shopping list and add / detract items from it then hopefully I can get some things ordered, set up my soldering station (if required) and get to work.

Thanks again.

Matt :)


* Last updated by: ThePowster on 9/2/2021 @ 5:56 AM *


Kawasaki ZZR 1400 - Black Widow 200mm 3k Carbon Silencers (blue tip) - Colour Angel Eyes - CNC Preload Adjusters - Valtermoto Exhaust Brackets - Single Seat Cowl - Rearsets - ZX14 Heel Plates - Stubby Levers - Renthal Grips - Goodridge Hoses - Brembo Pads - Puig Short Bar Ends

Link | Top | Bottom

david5525


david5525's Gravatar

Location: Kirkland WA PNW

Joined: 05/04/15

Posts: 509

RE: How to - Install an on/off switch for angel eyes?
09/02/21 7:08 AM

Good morning Matt,
I hadn't thought about wanting the choice whether one, the other or both are on. Options are better than either or.
I like your switch, it looks like a three way. Did it come with a wire drawing to use the NC (normally closed) with the light? I looked up the switch but couldn't find that info. I did see that the switch is only rated for 5amp. What is the circuit/amp requirement for the Halos? If it is less than 5amp then you don't need a relay.
To independently control your low beams with a second switch, we will need to understand the headlight circuit. I am at work and don't have access to my service manual. If the headlights are on when the key is on then I believe the system is essentially a 5 pin relay controlled by the hi/low switch on the handle bar. This would mean you need to interrupt the circuit with a second relay because of the higher current of the headlights. If the headlights are off with key on and only light up when bike is running then the circuit is a little more complicated but might work in your favour. If you have to interrupt the low beam circuit with a relay, I would still suggest a 5pin relay. This is so your switch will light up when you push the switch to turn off your low beams.
Solder and heat shrink is always the better way to go. There are non solder crimp type connectors, but the best way is to solder. Wire colour of red and black I think is enough.
If Hub or someone else Rook? can chime in on the headlight circuit would be great. I will look at my manual tonight and see if I can work through that circuit for idea that might work better than cutting a headlight wire to make this work.

Dave

Link | Top | Bottom

ThePowster


ThePowster's Gravatar

Location:

Nottinghamshire, UK

Joined: 08/31/21

Posts: 20

RE: How to - Install an on/off switch for angel eyes?
09/02/21 10:11 AM

Hey Dave.

The only info I got on that switch was on the bit of paper as photographed above.

The angel eye kit is here: Here

But I can't see any amp requirement for the halos on this page but it does give a volt rating if that means anything?

Appreciate you using your time to try and fathom this, oh I found this on youtube but it's too complicated for me to understand.

Youtube Link Light Delete

I also think that wires from the battery to the switch might be adequate in turning the halo's on / off, I just don't know how I would wire the switch to enable it to light upon enabling it and where the wires would go yet.

Each time I read all this I learn that little more and get a little closer :)


* Last updated by: ThePowster on 9/2/2021 @ 10:12 AM *


Kawasaki ZZR 1400 - Black Widow 200mm 3k Carbon Silencers (blue tip) - Colour Angel Eyes - CNC Preload Adjusters - Valtermoto Exhaust Brackets - Single Seat Cowl - Rearsets - ZX14 Heel Plates - Stubby Levers - Renthal Grips - Goodridge Hoses - Brembo Pads - Puig Short Bar Ends

Link | Top | Bottom

Hub


Hub's Gravatar

Joined: 02/05/09

Posts: 13710

RE&#x3a&#x3b; How to - Install an on&#x2f&#x3b;off switch for angel eyes&#x3f&#x3b;
09/02/21 11:25 AM

That's called a butcher with squid written all over it. Don't even go there. As soon as he said snip with those two fingers, peeling back the wire harness sheathing I laughed and stopped watching it. This is way too easy and no OE intrusion being that deep in the toggle chase.

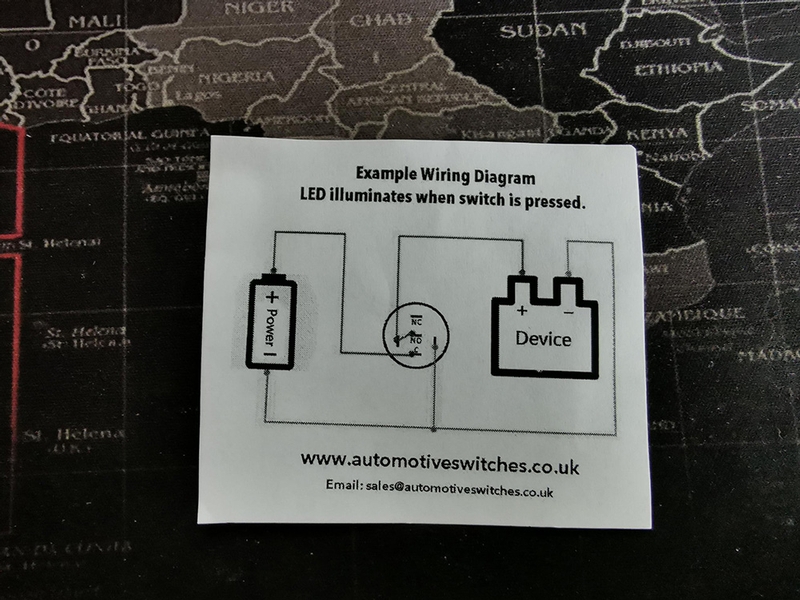
Shoot the angle box. It's either 2 or 3 wires out. Red/Black we already know that side, right?

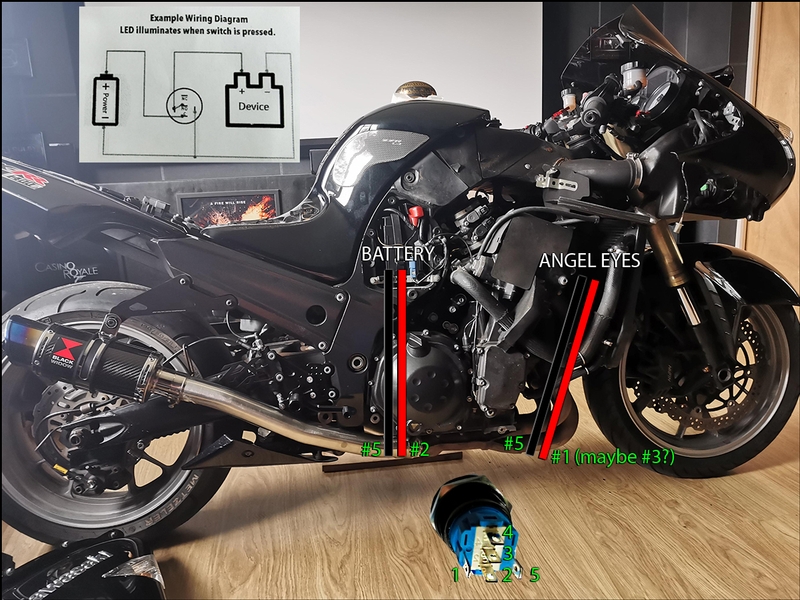
Here is more my approach as to the wring up of the lows/box. This harness goes from battery jack to the front of the bike. That says it's long enough to run the angle-box up front or under the seat. Your angle-box hooks up to this. Then wires out from the a-box. I run the bare spades and cut the plastic cover off... that type. That means it's the hole type for any crush tool. Bare spades with the arms wrapping over the wire with a special crimp tool, no. I prefer solder when making a harness, etc. I move the shrink right up to its neck so no short, no need to goop over the bare spade... but if you go shrink-less?
https://m.media-amazon.com/images/I/71vlitDtOFL._AC_SL1000_.jpg

Shrink wise, you'll at least have to have the diameter fit snug over the widest part of the spade. Those come in different colors and sizes so one of those little variety trays goes on the list.

Next on the list will be the same small selection box that has the plastic covered spades and eyelets in another tray type variety to work from. Find both on 'Harbor Freight' and see if they ship there?

Zips kind of work where you zip the box with a few, then lace a zip thru the two zips you put around the box and zip the a-box to the large harness off the headlights. The long jumper harness is going to lace thru the fairing covers and up out of the neck, between the fork; for a suggestion. You either bought a shorter length jumper or the one size you just roll it up to length.

We are up to the point where I'm going to roll up the length to size and keep the heads on both ends. My second 'sacrificial' plug end(s) is to be soldered up to the a-box for a quick [service] disconnect. I solder that to the a-box's red and black. I now can leave my jumper harness on, disconnect my a-box that is zipped onto the headlight wire harness, glued/velcor'd to the nose, etc.

The think is; we start adding aftermarket. So I now disconnect my a-box and plug in my cig lighter for the phone battery/etc., by using the other sacrificial head end, and wired that up to the cig lighter, cough, glued somewhere conveniently placed. My cig harness is short, I extend my main jumper out to reach.

If you followed the build from battery to neck, to box/cig connect, I'm going to stop here and have Dave wire up the other side out of the a-box. Meanwhile, I am going to add another tool, and this will be; you either make one, or buy the many different spade depressor tools on a chain. By studying the bare spade's locking tang, we are now looking at the 3 prong headlight socket on the bike.
https://i5.walmartimages.com/asr/e043a3c6-c147-470f-a774-afdea32ccf83.58025be5222a79d1fcaae8e0f2b3f45c.jpeg

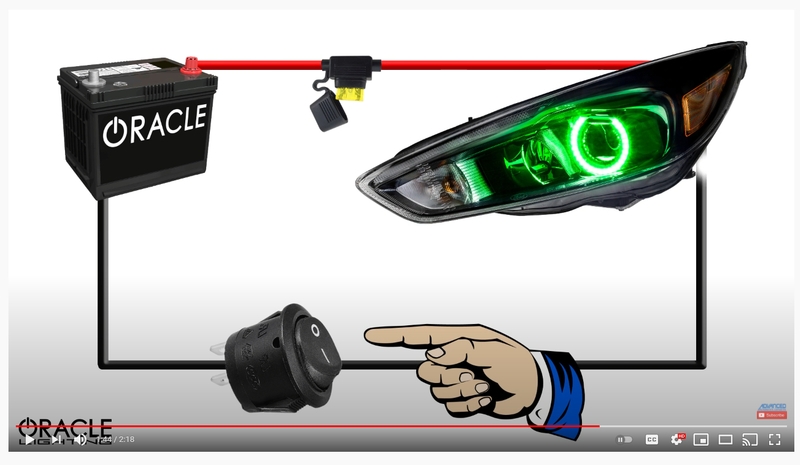
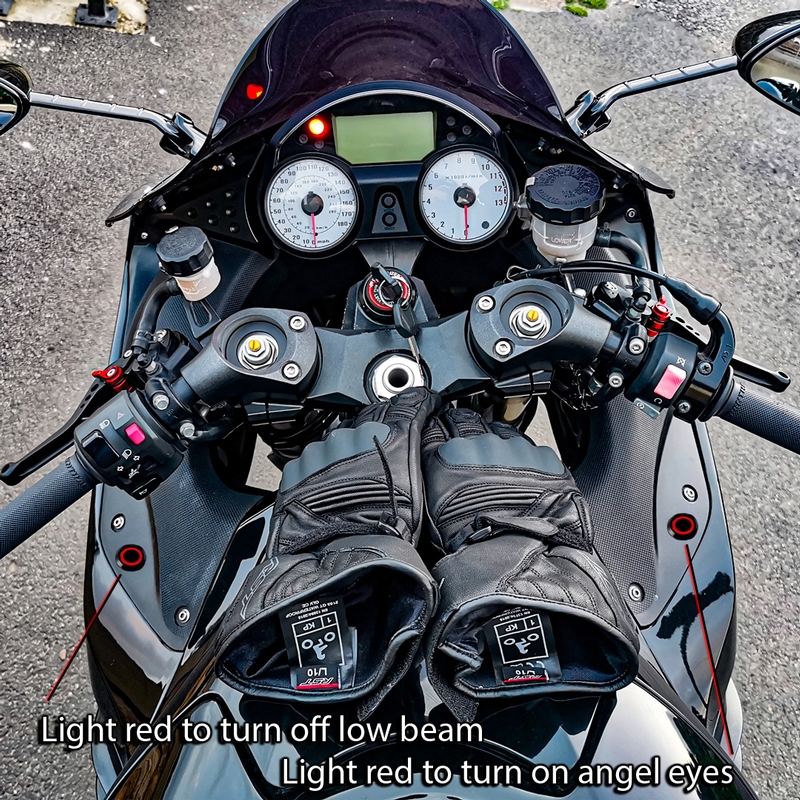
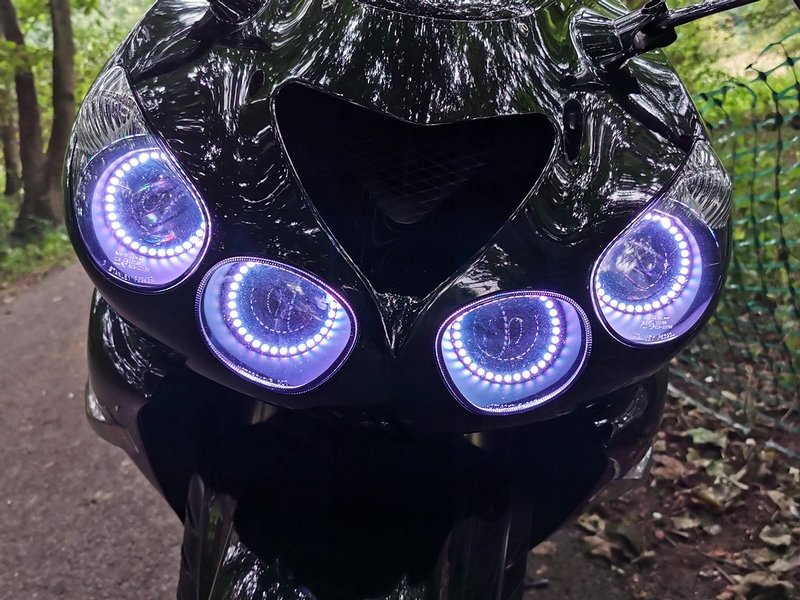
With said test light in hand, alligator clipped to a good ground on the bike... where we tap the start button to turn the headlights on and see if the light stays on without it running? Try that loophole. Start it and use the kill and see if the h/l stays on? Take the tester's point of the tool to the back of the spades inside the headlight connector. That lit up and we then toggled to high beam and the low beam went out... we found both low beam wires this way or, I see the color/code of the low's wire and matched the same wire on the other headlight connector. That, or the low stays on as well.
https://cdn11.bigcommerce.com/s-djx4jold1q/images/stencil/1280x1280/products/1140/2160/VTS-015-2__13210__42368.1600707996.jpg?c=3

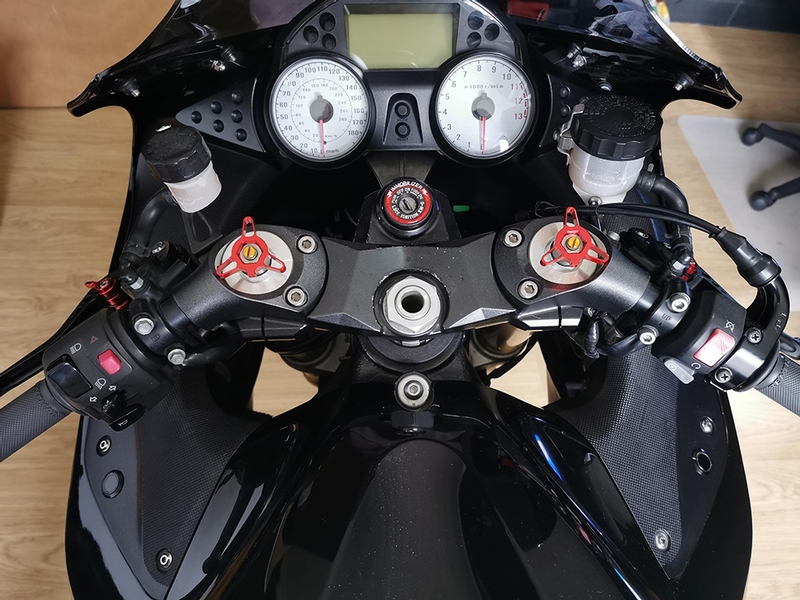
PITA, but I might have to pull the nose off, if not the windshield and attack those two [low beam] wires this way. With my same color wire spool, my shrink color selection, I'm going to match my low beam color and shrink it on the end of both wire ends. Because, say I buy a spool of black ga. wire and keep the cost down buying spools of colors. I code by shrink color over shrink color. Just a little ring size next to each other. Black w/yellow tracer is [factory] ground. So you know if you prong one spade and it's not lighting the test light, you switch to high beam and the test light comes on, then it's obviously the other wire is low beam.

This is now my other toggle turning off the low beams. I'm going to make my jumper low beam harness by attaching both female spades to enter the headlight connectors; the OE low beam wires you depressed the tangs out of. That says my homemade harness is a two headed harness going into the low beam connectors, the other end of the harness is going to be a Y junction.

There, you have one long wire [measured] and you fold it in half. When you find the middle, remove the plastic over the wire so you expose enough to twist the end so it fits into the end of the spade's hole. You're going to make two of these harnesses. So the first Y harness; hooks back into both low connector ends. The single wire end goes to the one side of the switch. The other Y harness; hooks into both OE low wire spade to spades and that single wire runs to the other side of the switch. You now can toggle off/on the lows.

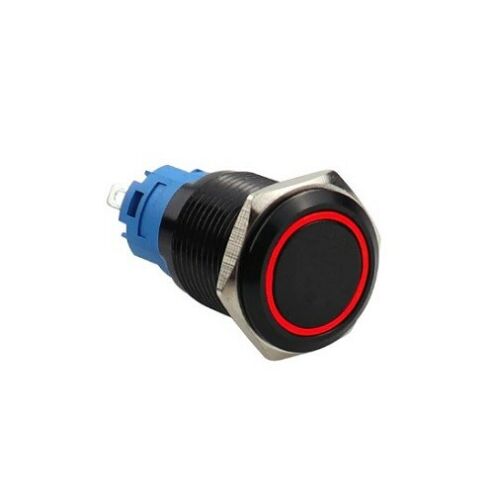
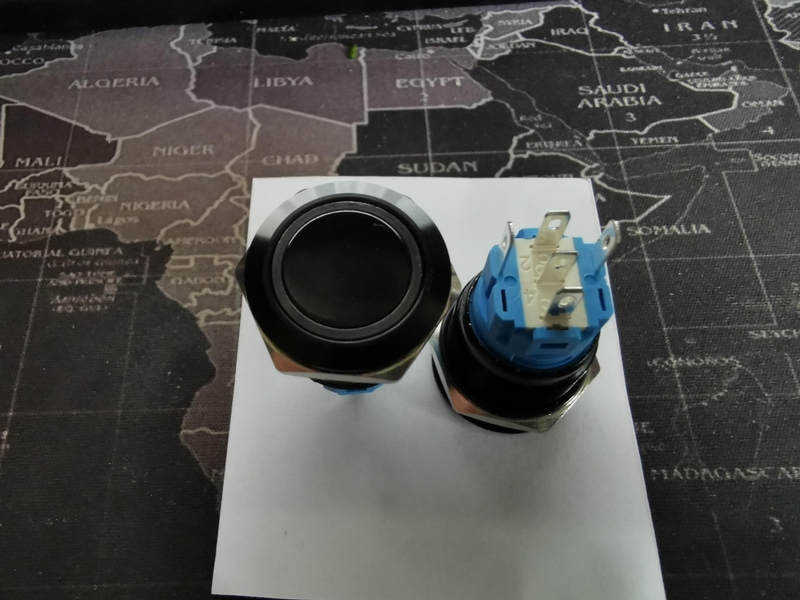
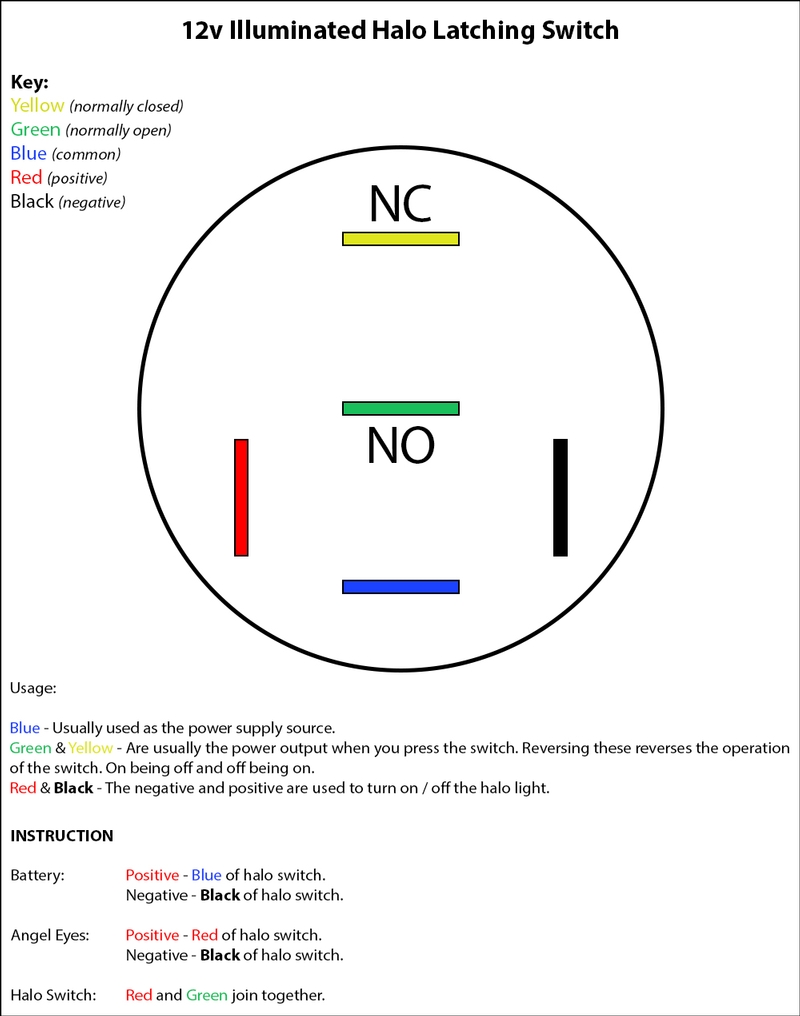
I'm using the two prong toggle style on/off only, but the 3-way you are using is more just finding the on/off prongs and you're in for the low switching side. Angle side, how many wires out of the box? Dave is going to need to know if it 2 or 3 wires out of the a-box.

If it's 2 wires out... toggling up should be a piece of cake.


* Last updated by: Hub on 9/2/2021 @ 11:43 AM *


Tormenting the motorcycling community one post at a time

Link | Top | Bottom

Hub


Hub's Gravatar

Joined: 02/05/09

Posts: 13710

RE: How to - Install an on/off switch for angel eyes?
09/02/21 11:52 AM

Too many wire diagrams. Is the antenna for the bluetooth? It's way more wires than 3 if I'm looking at the angle box. Again, gotta shoot the angel box and who/what/how goes every wire where?


Tormenting the motorcycling community one post at a time

Link | Top | Bottom

ThePowster


ThePowster's Gravatar

Location:

Nottinghamshire, UK

Joined: 08/31/21

Posts: 20

RE: How to - Install an on/off switch for angel eyes?
09/02/21 2:54 PM

Hey Hub.

Thanks so much for your reply.

Forgive me my friend but I am struggling to understand because I don't have the right vocabulary yet :( so a lot of your terminology goes over my head.

I will keep coming back and back to read this thread, and as my understanding and knowledge increases this will make more and more sense to me. Also this post will hopefully serve as a guide to anyone else wishing to carry out this modification.

I am not sure what you mean when you refer to angle box? Do you mean the box in the angel eye kit? It's just a small white box which inside has the electrical gubbins, wireless bluetooth chip etc and out of it comes a single red and a black wire, that's it.

Without getting too complex can we just address the angel eye switch and see if I can understand how to do that before we tackle the low beam which looks to be a lot more complicated?

A picture will better explain what I am thinking, I have just done this...

So despite having a diagram that came with the switch which is on the image above, having never done this it's still not self explanatory to me, so if we can look at my understanding that would be helpful to see if I have it right.

So the diagram, where it says Power I am assuming it means the 12v battery on the bike?

From there it looks like the positive red wire is being extended to go on to #2 as numbered on the underside of the switch and I connect this here?

The negative from the 12v battery goes to #5 on the diagram, so that's it, 2 simple connections as far as the battery is concerned, #2 & #5.

Then I have the angel eyes to connect. I am assuming the 'Device' as written on the diagram is the electrical device in question, the angel eyes? So my red positive wire goes to #1 on the switch, but... the diagram shows like a bridge to the centre #3 prong on the switch? Is that what it is suggesting? I should put a short wire between the two?

The black wire of the angel eyes is also going to #5 on the switch.

If I am to wire up as outlined above, in theory would that give me a working on/off switch to power the angel eyes so they are not always on drawing current? And when I hit the switch the halo part of the switch which glows should also light up to signify it's on? I am wondering if terminal #3 is responsible for that part.

I think there is a time delay between our posts, time now 9:53pm so I'll be hitting the hay soon, dreaming about switches and currents and volts, when I should be dreaming about Kate Beckinsale lol.


Kawasaki ZZR 1400 - Black Widow 200mm 3k Carbon Silencers (blue tip) - Colour Angel Eyes - CNC Preload Adjusters - Valtermoto Exhaust Brackets - Single Seat Cowl - Rearsets - ZX14 Heel Plates - Stubby Levers - Renthal Grips - Goodridge Hoses - Brembo Pads - Puig Short Bar Ends

Link | Top | Bottom

ThePowster


ThePowster's Gravatar

Location:

Nottinghamshire, UK

Joined: 08/31/21

Posts: 20

RE: How to - Install an on/off switch for angel eyes?
09/02/21 3:19 PM

Ohh I just wanted to add about the switch, this is the specification of it, so from this I don't think I need a relay as it's 12v ready:

------------------------------------------------------

Item Description

Smart Metal Switches 19mm round, with Ring Illumination, 12/24v (Momentary and Latching Applications)

High quality steel and brass construction with illuminated ring.

Rated IP67 for a high standard of waterproofing and IK10 for high impact protection.

Common uses for 12/24v Switches are:

Automotive: Cars, Vans, Boats, Mobile Homes, Camper Vans

Industrial: Control Boxes, Switch Panels.

Home: 12/24V Led Light Switch, Pumps, 12/24v Led Strip Light control.

The switches can be wired with crimps or soldered directly in to your existing wires.

Dimensions:

Face Diameter: 22mm
Holding Nut Size: 25mm
Fits Hole Size: 19mm
Fits Panel Thickness: 1mm to 15mm

Technical Specifications

Rated Voltages (DC): 6V/12V/24V
Rated Voltages (AC): 100-110V/220-240V
Power Rating: 3A
Mechanical Life: 500,000 Cycles
Electrical Life: 50,000 Cycles
LED Life: 40,000 Hours
Ingress Protection: IP67
Impact Protection: IK10

------------------------------------------------------

Something else I think I uncovered. If you want the halo to light when you press it, then install the traditional way as shown, if you want it to be lit all the time and go out when you press the switch, apparently you just switch the battery power and device power around then the halo will reverse it's light on press. So the positive the battery went to now the device power goes to and the power the device initially went to you make the battery go to, just reverse and this reverses the effect of lighting the switch... Phew :)

Hopefully I don't blow my angel eyes when I try this lol.


Kawasaki ZZR 1400 - Black Widow 200mm 3k Carbon Silencers (blue tip) - Colour Angel Eyes - CNC Preload Adjusters - Valtermoto Exhaust Brackets - Single Seat Cowl - Rearsets - ZX14 Heel Plates - Stubby Levers - Renthal Grips - Goodridge Hoses - Brembo Pads - Puig Short Bar Ends

Link | Top | Bottom

ThePowster


ThePowster's Gravatar

Location:

Nottinghamshire, UK

Joined: 08/31/21

Posts: 20

RE: How to - Install an on/off switch for angel eyes?
09/02/21 3:25 PM

Found a video which might help:

https://youtu.be/nlPj0VL_bGU


* Last updated by: ThePowster on 9/2/2021 @ 3:25 PM *


Kawasaki ZZR 1400 - Black Widow 200mm 3k Carbon Silencers (blue tip) - Colour Angel Eyes - CNC Preload Adjusters - Valtermoto Exhaust Brackets - Single Seat Cowl - Rearsets - ZX14 Heel Plates - Stubby Levers - Renthal Grips - Goodridge Hoses - Brembo Pads - Puig Short Bar Ends

Link | Top | Bottom

Hub


Hub's Gravatar

Joined: 02/05/09

Posts: 13710

RE: How to - Install an on/off switch for angel eyes?
09/02/21 11:07 PM

Much better. He showed a whole bunch of combos to choose from so it's pretty much follow what wire combo you like.

Here is my most recent quote from some other site that read my electrical post: "I have to be honest, I needed to read that a handful of times before it sunk in and it is ingenious."


Tormenting the motorcycling community one post at a time

Link | Top | Bottom

ThePowster


ThePowster's Gravatar

Location:

Nottinghamshire, UK

Joined: 08/31/21

Posts: 20

RE: How to - Install an on/off switch for angel eyes?
09/03/21 7:40 AM

Afternoon chaps.

Really excited today, one more step and I should have this working.

I've learned so much from you chaps and from that video, so thank you big time.

Right, I have put together a drawing which will both help me and anyone else wanting to undertake this task.

While relays are commonly used, I think if you can get a 12v switch it makes the whole process that bit easier and negates the use and cost of a relay.

So today I have got the dremel out and put 2 holes in this cockpit fairing and I installed a switch in each side, now that's done I could put my tools away and just concentrate on wiring.

Speaking of which here is the instruction for this particular switch for this application of giving angel eyes power from a halo switch:

This is my bike with the switches installed:

Now I need to have a dig around in my cupboards and see if I have any wire to wire this up, if not I will have to put an order in. Hopefully my next post is a snazzy image of her all lit up, fingers crossed.

Either that or I fry my ECU lol :)


Kawasaki ZZR 1400 - Black Widow 200mm 3k Carbon Silencers (blue tip) - Colour Angel Eyes - CNC Preload Adjusters - Valtermoto Exhaust Brackets - Single Seat Cowl - Rearsets - ZX14 Heel Plates - Stubby Levers - Renthal Grips - Goodridge Hoses - Brembo Pads - Puig Short Bar Ends

Link | Top | Bottom

ThePowster


ThePowster's Gravatar

Location:

Nottinghamshire, UK

Joined: 08/31/21

Posts: 20

RE: How to - Install an on/off switch for angel eyes?
09/04/21 7:49 AM

Hey guys.

Just wanted to finish off this topic by saying a huge thank you to Hub, David and Rook.

My halo lights now work off a halo switch and it feels fantastic!

I took a couple of pics for you guys today to show you what she's like out in the open.

My wiring job on this was appalling, the gauge of wire is far too thin and it's not long enough so it's stretched under the panel where the halo switch is but my soldering to the switch was good.

I just wanted to test the theory and it works. I can now order at my leisure the correct wire and fittings and do a proper job, but until then this works just fine as a temporary measure.

I'll have the low beam to sort at some point because as expected when the low beam comes on with the engine running it doesn't look good as the two low beam lights blow out the halo eyes so you cant see thme.

But, one mod at a time lol.

Thanks again fellas, I learned a lot and I'll be sure to pass this info on to anyone else that struggles in the future.

Matt :)


Kawasaki ZZR 1400 - Black Widow 200mm 3k Carbon Silencers (blue tip) - Colour Angel Eyes - CNC Preload Adjusters - Valtermoto Exhaust Brackets - Single Seat Cowl - Rearsets - ZX14 Heel Plates - Stubby Levers - Renthal Grips - Goodridge Hoses - Brembo Pads - Puig Short Bar Ends

Link | Top | Bottom

Grn14


Grn14's Gravatar

Location: Montana

Joined: 02/25/09

Posts: 15511

RE: How to - Install an on/off switch for angel eyes?
09/04/21 10:19 AM

Looks great Matt...way ta go!

Link | Top | Bottom

Rook


Rook's Gravatar

Joined: 03/28/09

Posts: 20579

RE: How to - Install an on/off switch for angel eyes?
09/04/21 10:25 AM

Lookin good, Powster!!


'08 MIDNIGHT SAPPHIRE BLUE Now Deceased

Link | Top | Bottom

ThePowster


ThePowster's Gravatar

Location:

Nottinghamshire, UK

Joined: 08/31/21

Posts: 20

RE: How to - Install an on/off switch for angel eyes?
09/04/21 10:26 AM

Thanks guys :)


Kawasaki ZZR 1400 - Black Widow 200mm 3k Carbon Silencers (blue tip) - Colour Angel Eyes - CNC Preload Adjusters - Valtermoto Exhaust Brackets - Single Seat Cowl - Rearsets - ZX14 Heel Plates - Stubby Levers - Renthal Grips - Goodridge Hoses - Brembo Pads - Puig Short Bar Ends

Link | Top | Bottom

david5525


david5525's Gravatar

Location: Kirkland WA PNW

Joined: 05/04/15

Posts: 509

RE: How to - Install an on/off switch for angel eyes?
09/06/21 9:30 PM

Hey Matt,
Looks awesome. Sorry I dropped off for a bit there. Was out of town for the weekend and didn't have access. Glad you were able to work your way through the wiring on the Halo switch. Hub is a feakin genius on this stuff, you just have to read what he is sayin a bunch until you start to get it.
I still believe you will want to use a relay on the low beam circuit because of the current needs of the low beam lights will be more than the 3 amp rating of the switch unless you have figured out another way to switch your low beams on and off.

Dave

Link | Top | Bottom


Welcome to zx14ninjaform.com!
 
New Topic Reply
Next Page

Page: 1 2

Previous Page

New Post

Please login to post a response.