Move Close
Welcome to zx14ninjaform.com!

You are not logged in.
New Topic Reply
Next Page

Page: 1

Previous Page

Thread: Jim G’s homemade rearset setup for better ergonomics

Created on: 04/14/19 03:35 PM

Replies: 6

JimGnitecki


Location:

Vancouver Island, Canada

Joined: 01/14/19

Posts: 326

Jim G’s homemade rearset setup for better ergonomics
04/14/19 3:35 PM

Some time ago I posted about some of the ergonomic changes I wanted to make to my 2017 ZX-14R, in order to make it fit me better. One key change I needed was to move the driver footpegs rearward so that my 29” inseam legs could reach the ground without being partially obstructed, and forced forward, by the OEM position of the footpegs, which made the bike seem “tippy” to me. (I had already had the seat “scooped” one inch to get me a bit lower without making the seat TOO thin to be comfortable).

I did this rearward movement in 2 stages:

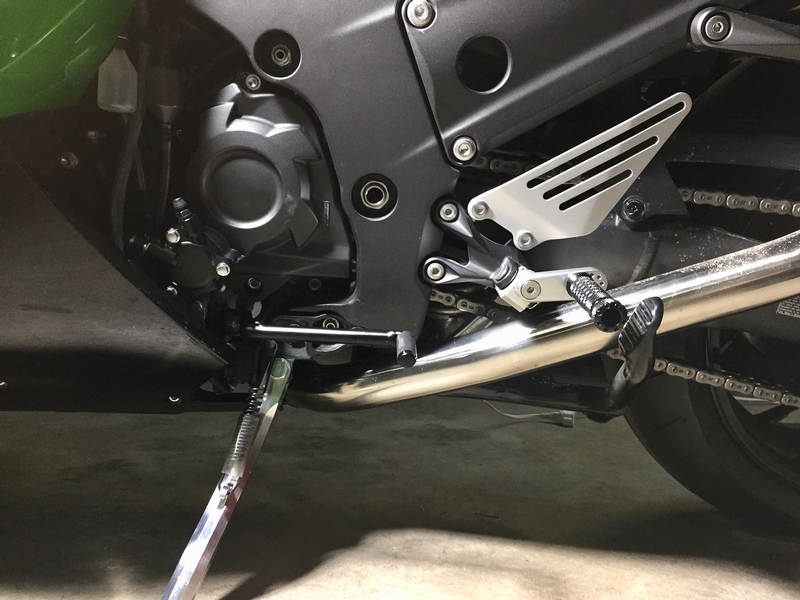
1. I installed an inexpensive (and very lightweight!) set of Chinese “offsets” that include 2 LH and 2 RH anodized alloy CNC plates with clever “multiple-mount” options that allow you to move the footpegs up, down, forward, or rearward in a range spanning from 20mm to 50mm in any of the 4 directions, plus a pair of billet footpegs that make the OEM footpegs look like trash. I set the offset footpegs at the same height as OEM, but 40mm (about 1.6 inches) rearward. This solved the problem of getting my legs cleanly to the ground, but made the distance between the gearshift lever pedal and the footpeg too long for easy, intuitive gearshifting.

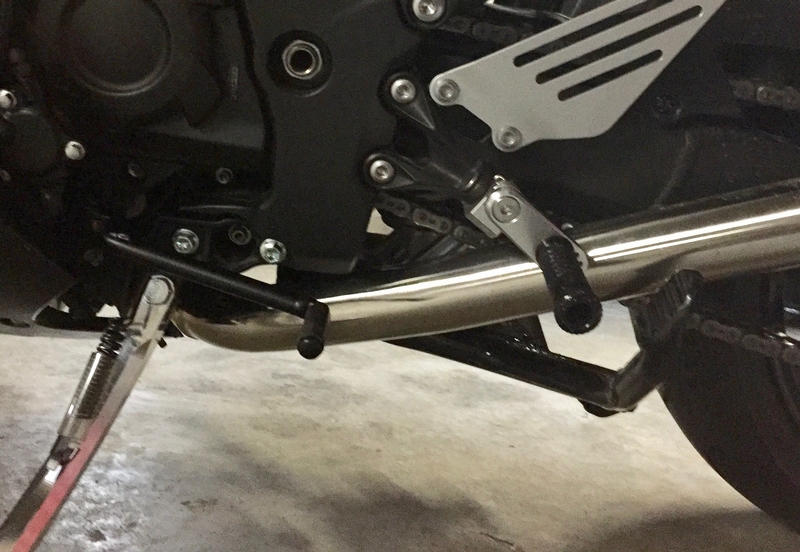
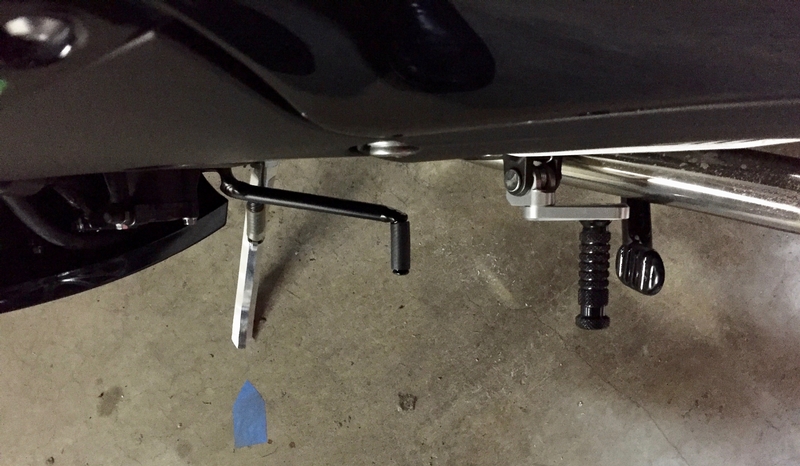
2. I bought a used ZX-14R gearshift lever that a recycler took off a Generation 1 ZX-14 (significance of Gen 1 versus Gen2 gearshift lever willl become clear below), got a local experienced TIG welder to combine the spline end and pedal end from that lever with aluminum billet rod, to make a new gearshift lever that is 40mm (about 1.6 inches) longer. That would keep the “OEM distance” (about 5.75 inches) between the footpeg and the gearshift pedal. (The brake pedal does not require this mod, as we can brake nicely over a very wide range of pedal to footpeg distance). The welder is skilled enough to pull that off and make a resulting lever that looks “OEM”.

The local powdercoating shop powdercoated it for me, and gave it back to me the same day that I took it in, as they happened to be doing a “satin black” run that very day!

Here are photos:


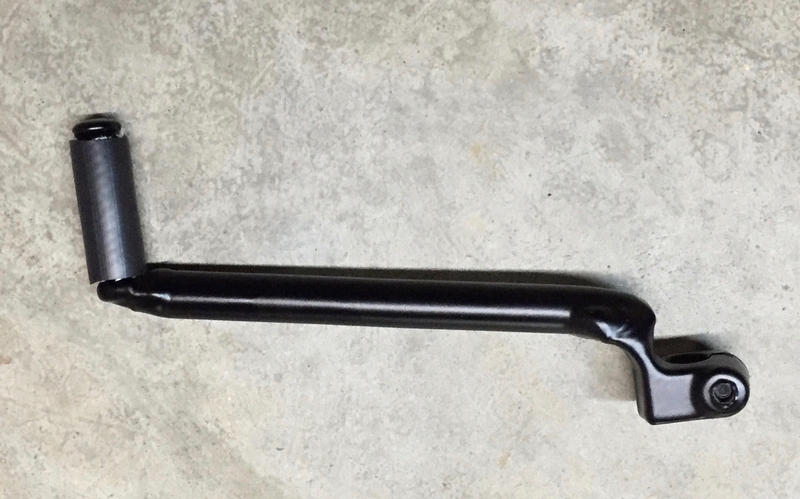
Earlier, I mentioned that I had the welder use a recycled Gen 1 ZX-14 gearshift lever. This turned out to be fortuitous (I cannot take credit for seeing it in advance and planning it). The Gen 2 gearshift levers, like on my 2017 model, are DIECAST (You can clearly see the die parting line). But the welder pointed out that the Gen 1 levers (or at least the one I got) are the much stronger FORGED type. He did a nice job of cutting both the spline end and the pedal end off the OEM lever, and replaced the “in between” part with the correct length of aluminum billet rod to get me the 40mm gain in overall length, welded it all together with enough skill that he did not even need to do any grinding, which is important, since grinding creates heat and changes the material strength.

The result is exactly what I wanted in the first place: fast, easy, and stable “landing” of the bike coming to a dead stop, easier launches, and fast, reliable “in the zone” gear shifting (I don’t even think about shifting anymore. It just happens as needed).

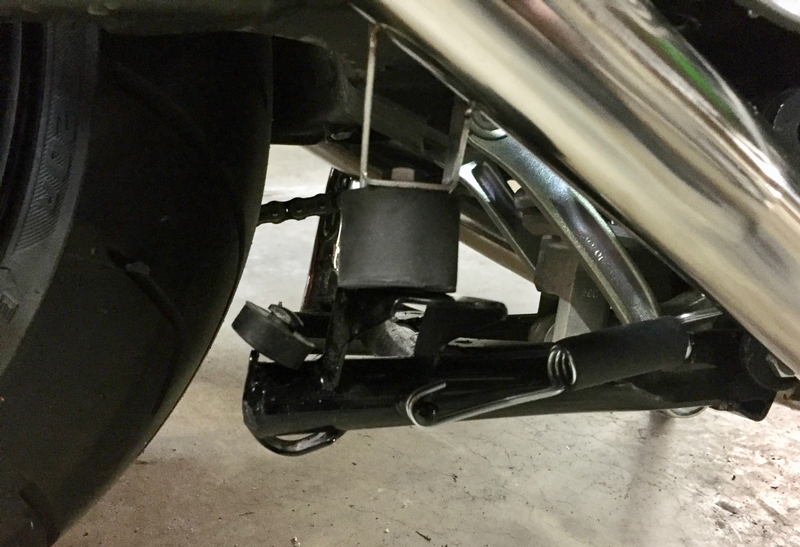
I would have also gone a bit lower on footpeg position, but I have the optional center stand (which I will never give up despite the 3.5 lb NET it adds to the bike), and as you can see from the photos, if I went appreciably lower, my left heel would encounter the center stand’s “foot pedal”.

However, anyone NOT running the center stand could go up to 50mm (2 inches) lower, if he/she wanted to enhance balance control on the bike even more (lower foot positions give you more effective balancing leverage and stability). Since the OEM peg position is so high, and the OEM pegs are so long, and since these Chinese offset footpegs RETAIN the “fold up upon contact with the pavement” feature, there are no ground clearance issues associated with dong this unless you are a very skilled track day rider or racer!

Also, this is a VERY inexpensive way to get “rearsets”, AND still retain the no-linkage DIRECT shifting that is such a valuable feature on the ZX-14. Any true rearsets I have seen replace the direct lever with a multi-piece linkage, which by its very nature introduces slop into the shifting.

Hopefully, the above will be useful to others with similar ergonomic needs.

Jim G

Link | Top | Bottom

JimGnitecki


Location:

Vancouver Island, Canada

Joined: 01/14/19

Posts: 326

RE: Jim G’s homemade rearset setup for better ergonomics
04/14/19 6:52 PM

By the way, the new custom 40mm longer gearshift lever is just 0.05 lb (less than one ounce) heavier than the OEM one (0.20 lb versus 0.15 lb).

Jim G

Link | Top | Bottom

Rook


Rook's Gravatar

Joined: 03/28/09

Posts: 20589

RE: Jim G’s homemade rearset setup for better ergonomics
04/15/19 6:48 AM

Very resourceful!

I have seen aftermarket shift pedals in different lengths or adjustable.

Like this'n here:


'08 MIDNIGHT SAPPHIRE BLUE Now Deceased

Link | Top | Bottom

JimGnitecki


Location:

Vancouver Island, Canada

Joined: 01/14/19

Posts: 326

RE: Jim G’s homemade rearset setup for better ergonomics
04/15/19 8:38 AM

Yes, I looked around a LOT on eBay, Amazon, and indiivdual websites, and found both adjustable and simply longer levers, but every single one I found had at least one of the following issues:

- Did not look quite right
- Was "not guaranteed" to fit a ZX-14R
- Could not tell me the size of the mounting spline
- Had a very long lead time to get actually get one
- Had a $US price that after shipping to Canada, currency conversion, import charges, and sales taxes was ridiculously expensive
or
- Had a GREAT price ($11) and promised arrival from Asia within a few weeks, but then simply never arrived (This is the way I went and have a refund coming from an Asian eBay seller as we speak . . . )

Usually, I have had good luck in sourcing and actually getting inexpensive parts online, but the longer gearshift lever was an exception! :)

Jim G

Link | Top | Bottom

Rook


Rook's Gravatar

Joined: 03/28/09

Posts: 20589

RE: Jim G’s homemade rearset setup for better ergonomics
04/15/19 2:59 PM


'08 MIDNIGHT SAPPHIRE BLUE Now Deceased

Link | Top | Bottom

JimGnitecki


Location:

Vancouver Island, Canada

Joined: 01/14/19

Posts: 326

RE: Jim G’s homemade rearset setup for better ergonomics
04/17/19 4:36 PM

I figured out how to get the footpegs one inch lower than OEM height! Here's how:

I realized that the center stand "pedal" is the limiting factor, but that "pedal" can be lowered by changing the "stowed height" of the center stand. The stowed height is determined by the thickness of the rubber dampener/stop that the center stand bumps up against when it is in the "up" position.

That rubber dampener/stop came with the Delkevic slip-on exhaust, and is only about 1/4" thick.I lowered the stowed height by about an inch by simply installing a much thicker rubber dampener/stop: an "anti-vibration pad" intended to be used on industrial machinery. That new thicker pad bolted right in using the hole that the Delkevic dampener snapped into.


In the photo below, you can see the new dampener mounted in position and securing the center stand, and you can see the Delkevic dampener which I placed for this photo right onto the center stand, just rearward of the new dampener:


This lowering of the center stand assembly's "up" position lowered the center stand "pedal" of course. This enabled me to lower the footpegs another inch, and to also lower the gearshift pedal to "match", by clocking the gearshift lever spline mounting 1 click clockwise! Here's how it looks now:


This does NOT reduce cornering clearance! As you can see in the photo below, on BOTH sides of the bike, the limited factors are the exhaust mufflers (even though the Delkevic mufflers are obviously MUCH thinner than the OEM "bazooka" mufflers!). On the right side, the footpeg is next, but it folds. On the left side, the muffler, AND the footpeg, would both need to drag first before the pedal on the center stand would drag, AND the bike would need to be almost parallel to the pavement for ANYTHING to drag at all! Here's the proof:


That extra inch lower footpeg position unfolds my knees a bit more, and gives me better bike balance control. It also lowers the combined center of gravity of the bike/rider combo a tiny bit more. All of these are good things. :)

Jim G

Link | Top | Bottom

Rook


Rook's Gravatar

Joined: 03/28/09

Posts: 20589

RE: Jim G’s homemade rearset setup for better ergonomics
04/18/19 6:50 AM

Gotta love that DIY ingenuity!


'08 MIDNIGHT SAPPHIRE BLUE Now Deceased

Link | Top | Bottom


Welcome to zx14ninjaform.com!
 
New Topic Reply
Next Page

Page: 1

Previous Page

New Post

Please login to post a response.