Move Close
Welcome to zx14ninjaform.com!

You are not logged in.
New Topic Reply
Next Page

Page: 1 2

Previous Page

Thread: fuel tank removal

Created on: 04/09/11 02:11 PM

Replies: 34

Rook


Rook's Gravatar

Joined: 03/28/09

Posts: 20589

fuel tank removal
04/09/11 2:11 PM

Fuel Tank Removal

It’s best to have the bike on a rear stand and positioned perpendicular to the ground for fuel tank removal. The side stand will work to support the bike for this procedure, however the angle that the bike is at while on the side stand makes propping the tank unsafe. If the bike cannot be positioned straight up and down, I would recommend removing the tank altogether or securing it by hanging the raised front from a sturdy overhead structure.

Do First:
Turn ignition switch off.

Remove left and right foremans, left and right ram air tube covers and fuel tank fairing (Fairings Removal).

Disconnect battery negative ground cable from frame (see Battery Removal, steps 1 2, and 3).

Open the fuel tank cap to release any pressure in the tank.

Syphon as much gas from the tank as possible if it is not already nearly empty.

Remove seat

Tools
ratchet
10mm socket
folded cloth
old bed sheet
empty 2 liter soda bottle
plastic wrap secured by a rubber band

Removal
1. Using a 10mm socket, remove the two front bolts and the two rear bolts. The rear bolts have washers that lay atop the the gas tank dampers.
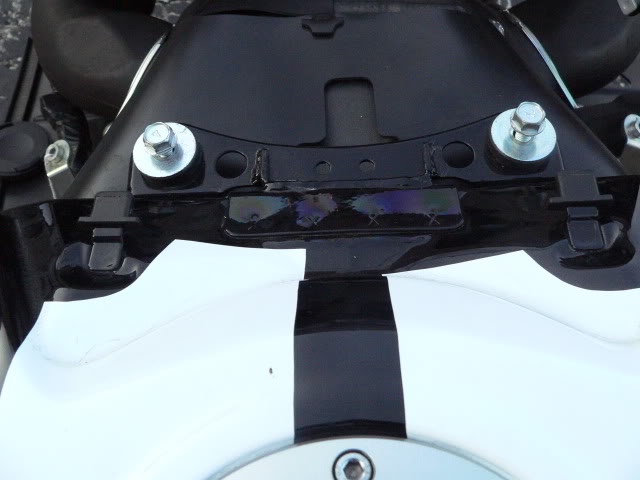
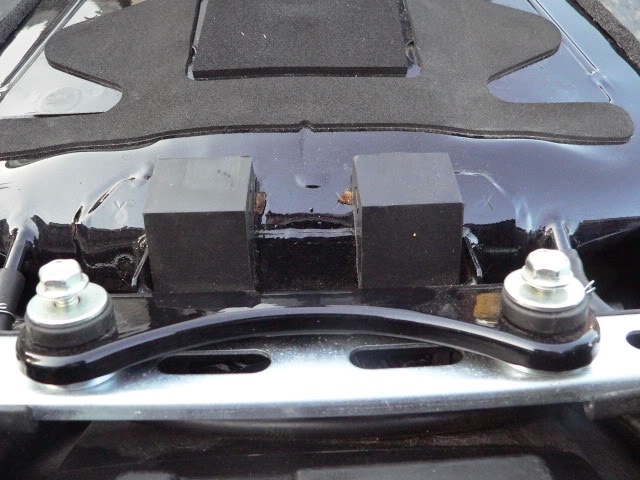

2. Remove the hoses at the back of the tank by pinching the retainer ring and working it back off of the nipple that the hose is attached to. Twist the hose on the fitting to “unstick” it. Push the hose off with thumbnails against the end of the hose. There is a hose on either side of the back of the tank and a third hose on California models. Probably Euros have 3 also. If any gas at all comes out of any of these hoses, it will only be a few drops. Wipe any spill up with a dry rag.
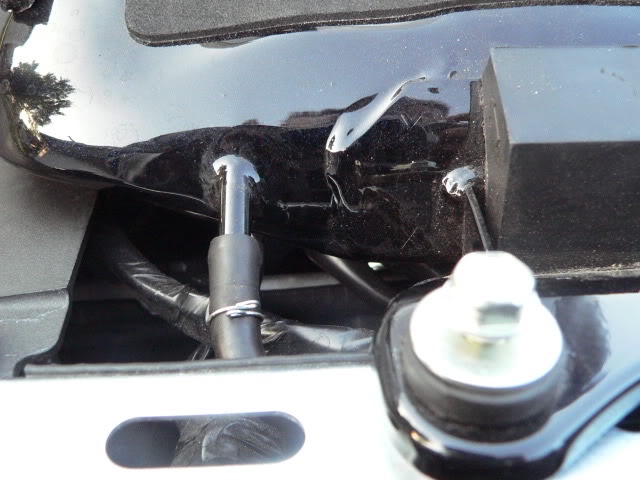

To prop the front of the tank:
To prevent accidental falling of the fuel tank, prop the tank only if the bike is in a vertical position on a rear stand. If the side stand is the only support available for the bike, remove the tank or hang the front of the tank from some secure, overhead structure rather than propping it.

Grasping the fuel tank by the front and rear mounts, lift up 1 inch on both ends and then elevate the front of the tank. Be careful not to push the two cube shaped rubber dampers off the bottom bracket but if you do, they may be re-secured with fresh rubber cement or double sided tape. Also be careful to avoid pulling the two electrical harnesses with short wires on the back of the tank.
Carefully place the rear fuel tank mount on the rear fuel tank bracket. I usually have a folded cloth over the rear fuel tank bracket to avoid scraping the tank.

Place a 2 liter soda bottle between the front bottom of the tank and the top of the air box as shown. Use caution. The tank is not secure in this position but it is convenient and fairly safe for some tasks that require fuel tank compartment access. Any work on the tank itself should only be done with the tank removed to avoid dropping the tank.
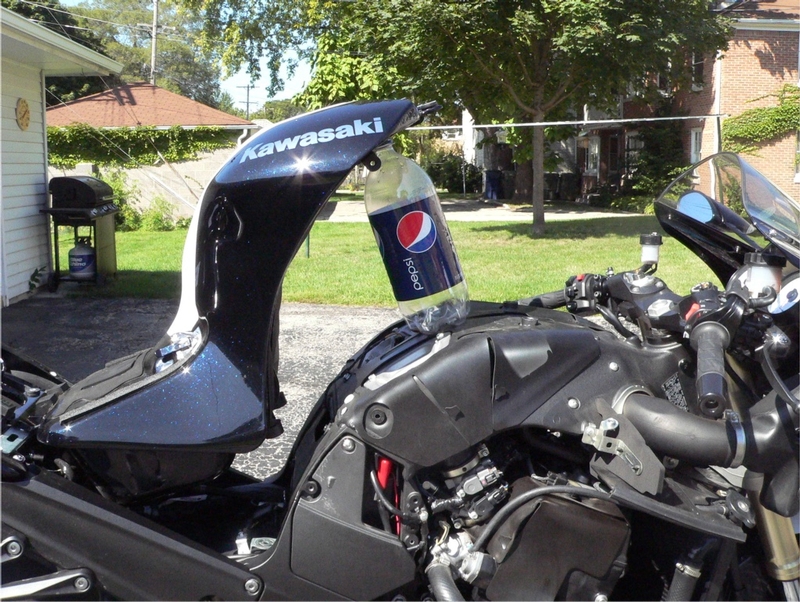

To prop the back of the tank
With the fuel tank bolts removed and the tank resting on its front mounts, lift the back of the tank. Wad up an old bed sheet and stuff it under the bottom edges of the tank to elevate the rear.
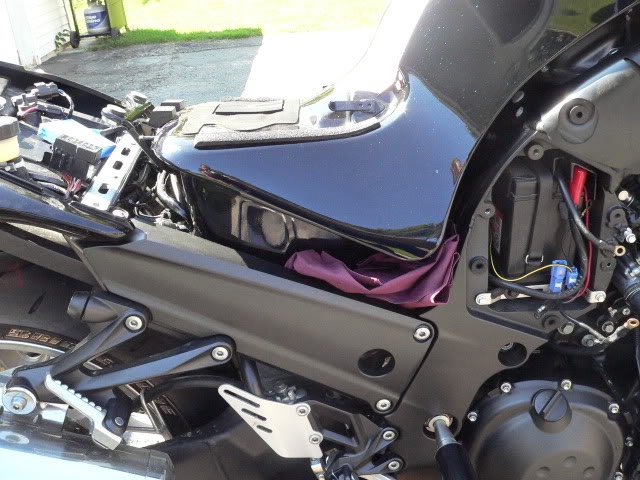
To Remove the tank:
3. With front fuel tank bracket resting on its mounts, lift the back of the tank slightly and find the two black electrical connectors at the back left corner. One is for the fuel pump and the other is for the fuel level sensor.
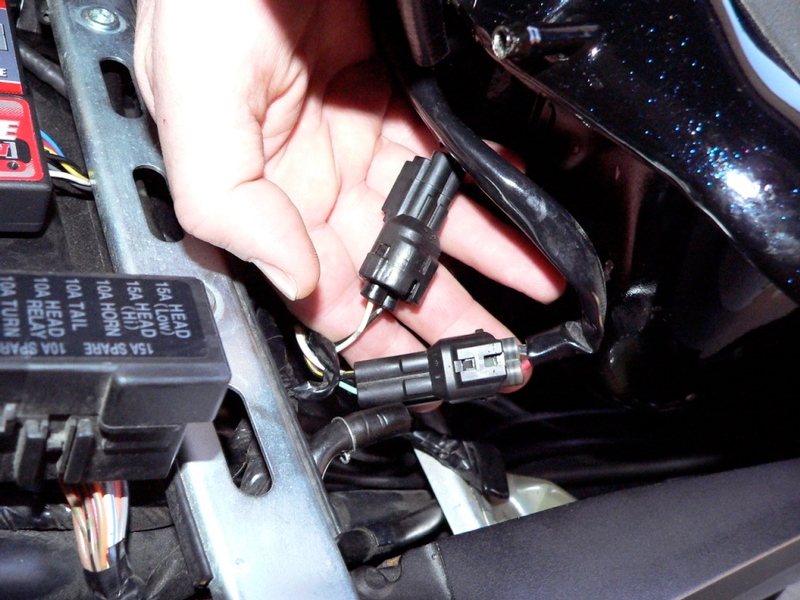
I normally prop the back of the tank (see To Prop the Back of the Tank, above) with a bed sheet while I work on these lead connectors and then lower the tank to proceed.


4. Open the catch on each lead by lifting the tab with your thumb while pulling the male and female halves apart.
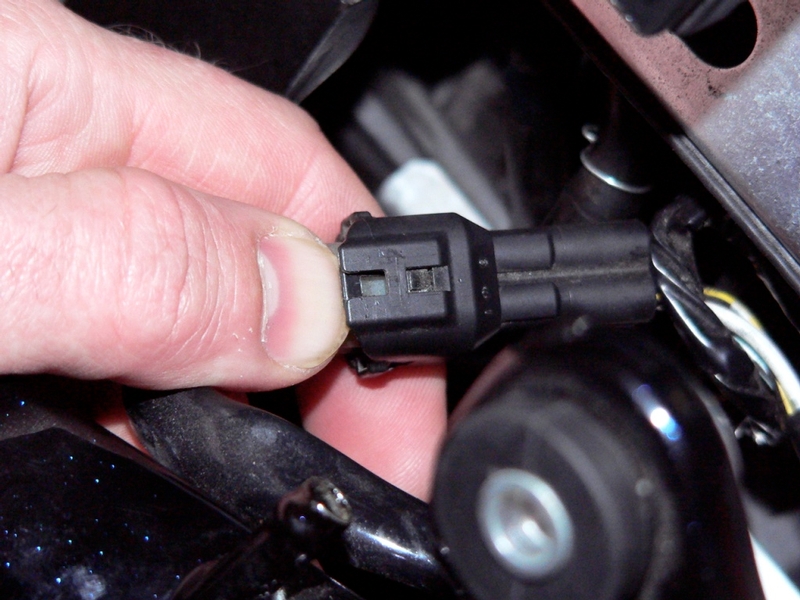

5. Disconnect the fuel hose from the fuel pump delivery pipe (see FUEL HOSE REMOVAL, steps 1, 2 and 3).


6. The fuel tank is now free. Grasp the fuel tank by the front and rear mounting brackets and lift straight up to remove the fuel tank.

If the fuel tank will be detached from the bike for some time, plastic wrap secured by a rubber band may be use to help prevent any dripping from the nipples at the back of the tank and on the delivery pipe.

The fuel pump is meant to be immersed in gasoline. I try not to let it sit dry for too long.

Installation
7. Connect the fuel hose to the fuel pump delivery pipe (see FUEL HOSE REMOVAL, step 9).


8. Place the front fuel tank mount in position on the air box and lift the rear mount up enough to access the fuel pump and fuel level sensor lead connectors. Stuffing the bed sheet in the bottom of the mud flap will be handy to hold the tank up again.

Connect the fuel pump lead and the fuel level sensor lead (steps 3 and 4, above). Be sure the leads are routed correctly.

Place the fuel tank flat on both of its mounts.


9. Push the hoses back on the nipples at the back of the tank.

Position the spring clip retainers on the hoses and over the flared tip of the nipples.


10. Use a 10 mm socket to fasten 4 bolts (2 washers under bolt heads on rear bracket) into fuel tank mounts. If the front and back bolts do not thread in smoothly, it is probably because the fuel tank bracket has been moved out of orientation to the front mount (see FUEL TANK AND MUDFLAP BRACKETS REMOVAL, step 2 ). It is typical for the fuel tank bolt holes to not quite match up to the mounts. Do as you see fit so the threads are not damaged.

There is no torque spec for the fuel tank mounting bolts. I avoid over-tightening them so that the rubber dampers are not distorted.

Connect the battery negative ground cable to the frame (see Battery Removal, step 11).

Check for leakage from fuel hose joint (see final comments, FUEL HOSE REMOVAL).

Install the left and right foremans, left and right ram air tube covers and fuel tank fairing (Fairings Removal).

Install seat.


* Last updated by: Rook on 7/7/2018 @ 10:37 AM *


'08 MIDNIGHT SAPPHIRE BLUE Now Deceased

Link | Top | Bottom

SnuffyZX


SnuffyZX's Gravatar

Location: New York City

Joined: 03/16/09

Posts: 1080

RE: fuel tank removal
04/09/11 3:06 PM

NICE JOB RooK!!!


2012 Golden Blazed Green SE
Brocks Titanium Alloy CT Dual's
CBLASTED!
Brocks Ohlins Steering Dampner
Ohlins KA544 Rear Shock
MRA Touring Windscreen
Power Bronze Hugger
Muzzy Fender Eliminator
DDM 55w HID's
COX Radiator Guard
Clear Alternatives Intergrated Tailight
HyperLight Flashing Brake lights
Radar/Laser Detection & GPS with Radar Screamer


2007 Candy Plasma Blue (Retired)

Link | Top | Bottom

Grn14


Grn14's Gravatar

Location: Montana

Joined: 02/25/09

Posts: 15511

RE: fuel tank removal
04/09/11 3:23 PM

Excellent write up again Rookster on that job.Way to go...just great...professional.This keeps up,you're gonna get discovered by Kawi or somethin!Who knows WHERE this might go?????!!!I know one thing..anyone reading your "how-To's" is gonna have a much easier time gettin things right and proper..great work there,really.

Link | Top | Bottom

Rook


Rook's Gravatar

Joined: 03/28/09

Posts: 20589

RE: fuel tank removal
04/09/11 10:15 PM

Thanks. Kawi SM recommends disconecting the negative battery cable before starting the procedure and that is what I normally do. I guess this is so that no spark can occur and ignite fumes. Any time you work with the battery, a small arch can occur between the cable and the frame even where the frame is painted. A spark resulting from arching is actually more likely if the wire is disconnected. I'm sure removing the whole battery is the safest, when there will be flamable vapors. Something to keep in mind when we do this stuff.

This keeps up,you're gonna get discovered by Kawi or somethin!Who knows WHERE this might go?????!
I guess that would mean a few new bikes in my future, guaranteed. Come and get me Kawi!!!!!!!!!!


* Last updated by: Rook on 4/10/2011 @ 12:48 AM *


'08 MIDNIGHT SAPPHIRE BLUE Now Deceased

Link | Top | Bottom

viffer781


Location: Canberra, Oz

Joined: 02/26/09

Posts: 12

RE: fuel tank removal
09/12/11 5:08 AM

Rook, thanks heaps for the HOW TO. I've been using your guides to get to get my tank off to change my sparkies and air filter. Great to have the iPad next to the bike :-)

Link | Top | Bottom

COOTER


COOTER's Gravatar

Location:

South West Florida

Joined: 04/27/11

Posts: 1342

RE: fuel tank removal
09/12/11 5:42 PM

Is there any way we can make a rook how to section and put his entire how to’s in it for easy reference?


Team panda (ride safe ride sober)

Link | Top | Bottom

bgordon

Forum Administrator

bgordon's Gravatar

Location:

Grand Junction, CO

Joined: 07/19/09

Posts: 1520

RE: fuel tank removal
09/13/11 9:59 AM

We could sure make the important ones sticky. I haven't kept track, so any suggestions as to which ones to make sticky would be appreciated. -bg

Link | Top | Bottom

Rook


Rook's Gravatar

Joined: 03/28/09

Posts: 20589

RE: fuel tank removal
09/13/11 5:58 PM

Stickies are perfect but you can't have a zillion of them. I could make a post called Rook's How Tos or something and just post a hyperlink for each thread. I hate be a pompous and do that if you are the only one asking, Coots but thank you for the suggestion to have a special section for my HOw Tos. (maybe I could just include the links in my signature. what do you think? JK )

I put pretty much work into them and it is good to know that 3 or four or 3 or 4 hundred people find them helpful. There are a couple I have come across just googling some topic dealing with the ZX-14. I know they are often pretty long and usually have a bit more info than most people really need. Sometimes make the job look like it will take a year to do -LOL but some people might benefit from really complete step x step instructions. So thanks for asking, Cooter.


'08 MIDNIGHT SAPPHIRE BLUE Now Deceased

Link | Top | Bottom

bgordon

Forum Administrator

bgordon's Gravatar

Location:

Grand Junction, CO

Joined: 07/19/09

Posts: 1520

RE: fuel tank removal
09/13/11 6:54 PM

Your HOW-TOs are GREAT! Thanks for the contribution to the forum... -bg

Link | Top | Bottom

Rook


Rook's Gravatar

Joined: 03/28/09

Posts: 20589

RE: fuel tank removal
09/13/11 9:00 PM

I have posted links to other tutorials at the end of my fairings removal tutorial. I will finish adding links to all I have done later. Also I will add a link to all new tutorials I write after I post them with the regular threads.

Fairings Removal (POSTED IN STICKIES) with Links to Other Tutorials


'08 MIDNIGHT SAPPHIRE BLUE Now Deceased

Link | Top | Bottom

Broco


Broco's Gravatar

Joined: 02/08/12

Posts: 6

RE: fuel tank removal
02/10/12 11:09 AM

Rook... thanks I going to remove my tank right now. For some reason Im leaking fuel not sure why. (I have just put the o'l girl back together, little run in with a couple of deer sept/2011) Any how, I will hopefully get this figured out. Thanks for taking the time for the show and tell, I'm sure I will be thanking you again at some other point too.

Link | Top | Bottom

Rook


Rook's Gravatar

Joined: 03/28/09

Posts: 20589

RE: fuel tank removal
02/10/12 10:21 PM

Glad the tutorial could help out, Broco.

Can't see how hitting a deer would cause fuel leak unless the damage went all the way back to the throttle bodies (which I doubt or else you would be junking the bike. A fuel tank leak also seems unlikely unless it got cracked but you would know about that by looking. No small parts to crack off except under the seat well protected from collision. Fuel lines are all way inside. No way a deer got inside your engine without causing extreme damage to the whole rest of the bike.

I'm guessing it is fuel tank overflow? Have a look at the overflow tube. Is that where the gas seemed to come from? Maybe the gas got sloshed around. I had a wad of goo come out of my overflow tube after a long hot ride one time. Was one of the rubber tubes in front of left foot peg. One is a breather and the other is the drain hose.

If there is a leak under the tank, You will probably see a pool of gas in the bottom of the fuel tank compartment. There is a cup shaped recess that the delivery pipe from the fuel pump sticks down into.

Hope you track the source of the leakage down soon and hope it is not a leak but maybe just runoff from a drain tube.


'08 MIDNIGHT SAPPHIRE BLUE Now Deceased

Link | Top | Bottom

Broco


Broco's Gravatar

Joined: 02/08/12

Posts: 6

RE: fuel tank removal
02/11/12 6:27 PM

Rook... Thanks for getting back to me. I got everything apart ok. The indent for the fuel pump was full of gas, cleaned it all out looked over the tubing and found nothing. The over flow wasn't clogged, and the fuel line had no signs of wear either. I'm hoping that maybe the fuel line wasn't connected properly and maybe that was causing the leak. I hate to put it all back together without knowing for sure what the heck is going on. Of all the machines I've owned this is by far my favorite. If you have any suggestions I would greatly appreciate it.

Link | Top | Bottom

Rook


Rook's Gravatar

Joined: 03/28/09

Posts: 20589

RE: fuel tank removal
02/11/12 7:47 PM

Must be a fuel line or fuel pump leak. The only thing that I can think of is that the collision with the deer caused such a violent jar to the bike that the fuel line came loose? I really can't see how anything would break under the tank unless the outside was also severely damaged. Maybe the fuel line connector was not on there properly. Still seems like a long shot. The fuel is under high pressure with the bike running. If the connector was not attached properly, I think the pressure alone would have made it leak before you had the run in with the deer.

I guess I would just make sure that connector is locked on the delivery tube and then drop the tank in and start it. No need to put any fairings on. If it still leaks, you start your parts replacement chase. I would think it is the fuel line/connector or some part of the fuel pump.

I don't know how much more I can tell you at this point, Broco. I'm just a newbie wrencher myself. I'm sure you will get some ideas if you start a thread. Hub will probably have some idea. Maybe post it ZX-14 questions or even in the General section. Everyone reads that.


'08 MIDNIGHT SAPPHIRE BLUE Now Deceased

Link | Top | Bottom

Broco


Broco's Gravatar

Joined: 02/08/12

Posts: 6

RE: fuel tank removal
02/12/12 5:50 AM

Rook you the man... I will follow up with a thread. Ever come up to towards Binghamton NY look me up, great riding in the Catskills.

Link | Top | Bottom

Rook


Rook's Gravatar

Joined: 03/28/09

Posts: 20589

RE: fuel tank removal
02/12/12 3:21 PM


'08 MIDNIGHT SAPPHIRE BLUE Now Deceased

Link | Top | Bottom

KoflaOlivieri


KoflaOlivieri's Gravatar

Location:

Philadelphia, PA

Joined: 02/17/12

Posts: 1805

RE: fuel tank removal
04/12/12 8:53 PM

I will be replacing my tank next week, this has been VERY helpful! Thank you!


NINJA ZX-14 MotoVlog

Link | Top | Bottom

Rook


Rook's Gravatar

Joined: 03/28/09

Posts: 20589

RE: fuel tank removal
04/12/12 9:57 PM

GOOD DEAL <MAN! One thing to watch out for....if it isn't a little obvious....that 2 liter soda bottle trick, I ve used it a few times but it is not the most reliable way to set up the tank. You have to be so careful how you position the bottle and to not upset it that I just stopped doing it. I just take the thing off. It's not so hard to get that gfuel line coupler undone once you understand how it works.

Or just hang the tank with some rope or strong string from the garage ceiling. Hate to see someone drop their tank on the floor.


* Last updated by: Rook on 4/12/2012 @ 10:02 PM *


&#x27;08 MIDNIGHT SAPPHIRE BLUE Now Deceased

Link | Top | Bottom

bankheadd


bankheadd's Gravatar

Location: Madison, AL

Joined: 11/05/12

Posts: 123

RE: fuel tank removal
05/24/13 6:42 AM

Rook I'm getting ready to install my PCV and my question may seem stupid... does the tank need to empty in order to remove the fuel lines? May tank is full and I have already removed exhaust pipes and fairings.


Brock CT Duals Exhaust, Cox Radiator Guard, LSL Frame Sliders, Driven D3 Grips, Throttlemeister, Puig Windscreen, Image Design Seat, Yosh Fender Eliminator, DDM HID 6K Lights (HI/LO), Vortex Frt/Rear Sprocket 16/43, Muzzy Fan, Muzzy Block-Off Plates, Schnitz Secondary Fan, Galfer Rotors & Brake Lines,Stock A/F, EBC HH Pads, PCV w/Brock Map, Speedohealer v4, Pazzo Levers, Flies Out, 0W Alisyn Synthetic Oil, Engine Ice

Link | Top | Bottom

toledoUPSguy


toledoUPSguy's Gravatar

Joined: 06/17/12

Posts: 512

RE: fuel tank removal
05/24/13 9:17 AM

Rook I'm getting ready to install my PCV and my question may seem stupid... does the tank need to empty in order to remove the fuel lines? May tank is full and I have already removed exhaust pipes and fairings.

just curious why your going to remove the tank to install you PCV? There aren't any buttons on the PCV that need to be pushed to make adjustments so mounting it like shown in the instructions work fine. ran the USB cable along the wiring harness and up under the seat so I can plug the laptop in.


The man on top of the mountain didn't fall there.
2014 zx14r in nuclear sunset orange and black

Link | Top | Bottom

bankheadd


bankheadd's Gravatar

Location: Madison, AL

Joined: 11/05/12

Posts: 123

RE: fuel tank removal
05/24/13 4:39 PM

Toledoupsguy, rook posted it here in How to's
PC5 under seat installation. Plus I have my HID's ballast installed on my left & right ram air tubes.


Brock CT Duals Exhaust, Cox Radiator Guard, LSL Frame Sliders, Driven D3 Grips, Throttlemeister, Puig Windscreen, Image Design Seat, Yosh Fender Eliminator, DDM HID 6K Lights (HI/LO), Vortex Frt/Rear Sprocket 16/43, Muzzy Fan, Muzzy Block-Off Plates, Schnitz Secondary Fan, Galfer Rotors & Brake Lines,Stock A/F, EBC HH Pads, PCV w/Brock Map, Speedohealer v4, Pazzo Levers, Flies Out, 0W Alisyn Synthetic Oil, Engine Ice

Link | Top | Bottom

Rook


Rook's Gravatar

Joined: 03/28/09

Posts: 20589

RE: fuel tank removal
05/26/13 6:19 PM

my question may seem stupid... does the tank need to empty in order to remove the fuel lines?

I had that exact question when I first removed my fuel lines from the tank.

The answer is NO. You can remove the fuel delivery line below and the breather line and overflow at the back bottom of the tank regardless of fuel level in the the tank. The wost that will happen is that a few drops to ~1 oz of fuel will spill out. Have rags ready to catch it....no biggy.

What is a biggy is lifting the tank with a lot of fuel in it. That sucker will be heavy. I would NOT try without a second set of STRONG hands to hold that thing. That fuel line clip will be a little tricky the first time you try it (not to mention the electrical connectors under the back bottom). I have illustrated those in my how to in detail so that will help a lot...I still highly recommend siphoning as much gas as you can get out of there. I suggested that in the Fuel Tank Removal how to as well. Never tried to take off a full tank and don't plan to.


* Last updated by: Rook on 5/26/2013 @ 6:20 PM *


&#x27;08 MIDNIGHT SAPPHIRE BLUE Now Deceased

Link | Top | Bottom

bankheadd


bankheadd's Gravatar

Location: Madison, AL

Joined: 11/05/12

Posts: 123

RE: fuel tank removal
05/26/13 9:30 PM

I'm in the process of installing a few mods particular my pcv. My problem is that I was only able to remove about 2.5gals using my siphon hand pump (http://www.amazon.com/Hand-Pump-Siphon-Gas-Liquid/dp/B004107292/ref=pd_sbs_auto_5.)The original hoses were to short so I added a 2ft hose but it's to stiff and tends to curve up in the tank not allowing you to get at the fuel at the bottom of the tank. What are you guys using?


Brock CT Duals Exhaust, Cox Radiator Guard, LSL Frame Sliders, Driven D3 Grips, Throttlemeister, Puig Windscreen, Image Design Seat, Yosh Fender Eliminator, DDM HID 6K Lights (HI/LO), Vortex Frt/Rear Sprocket 16/43, Muzzy Fan, Muzzy Block-Off Plates, Schnitz Secondary Fan, Galfer Rotors & Brake Lines,Stock A/F, EBC HH Pads, PCV w/Brock Map, Speedohealer v4, Pazzo Levers, Flies Out, 0W Alisyn Synthetic Oil, Engine Ice

Link | Top | Bottom

Rook


Rook's Gravatar

Joined: 03/28/09

Posts: 20589

RE: fuel tank removal
05/27/13 6:53 AM

just curious why your going to remove the tank to install you PCV? There aren't any buttons on the PCV that need to be pushed to make adjustments so mounting it like shown in the instructions work fine.

It is extra monkey business to install the PCV under the seat but I just like having all my electronics under the seat where I can see them easily. Mostly, it's just a neater install, IMO. Also, Autotune sensor wire is very conveniently routed from the exhaust up to the underseat compartment.


&#x27;08 MIDNIGHT SAPPHIRE BLUE Now Deceased

Link | Top | Bottom

Rook


Rook's Gravatar

Joined: 03/28/09

Posts: 20589

RE: fuel tank removal
05/27/13 6:53 AM

My problem is that I was only able to remove about 2.5gals using my siphon hand pump (http://www.amazon.com/Hand-Pump-Siphon-Gas-Liquid/dp/B004107292/ref=pd_sbs_auto_5.)

I use a 1/8" ID tube with a squeezeball inline. You will probably find one at an auto supply. It is about 3 feet long, I think....plenty long, however, I have the same problem you have with the hose curving up. It is stored in a loose coil and it wants to go back to that shape. Seems impractical to try to store it straight. I find it best to bend the hose straight every now and then while using it.

While siphoning, I keep pulling the hose up and pushing it around, squeezing the sucker ball to find a new spot where the hose tip is submerged so that I can get more gas to drain. You will probably find that the tank splash guard is very sharp and scrapes along the side of the hose. I do my best to avoid this because it seems it could end up causing a blockage problem in the fuel tank if done repeatedly. There is a fuel filter but it is not replaceable so best to do all you can to keep it clean.

You might try placing a ten - twelve inch length of clear water hose such as is used for plumbing into the tank. That should wedge between the hole and the splashguard pretty secure. Slide your smaller tube down the water hose. That will make turning and twisting and pulling the siphon hose a lot smoother and safer. Just be careful not to scrape off flakes of plastic from the large hose on the edge of splash guard. Never tried the larger hose as a guide tube but another member used that technique with good results.

The 1/8 ID hose will siphon pretty slow. Prolly take an hour to to do a full tank.

It is not possible to get every last drop out with a siphon hose. I usually have about 3/4 to a gallon left in there, I'd say. If you are especially diligent, you can get down to maybe 1/2 gallon.

Once you get the 4 bolts that secure the tank removed, you will be able to lift up on the tank. That should tell you if you need to siphon more gas out or if you can handle the weight of the tank and the fuel left inside.


* Last updated by: Rook on 5/27/2013 @ 6:59 AM *


&#x27;08 MIDNIGHT SAPPHIRE BLUE Now Deceased

Link | Top | Bottom


Welcome to zx14ninjaform.com!
 
New Topic Reply
Next Page

Page: 1 2

Previous Page

New Post

Please login to post a response.