Move Close
Welcome to zx14ninjaform.com!

You are not logged in.
New Topic Reply
Next Page

Page: 1 2 3 4

Previous Page

Thread: How-To Inspect Shim Clearances

Created on: 07/04/09 07:11 AM

Replies: 98

Rook


Rook's Gravatar

Joined: 03/28/09

Posts: 20583

RE: How-To Inspect Shim Clearances
09/05/11 10:30 AM

Here is the OEM parts order.

1. I own a 2008 ZX-14 midnight sapphire blue. Is that the ZX-14C8F that I should order parts for? There is also a 2008 ZX-14C8FA --is that is just to address special decal/color needs of the 2008 SE?

2. Gasket, Head hole is for plugs. I will need to order 4 of these? They do not come in a set of 4, right?

3. Gasket, Liquid. $64 for silicone liquid gasket. Will a $6 tube of Permatex from the auto supply work just as well?

Mfg Part Number: 11061-0196
Description: GASKET,HEAD HOLE for 2008 KAWASAKI Ninja ZX-14 (ZX1400-C8F)
Unit Price: $8.34
Requested
Quantity:

Purchase Quantity:
Mfg Part Number: 11061-0738
Description: GASKET,HEAD COVER for 2008 KAWASAKI Ninja ZX-14 (ZX1400-C8F)
Unit Price: $40.02
Requested
Quantity:

Purchase Quantity:
Mfg Part Number: 92025-1984
Description: SHIM,T=2.525 for Kawasaki
Unit Price: $10.12
Requested
Quantity:

Purchase Quantity:
Mfg Part Number: 92104-0004
Description: GASKET-LIQUID,TB1211F for Kawasaki
Unit Price: $64.56
Requested
Quantity:

Purchase Quantity:


* Last updated by: Rook on 9/5/2011 @ 10:31 AM *


'08 MIDNIGHT SAPPHIRE BLUE Now Deceased

Link | Top | Bottom

Rook


Rook's Gravatar

Joined: 03/28/09

Posts: 20583

RE: How-To Inspect Shim Clearances
09/05/11 10:33 AM

I see your initial post you address question #2. The answer is YES--4 hole gaskets to replace all spark plug hole gaskets.


'08 MIDNIGHT SAPPHIRE BLUE Now Deceased

Link | Top | Bottom

Rook


Rook's Gravatar

Joined: 03/28/09

Posts: 20583

RE: How-To Inspect Shim Clearances
09/08/11 11:04 PM

Hub-- just got my kawi parts and measured the 2 shims I bought. The two 2.525s were actually 2.54(why can't they get these the size they are supposed to be? I guess it depends who is on the shim machine that day). Shooting for a clearance of .009" these should give me a .00876" and a .00899" I will have all those valves just about perfect.

ALso, I know you would swat me with your cap over this but I bought the Kawi engine sealant for $64. At least it is a decent sized tube. Lifetime supply. Any leaks and I won't have to wonder if it was because I didn't use the Kawi recommended product. We will have to include the info about the GM sealant in the How To. I'm sure almost all people would go with that for $53 cheaper.

I guess the next thing is to put these shims back in where they belong. How would you go about installing a shim? Stick it to the underside of the bucket or place it on the tip of the valve stem?


* Last updated by: Rook on 9/8/2011 @ 11:07 PM *


'08 MIDNIGHT SAPPHIRE BLUE Now Deceased

Link | Top | Bottom

Rook


Rook's Gravatar

Joined: 03/28/09

Posts: 20583

RE: How-To Inspect Shim Clearances
09/09/11 4:18 PM

How will you get that to stay in the center as you drop the bucket at a slight angle to the head.
IDK? Most of the shims seemed to love to stick in place under the buckets when I removed them but that was after they had been there for 3 years and 29000 miles. I don't think it was the magnet that held them in place. Some just stayed there after I pulled the bucket.


but I see we have a nice little ring to place the shim in there atop the valve stem.


yes, seems pretty intuitive but things sometimes aren't even though they seems as though they are. I am really glad I asked because I may have just put the shims in any which way. I will be sure to go with the # facing down at valve stem tip. I see the original shims all were placed that way. They clearly have a circle printed on them from the butt of the valve stem and most or all still have a part of the number visible. The HotCams shims I bought also have some numbers on one side only....but much less obvious than the Kaw shims.

..yeah. Glad I asked. We unturn the stuff that the book does not tell.

BTW, the shims seem to have some sort of week magnetism to them. IDK if it is from the brief touch of the magnet tool to pull the bucket or if the HotCams shims are magnetic. That may be why they seeem to like to stick to the buckets.


* Last updated by: Rook on 9/9/2011 @ 4:29 PM *


'08 MIDNIGHT SAPPHIRE BLUE Now Deceased

Link | Top | Bottom

Rook


Rook's Gravatar

Joined: 03/28/09

Posts: 20583

RE: How-To Inspect Shim Clearances
09/12/11 12:55 PM

That shim size number faces down or flipped hidden so the bucket spins on the clear side facing you.

I am noticing by the ware mark circles that some of the original shims were installed with number facing up. In keeping with established wear patterns, I guess I will follow suit if the shim is staying where it came from. if I swap over or replace the shim with brand new I will install it with # down.

Installing with number down, less of the number gets worn off, leaving some indication as to what size the shim is/was. Is there any other reasons to install with number down?


'08 MIDNIGHT SAPPHIRE BLUE Now Deceased

Link | Top | Bottom

Rook


Rook's Gravatar

Joined: 03/28/09

Posts: 20583

RE: How-To Inspect Shim Clearances
10/24/11 11:25 AM

Checked clearance adjustments for #4 TDC last night. I was going for minimum clearance which is .006 Inlet : .009 Exhaust.

All 4 Inlet clearances are .006" for #4 TDC.

Two exhaust clearances are .009 but two came up tight at .008 Still, those two clearances are CLOSER to spec than what I had on both when first I checked. The exact spec is .0087 inch minimum. My .009 won't go in but the .008slips right through with ease. I will check all clearances again after about 10K miles.


* Last updated by: Rook on 10/24/2011 @ 11:52 AM *


'08 MIDNIGHT SAPPHIRE BLUE Now Deceased

Link | Top | Bottom

Rook


Rook's Gravatar

Joined: 03/28/09

Posts: 20583

RE: How-To Inspect Shim Clearances
10/24/11 11:44 PM

H=ey there, Hubarino??? U out there somewhere??

Had an interesting scare turning the motor w/o the CCT installed. I bungeed the clutch and turned the crankshaft by timing wheel nut. The slack came out of the chain very nicely but then I noticed the chain was looking like it was heading toward lifting right off the Inlet sprocket. I remember you saying something about the Exhaust sprocket has no problem maintaining tension because it gets pulled by the CChain. The Inlet sprocket gets pushed so this can make the chain want to bunch up behind the sprocket. I was about to reinstall that PITA CCT we have but then I just decided to stick a ratchet handle in the CCT hole (that was a 1bad tip) to maintain tension. Worked great. I got the crank turned 360 with no problems.

ONly thing. Looks like the chain is floating back up off the Inlet sprocket again as it just sits there. No worries, I marked it with some paint just in case. The chain will go back to normal after I install the CCT again.

The results for #1 TDC valve clearance check was much the same as #4. I have 2 Exhaust valves tight at .008 " and the other two are .009 which is what I was shooting for. The Intakes are all at .006

I will check again after the final torque of the caps (to 90"#) but I think it will stay the same. I have torque at about 60"# right now.

All 8 intakes are at .006in.

4 exhaust are at .009 and the other 4 are at .008 .


I'll put some pics up tomorrow


* Last updated by: Rook on 10/24/2011 @ 11:45 PM *


'08 MIDNIGHT SAPPHIRE BLUE Now Deceased

Link | Top | Bottom

Rook


Rook's Gravatar

Joined: 03/28/09

Posts: 20583

RE: How-To Inspect Shim Clearances
10/24/11 11:53 PM

IDK if it is just a coincidence but looks like all the Exhaust valves that came up short on the check after adjustment were valves that had swapped shims. I measured them the same as the new shims. I did not plan to reuse the shims, it just so happened they were very close to what I needed. Maybe that is why they cam up tight, They were very close to what I needed but not exact.


'08 MIDNIGHT SAPPHIRE BLUE Now Deceased

Link | Top | Bottom

Rook


Rook's Gravatar

Joined: 03/28/09

Posts: 20583

RE: How-To Inspect Shim Clearances
10/25/11 3:52 PM

The shim number means nothing. You always measure the shim with the tool. The number is for factory convenient sort of assembly line. So flip it on any side.
Always good to check a shim with a micrometer but The brand new Kawasaki made shims are dead on accurate. Hot Cams, not so much.


turn the crank, you jam the tensioner so that tooth does not ride up the intake cam. This is a non-spin type of move. This is turn, jam the chain down off the cam rise; turn-jam tensioner-turn some-jam some-turn some-get it?
You have to do the work of the Cam Chain Tensioner of it is not installed. Can all be done at once if yuo turn the crank with a ratchet and hold a blunt tool against the chain through the CCT hole.

do this

or you will get this

next stage is skip a tooth. UR SKE-rude!


'08 MIDNIGHT SAPPHIRE BLUE Now Deceased

Link | Top | Bottom

Rook


Rook's Gravatar

Joined: 03/28/09

Posts: 20583

RE: How-To Inspect Shim Clearances
10/25/11 3:58 PM

I was wondering this for a while but have been waiting to ask so as to not be asking questions all over the map.


You know how we talked about the drive chain rolling over the sprockets and if you marked a link to a sprocket tooth, those two would line up like every 60 revolutions??

All the other 59 revolutions (hypothetically speaking) that link is some other tooth. Right?

The same thing would happen with the Can Chain on its sprockets, wouldn't it? you mark a link to a tooth but you turn the chain around until that link comes up again----your marked tooth no longer lines up....until many cam chain revolutions later.

I will tryig this after I am done with the clearance adjustment. What do you think will happen?


'08 MIDNIGHT SAPPHIRE BLUE Now Deceased

Link | Top | Bottom

Rook


Rook's Gravatar

Joined: 03/28/09

Posts: 20583

RE: How-To Inspect Shim Clearances
10/25/11 7:19 PM

I think those are too many dry runs. Try the rear chain instead. Mark the chain. Who cares. A line is a link. 360 is 360, right?

haha, I was just going to give the CChain one or two more 360s. I will need to do to double check the clearances after the final torque-down of the caps anyway (90in lbs a little shy of spec). If the marked tooth doesn't line up with the marked link, I should see that on the first turn. Don't need to know how many turns it takes to line up the tooth and the link again.


Or, set up the APE.

Yeah, the APE. I had written about that last night and deleted it because I didn't want to ask 40 questions in one post. Well, I think I may just reinstall the stock CCT and run it for a few miles just to not have too many new things happening in the motor. I'll put the APE on later and tighten it according to rattle elimination like everyone else does. I'll do a how too on that too over the winter.


'08 MIDNIGHT SAPPHIRE BLUE Now Deceased

Link | Top | Bottom

Rook


Rook's Gravatar

Joined: 03/28/09

Posts: 20583

RE: How-To Inspect Shim Clearances
10/26/11 10:46 PM

The head hole gaskets, you know the spark plug hole seal between the head cover and the inside of the head. How do those come out? They are not fastened in place any way, are they? Just press a finger nail under and lift up?

Haven't tried yet but just thought I'd ask in case it is more complicated than I think.


(almost there!!!)


'08 MIDNIGHT SAPPHIRE BLUE Now Deceased

Link | Top | Bottom

Rook


Rook's Gravatar

Joined: 03/28/09

Posts: 20583

RE: How-To Inspect Shim Clearances
10/28/11 8:03 PM

Not the shift the plug gasket as you distort the cover to push the plug gaskets in place. Look at the design execution. The 4 down [in place] and one cover over 4 rings makes more sense to me. See if you agree

Prolly not to much shifting of gaskets if you follow the tightening sequence. The middle two bolts get torqued first. Should keep the whole cover fairly level.. You and I torque a tiny bit at a time anyway.. I think that cures a world of ills all by itself.


'08 MIDNIGHT SAPPHIRE BLUE Now Deceased

Link | Top | Bottom

Rook


Rook's Gravatar

Joined: 03/28/09

Posts: 20583

RE: How-To Inspect Shim Clearances
10/30/11 10:28 PM

Actually Hub, I purchased a brand new head cover gasket but I decided I would like to just see if the original would do the job it was supposed to do. The cover bolts were not tight at all when I first removed them. No wonder the gasket leaked. Not much pressure on it at all. I am going to torque to spec (-20% to save on thread life) and watch it for leaking. If it leaks again, I'm going to put some washers under the bolt heads. If it still leaks (which I doubt it will), then the new gasket will go in. That will probably be 10K miles down the road when I check the clearances again.


I have an answer to the question about chain link to tooth alignment. You know how we marked the tooth to the link on the Cchain and sprocket?? I turned the engine 360 degrees x 2 and the marks were nowhere near each other when they came back around. So a paint mark is only good if you mark it and leave it.. If you turned the chain with the Camshafts out, the marks would be useless. Never did that. I'm sure you know a way to correctly set the timing in that situation but for me, glad I don't need to mess with it.

Have CCT pre oiled and installed and sprung open. Head cover ready to torque down tomorrow and then I guess the T bodies. I will be hooking the wires and crap back up. And the poor Shorai battery that has been sitting a few months now.

Compression test and T body sinc after I ride a bit.


* Last updated by: Rook on 10/30/2011 @ 10:29 PM *


'08 MIDNIGHT SAPPHIRE BLUE Now Deceased

Link | Top | Bottom

Rook


Rook's Gravatar

Joined: 03/28/09

Posts: 20583

RE: How-To Inspect Shim Clearances
11/02/11 12:14 AM

The factory installation of my Crankcase Sensor Cover has a silicone like engine sealant on the inside edge and the rubber gasket. I have a tube of Silicone engine sealant recommended in SM. How do I prep the surface to reinstall the cover with the sealant applied.

Also, how is the sealant applied? Do I let it dry a bit or do I bolt the cover down immediately after the sealant is applied?


The SM states that (1) bolt on the sensor cover is to have nonpermanent thread locking agent applied. I assume the one bolt they are talking about is the top one. It has less threads than the other bolts because the hole does not drill into a solid piece of engine case like the other sensor cover bolts.


* Last updated by: Rook on 11/2/2011 @ 12:15 AM *


'08 MIDNIGHT SAPPHIRE BLUE Now Deceased

Link | Top | Bottom

Rook


Rook's Gravatar

Joined: 03/28/09

Posts: 20583

RE: How-To Inspect Shim Clearances
11/02/11 10:54 AM

See that half moon hoops for the line bore machine? Right at those 8 corners do dab a tab of sealer at those areas. Look in the book for those glue hits.
The roundish thickened part of the case wall where the 7 bolt threads and that 1 positioning pin were set. Only explanation I found about sensor cover installlation is a table with torque spec for the sensor cover bolts and a note about nonpermanent locking agent (1). They do not even say anything about the sealant but I see it was applied when assembled at the factory.

As far as a bond back on that bolt? Pass on my end. You call that ball on your end. I use very little if none after an engine build. I do not want some internal contamination that does not need to be addressed if it is not leaking. Make sense?
I think I will do a drop of blue thread lock on there if the outside temp gets up to 60 F. No reason to use that stuff in the cold. If it does not firm up quick as you can get the bolt in, it will not fill any gaps in the threads at all.

*Did you stab the tensioner as per book to preload it out of the cartridge? How do you know the piston came out for sure?
Yes. Last time I re-re-reinstalled it (so I could turn the crank w/o skipping time on the inlet sprocket) I heard and felt the pushrod ratchet out. This last time, I was not as quick on the pull back of the screw driver so the ratchet feel was not very pronounced. I felt something though. I also turned the crankshaft and watched the Cam Chain on the teeth of the Inlet Sprocket. The chain maintained good tension and no lifting up as though it were going to jump a tooth (although the chain does not ride quite as tight on the Inlet sprocket as it does on the Exhaust--just cuz we are pulling on the Exhaust with the chain and pushing up at the Inlet).

I then rolled the the tensioner screws back evenly until I saw the tension body come along with the bolts. I stopped so as not to trigger another lock tumbler.
That worked really well for me the last time. NOw that I am familiar with how this works, I am a lot more confident about if the tensioner pushrod pops out or not. The spring was sprung, I'm sure. Otherwise I would have seen the timing chain start to lift w/o tension on it. Although the loose bolt test a 100x safer than observing the cam chain tension, there is the slightest chance that pushrod might be right at the edge of ratcheting to the next stop. You losen up a half thread and that could be all it takes to jump to the next setting which would be 1 setting too tight (although, if it is already that close, might actually be an improvement, hey?).

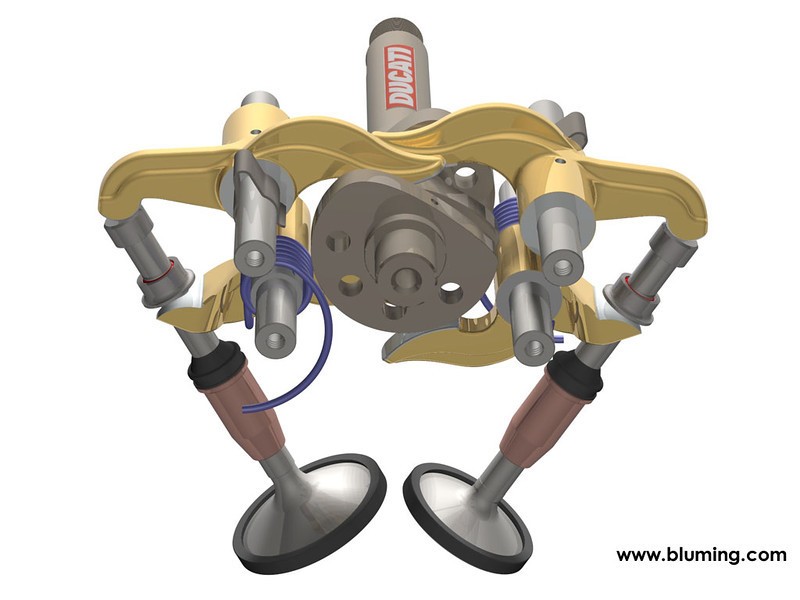
But, do you see how that dot to cam comes around again in so many revolutions?
Yeah. It's a beautiful thing. Now that you mention it, I should start playinging with the animation software I got with my Adobe Suite. Ps might not be quite enough for complete engine internals. IDK. Would be cool but no time, unfortunately.


That engine goes together one way and if you hit the factory marks? Shedingdongdisdone!
Getting closer. I torqued the head cover bolts according to sequence. I used 70 in lbs instead of the spec 87. felt good enough. I think that might be all it takes to solve the leaky gasket.


'08 MIDNIGHT SAPPHIRE BLUE Now Deceased

Link | Top | Bottom

Rook


Rook's Gravatar

Joined: 03/28/09

Posts: 20583

RE: How-To Inspect Shim Clearances
11/02/11 5:22 PM

mmmmmnope. Still a month and a half of acceptable riding weather. I wouldn't ever put her away if it weren't for the salt on the roads. I can ride in 20 F weather on the highway. The 14 will ride again before 2012 hits.


'08 MIDNIGHT SAPPHIRE BLUE Now Deceased

Link | Top | Bottom

Rook


Rook's Gravatar

Joined: 03/28/09

Posts: 20583

RE: How-To Inspect Shim Clearances
11/17/11 1:02 PM

HEY, HUBSTER!

GREAT NEWS!!!!!

I put the fuel tank on last night and got the bat in there today. I heard the mutifunc go "tock" as I was hooking up the battery cable. Made my heart race! I turned the key and got the fuel pump spin and the needle sweep. Sounded pretty weak after 5 months with no battery activity. There was a moment of apprehension before i hit the starter. Last night I had to stop and think:

"any possibility I left a screw laying in there...of forgot something or transposed camshafts or something stupid like that??? No way of knowing now. She's all closed up."

I started her up and the cam chain tensioner ratted a lot which is normal after sitting like that for 5 months w/o starting. after the rattle quieted it was smooth like glass. Not the slightest clip or clop--just a motor

running

as it should. HUrrayyyyyyyyy! I will post video of the start when I get that all set.

Only issue I can see as of now, the crankshaft sensor cover leaked a drop on the floor. Right at that rubber plug where the sensor goes under the cover. I did use that expensive engine sealant there as well as 2 other places on the cover where I saw it had been applied at factory. My application was quit thin. Maybe I shoulda went heavier by the sensor. I will try torquing the cover bolts tighter as I held back ~20% to save thread life. Also, I have a feeling this new cheap torque wrench is on the soft side. Will have to test it this winter.


'08 MIDNIGHT SAPPHIRE BLUE Now Deceased

Link | Top | Bottom

privateer


privateer's Gravatar

Location: [random forest]

Joined: 02/16/09

Posts: 3605

RE: How-To Inspect Shim Clearances
11/17/11 1:20 PM

7 pages on how to shim valves! /boggle


Living the Gypsy Life

Link | Top | Bottom

Rook


Rook's Gravatar

Joined: 03/28/09

Posts: 20583

RE: How-To Inspect Shim Clearances
11/17/11 3:06 PM

Thank GOD for every post. My fail record is still perfectly clean. Glad fpr all the help from everyone especially Hubster. This is a pretty big deal if the most you ever did was change a spark plug or oil or take off fairings. LOTS of ways you could make a mistake that would be a disaster. There are always a few but on this job, LOTS.


'08 MIDNIGHT SAPPHIRE BLUE Now Deceased

Link | Top | Bottom

Rook


Rook's Gravatar

Joined: 03/28/09

Posts: 20583

RE: How-To Inspect Shim Clearances
11/18/11 10:47 PM

I'm stepping up to the podium right now to deliver my acceptance speech for the DUM BASS award


...found the cause of the oil drip from the crankshaft Sensor Cover. You know those two wire retainers made out of sheet metal that go under the bolt heads? I put them between the cover and the engine case. Seemed wrong to me but sure as hell looked like there were some marks there that resembled the outline of the retainer right at the screws where the retainers are placed.

I loosened up the bolts and the wire retainers pulled out. FDid not even have to remove the cover. I put them under the bolts and torqued back 20% shy of torque spec. I ran the motor and and revved her up to about 5. No drips. Maybe a very slight weep---IDK. I start to let my imagination get the best of me when I am looking for something to be not right. I am quite sure I have found a dirt oil film in the right lower fairing. Prolly has a very tiny bit of seepage all along. As long as I know where it is coming from, it is not severe and how to fix it if it gets severe, I'm not concerned.


* Last updated by: Rook on 11/18/2011 @ 10:49 PM *


'08 MIDNIGHT SAPPHIRE BLUE Now Deceased

Link | Top | Bottom

ethin14


Location: Qld Australia

Joined: 03/09/09

Posts: 589

RE: How-To Inspect Shim Clearances
11/19/11 2:17 AM

Congrats Rook, hopefully it will be a long time until the next time for you,
You must be about to pick up an old Duc, and try your luck, Drive them down drive them up no springs.

Hub would be all over it.


* Last updated by: ethin14 on 11/19/2011 @ 2:18 AM *

Link | Top | Bottom

Rook


Rook's Gravatar

Joined: 03/28/09

Posts: 20583

RE: How-To Inspect Shim Clearances
11/19/11 5:19 PM

You kept learning down to the last bolt = Literally!

Yeah, and the last bolts were one of the biggest epiphanies.


'08 MIDNIGHT SAPPHIRE BLUE Now Deceased

Link | Top | Bottom

Rook


Rook's Gravatar

Joined: 03/28/09

Posts: 20583

RE: How-To Inspect Shim Clearances
11/19/11 5:27 PM

Congrats Rook, hopefully it will be a long time until the next time for you,

I will prolly be measuring with the feeler tapes again by late summer 2012. I did choose to go with the minimum spec clearance and a couple of the clearances actually came up just a tiny bit tight. Better than they were but still just barely out of spec. So next time, prolly I will take your's and Hub's advice and shoot for looser rather than dead nuts minimum clearance.

50 degrees F here today. I'm getting the fairings on and going for a ride soon if it doesn't rain.


'08 MIDNIGHT SAPPHIRE BLUE Now Deceased

Link | Top | Bottom


Welcome to zx14ninjaform.com!
 
New Topic Reply
Next Page

Page: 1 2 3 4

Previous Page

New Post

Please login to post a response.