Move Close
Welcome to zx14ninjaform.com!

You are not logged in.
New Topic Reply
Next Page

Page: 1

Previous Page

Thread: AFR Tuning Basics with AutoTune

Created on: 09/18/16 08:39 PM

Replies: 13

Rook


Rook's Gravatar

Joined: 03/28/09

Posts: 20589

AFR Tuning Basics with AutoTune
09/18/16 8:39 PM

AFR Tuning with Auto Tune

Many thanks to Romans and all the others who gave me the knowledge to get this far in my tuning ventures. This tutorial is entirely based on their advice. I will point out that my approach of tuning the very low rpm cells in first gear before the cells at 2000 rpm and higher in 6th gear is my own innovation. Similarly, I suggest the possibility of tuning one area of the power band at a time (splitting runs) to avoid prolonged high speed on the road. Splitting runs is somewhat unorthodox and most people seem to favor doing one run to gather all tuning data.

I am making this tutorial as uncomplicated as possible. The procedure of tuning can go off in too many directions to explain every nuance. Instead I have tried my best to write a step by step guide that covers the essential information you will need to tune your ZX-14 AFR properly. The details are so many that we would soon loose sight of the algorithmic process that AFR tuning is. We can address details in replies to this thread rather than have me clutter the tutorial with all of that right from the start. For additional details and offshoot topics, I suggest he following two threads. It will probably be best that the use of Autotune as described in this tutorial be well understood before getting much deeper into the topic.

ROMANS FLASH PP 24-28

ROOKS TUNING THREAD

In writing this tutorial, I am assuming that the reader has a solid understanding of the info in my Power Commander 5 v 1.0.6.4 tutorial. I will not be explaining any of that information here except in an abbreviated fashion or where necessary to expound on Auto Tune specific information.

The PCV software functions can be used in a number of ways to achieve the same goal which is simply to make your engine use the right amount of fuel at all rpm and throttle positions. Your method of tuning will be something you discover through the process of doing it. The key is to learn the PCV software and how it interacts with the operation of your motorcycle. This is not so difficult to do. The PCV software is less complicated than any word processing software I have used.

Do not expect to get your entire map finished in one day. After you learn the process, it may go much faster but there are a variety of factors that cannot be speeded up. The weather is one. Also the cooling of the engine and all other hazards of street riding. Ideally, you would get all of your tuning done under exactly the same conditions but this will not be possible until you are a more experienced tuner. After you are finished with the entire map, you can go back to it and refine the areas you are concerned about.

Auto Tune Tables and Tuning Concepts
Cells Each of the three tables used with Auto Tune (Target AFR, Trims and Fuel) are a matrix of throttle percentage columns and engine rpm rows. These columns and rows form boxes called cells. When the engine is running at X rpm and Y throttle position, the value in that cell is relevant to the current fueling. The structure of all three tables are the same and the values in the cells that correspond are interrelated.

You will test every cell in your fuel table and change many, if not all of their values based on the values that are contained in the trims table which are based on the values in the AFR table.

Get Map > Primary module > Fuel

Fuel The fuel table is used by the PCV to adjust the fueling that was factory programmed into your ECU. The ECU has a fuel table just like the PCV. The PCV fuel table adjusts the ECU fuel table. Read step 8 of Power Commander 5 v 1.0.6.4 for more info on how the PCV fuel table adds and subtracts fuel from your ECU fuel mapping.

Auto Tune > Target AFR

Target AFR The Target AFR (Air to Fuel Ratio) table is divided into cells identical to the cells of a fuel table. The number in each cell indicates a ratio of air to fuel for the rpm and throttle position associated with that cell. An AFR number of 13 would indicate a ratio of 13 parts air : 1 part fuel. An AFR of 12.8 would indicate 12.8 parts of air : 1 part fuel. A higher amount of air is called leaner (less fuel dense). A lower amount of air is richer (more fuel dense). The number of units each fuel table cell adjusts your ECU fueling by should make your engine achieve the AFR number in the corresponding target AFR cells. Depending on a variety of factors, it may not reach that AFR in your bike and that is why you need to tune.

Auto Tune > Trims

Trims This table is also arranged in rpm rows and throttle percent columns like the fuel table and the target AFR table. The numbers in the Trims table cells show the percentage of fuel Auto Tune last added or removed to achieve the target AFR in the corresponding cell of the Target AFR table.

Fuel Dump Zone Tuning the ZX-14 suffers from exhaust reverberation on deceleration and fuel dumping during backward movement of the throttle in the area of the map where the bike maintains steady rpm at small throttle positions (0-10% TP). Unburned fuel enters the exhaust and causes Auto Tune to perceive a rich condition and calculate false trims. The explosion of dumped fuel in the exhaust system during deceleration also causes Auto Tune to make mistakes. The area of the map that you use most often for everyday riding will be all wrong if special measures are not taken to tune the fuel dump zone you will be constantly passing through.

Forward Movement of Throttle Very simply put, this is opening the throttle progressively wider and this is the only way you can reliably tune your engine. You will not want to accept trims that were made by backward movement of the throttle for reasons explained directly above. Holding the throttle steady without going backward while generating trims is also ok.


Do First:
Install PCV (see PCV Underseat Install)
Become well acquainted with PCV software and Load Base Map (see Loading Maps and Overview of PC5 v1.0.6.4)
Save a copy of your base map to the desktop (see steps 15 through 17, PCV Software).
Install Auto-Tune (see Auto Tune Underseat Install).
Make sure muffler is clean of excessive deposits. If your exhaust doesn’t have grease around the tip, it’s probably fine.
Change air filter if it’s dirty (see Air Filter Element Replacement).
Block PAIR if it is not Removed (see Pair Block or PAIR Removal/Blockoff Plates Install).
Remove Fairings (optional, see Fairings Removal).

Tools:
rear stand (optional)
window fan
Laptop with PCV software
velcro
painters tape

Fuel Dump Zone Tuning
We must tune the fuel dump zone with the engine running in Neutral and ONLY under forward throttle movement. These together will eliminate fuel dumping and exhaust reverberations that will give false O2 sensor readings that would make tuning in gear difficult.

1. It’s not necessary to have the bike on a rear stand but I find it preferable to using the side stand. Place a window fan on HIGH in front of the front tire to help cool the engine. You may also remove fairings to help dissipate heat. Use self adhesive velcro and painters tape to hold a laptop with PCV software on the bike’s fuel tank cover. Open the PCV software and connect the usb cable from the PCV to the laptop (see Functions and Settings of Power Commander 5 v 1.0.6.4, PCV software).

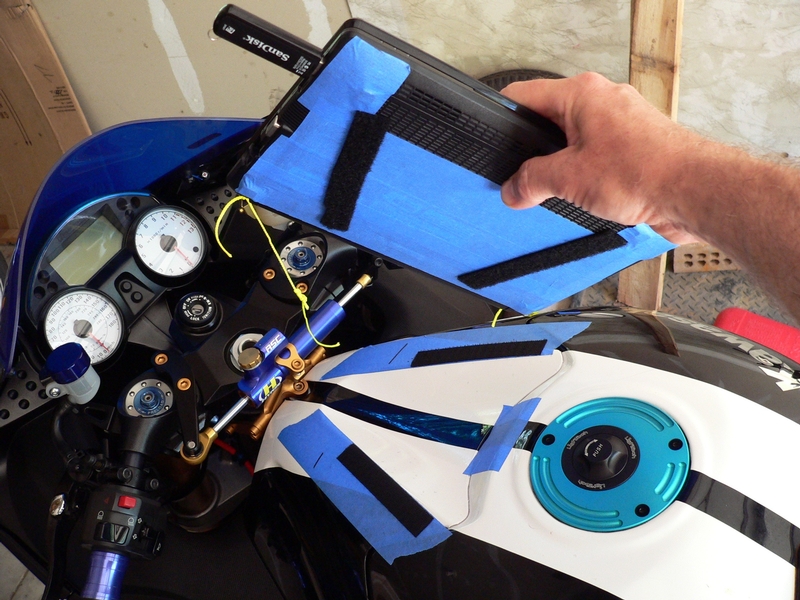
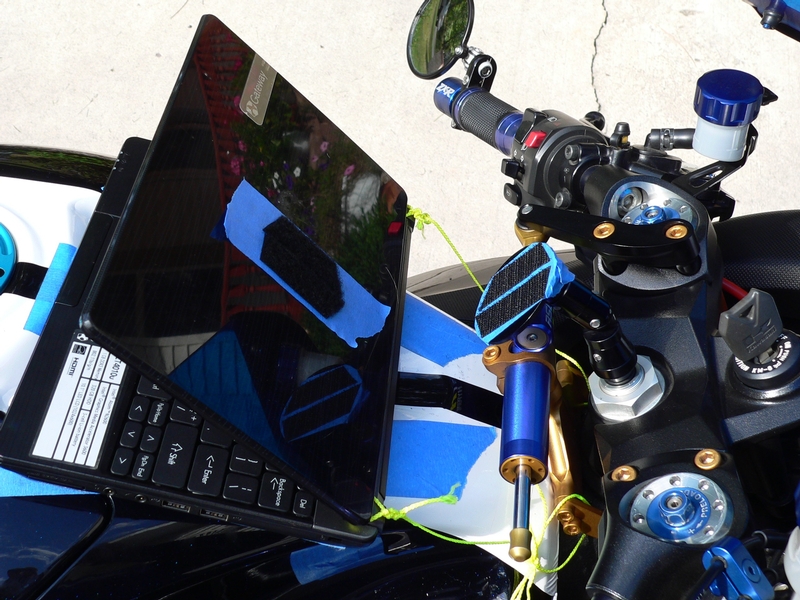
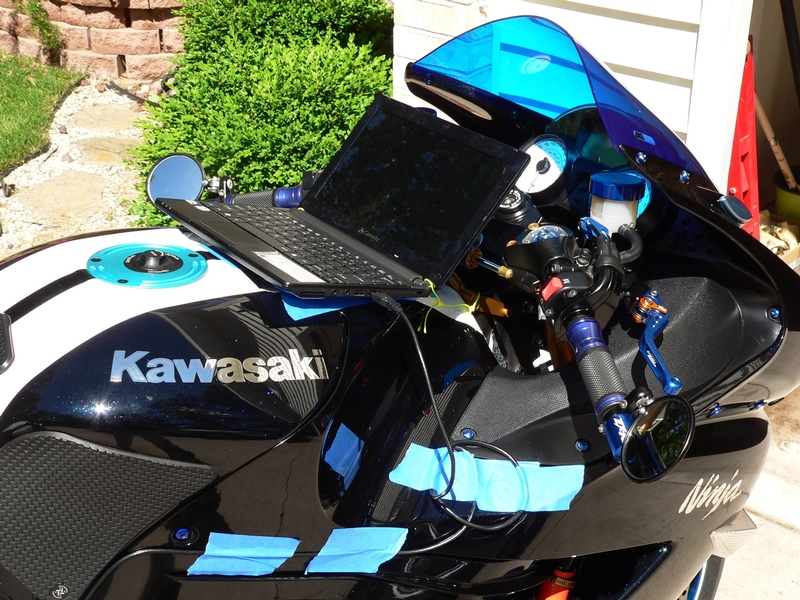
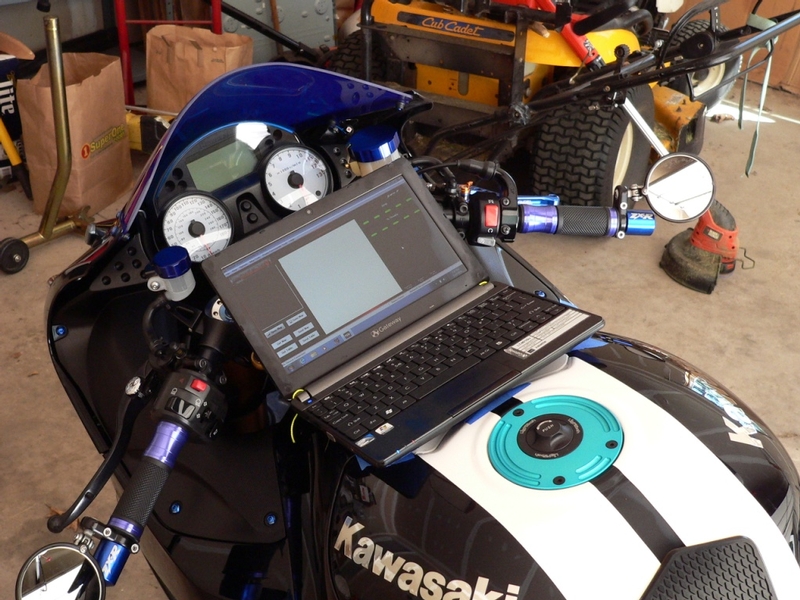
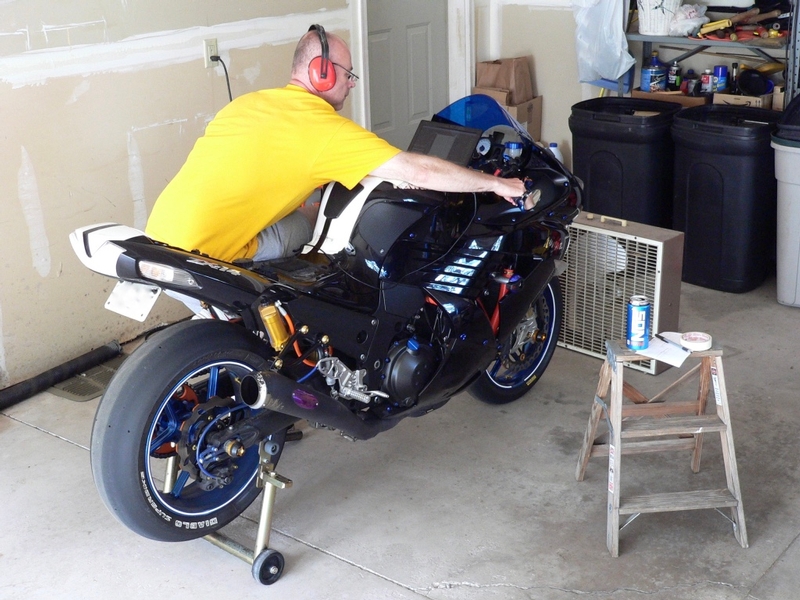
The laptop will go on the road eventually. Here is my tuning setup. I first applied painters tape to avoid messy residue from the velcro. The painters tape stayed adhered perfectly and so did the velcro. I also found it necessary to velcro the computer screen to stop it from wiggling and so that the wind did not close it. A Techmount steering stem mount with tape and velcro works well for this. Just in case the velcro failed, I have safety tethers attached from the laptop to the steering damper bracket. There is a screw on each side of the steering neck that could be used to fasten a D-ring or similar tie down point. I also used painters tape to secure the USB cord to the side of the bike.


2. Options > Environmental Options > Table Cell Tracer > check Enabled
Select Single Cell from the menu.
Click OK.

Cell Tracer is on.

Get Map > Primary Module > Fuel
The fuel table opens. Notice that the 0% TP/500 rpm cell is highlighted in yellow. This is cell tracer indicating where the engine is in the map. The engine is not running and the throttle is closed so cell tracer rests at the lowest rpm indicated in the fuel map. With the ignition switched ON, turn the throttle grip and watch cell tracer move across the 500 rpm row. The throttle is opening but the rpm is not increasing so cell tracer remains in the lowest possible rpm row. Now you may turn the ignition OFF.


3. Auto Tune > Target AFR

This will show you the target AFR table that was used to establish the fueling for the current map in your PCV. Notice cell tracer is active in the target AFR table as it was in the fuel table. When cell tracer is turned on, it is active in any table that is opened.

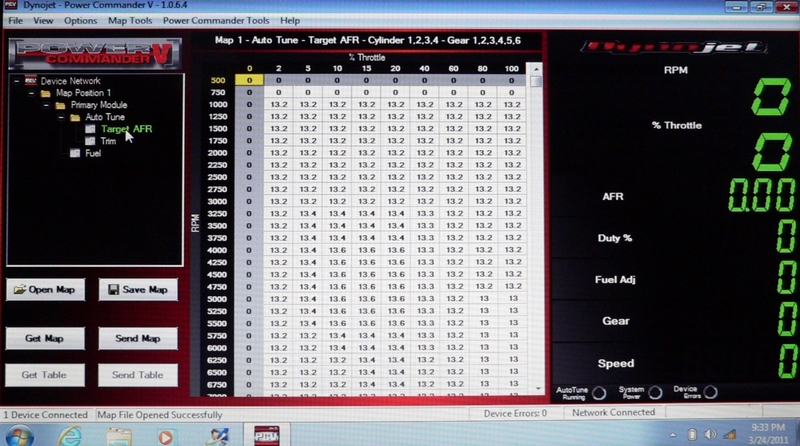
Starting in the upper left hand corner of the target AFR table (0 Throttle Position %, 500 Engine Speed rpm), click and drag to the lower right to highlight the entire table.

Type in the target AFR of your choosing.

13.1~13.3 AFR for a Gen1; 13.7~13.9 AFR for a Gen2. I suggest going with the richer number to start. You can always refine to leaner later on if you find it makes a difference for you.

You have created a new target AFR table on your computer screen but the original target AFR table is still in the PCV.

With the Target AFR table open, click Send Table.

Now the original target AFRs are gone and yours are there instead. If you ever want the old AFR table back, you can always send it to the PCV from the saved map on the desktop.
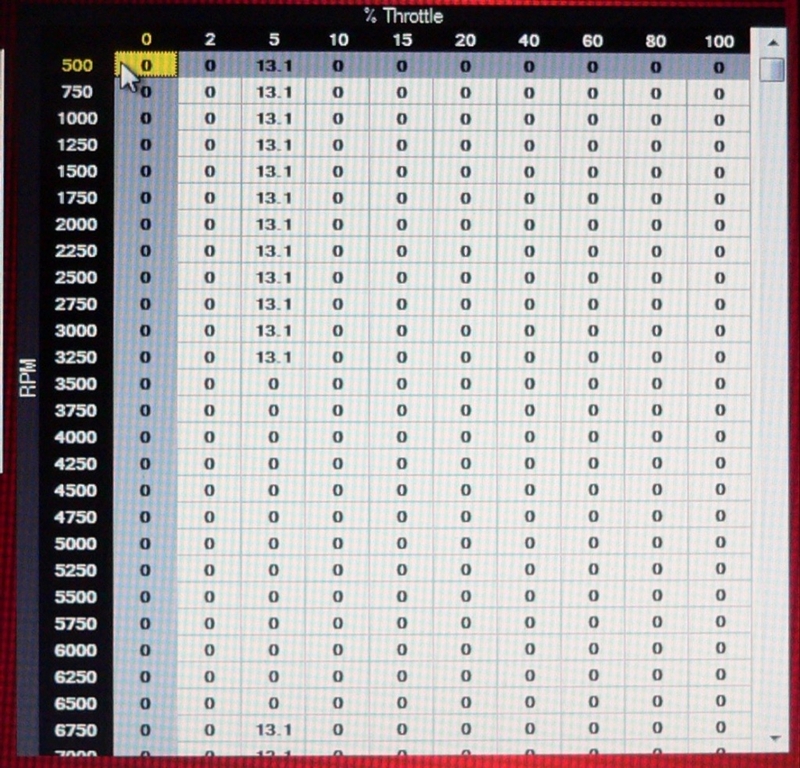

4. AutoTune > Trims

The trims table opens showing the adjustments that AutoTune last made to the fuel table.

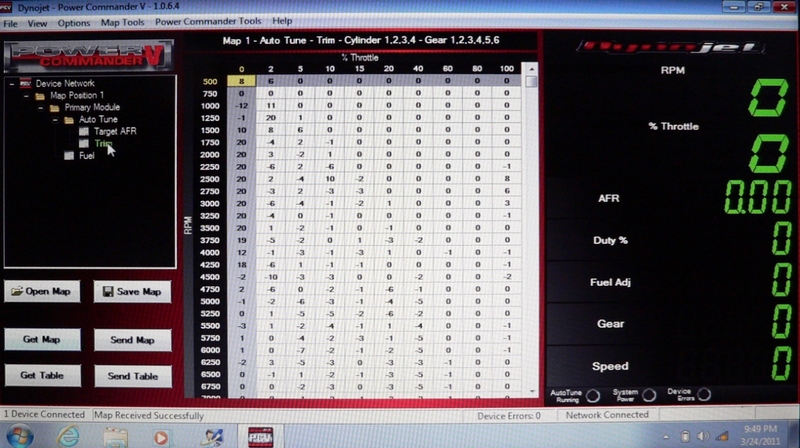
Map Tools > Clear All Trims
Click Clear All Trims

Alternately, you may click and drag the trims table to highlight as you just did the AFR table then type, 0.

You have created a zeroed trims table on the laptop but the old trims are still in the PCV.

With the zeroed Trims table open, click Send Table.

Now the trims are permanently deleted from the PCV and the zeroed trims table you created has replaced it.

** To save table edits to the PCV, It is very important that you remember to have the table you want to send open when you click Send Table. If not, the old table will be retained and function with the map in the PCV. It will be there as soon as you click Get Map. Anything you edit on the screen is ONLY in the laptop until you click Send Table so be sure you have the table you want to send open and not one of the other tables. Now that you Clicked Send Table for both the target AFRs and the trims…

Click Get Map.

Do you see your edited tables you made or are the previous tables still there? You need to have your new target AFR table and zeroed out trims table to proceed.


5. Power Commander Tools > Configure > Feature Enables and Input Selections

Select On Auto Tune (not to be confused with the box for Auto Tune Switch directly above it).

Click the Configure button for Auto Tune (not Auto Tune Switch).

Deselect Require Run Time. There is always a 20 second default run time.

Highlight Max Enrichment and type in 20.
Highlight Max Enleanment and type in 20.

Click OK in the Auto Tune Configure box.

Click OK in the Feature Enables and Input Selections box.


6. Start the engine. You will see the Auto Tune Active indicator come on in the indicator bar after the 20 second default run time delay if Autotune detects a need to change fueling in any cell that cell tracer enters. Watch cell tracer bounce around while the engine warms to operating temperature. Turn your box fan on.

When the engine reaches normal operating temperature, use the tachometer reading in the gauge panel to adjust your engine rpm to 1000 (see Engine Vacuum Sync, step 9). Verify that cell tracer is settled in the 0% 1000 rpm cell.

Turn the throttle open a bit. watch as cell tracer moves up the table. Turn slowly up to about 3500 rpm. Turn fast if you want. Rev to about 5000 and watch the AFR display in the gauge panel. Note the general numbers you see. Do you more or less see a constant 12 point something? Do you ever see an 11, a 13? Just take a general note of what the AFR gauge is doing because we are going to change that. Have fun for 30 seconds but don’t let the engine get hotter than necessary or you will have to wait for it to cool off. Run engine a short time at idle and then turn it off. Keep the box fan blowing on it.


7. Click the Trims icon in the table manager.

The zeroed trims table you made in step 4 opens.

Click Get Table in the tool panel.

The last trims table made by AutoTune will open from the PCV. All of these numbers were made during your play session in step 6. This was just a practice run so clear all trims as you did in step 4. Do not forget to click Send Table with the Trims table open.

Fuel Dump Zone Tuning
8. Bike is warm….not hot! It should be at about 2-3 bars and warm.

Pre-tuning checklist.

Box Fan- running
Laptop- on
PCV software- open
PCV- connected
Target AFR table- your AFR.
Trims- zeroed

All systems GO. Ready for take-off.
Start engine.
Steady Idle, 1000 rpm

Auto Tune is sampling exhaust and calculating trims 10 x/second. You will see the Auto Tune Active indicator on. Grasp the throttle and turn very slowly. It’s ok if you see cell tracer flutter between cells as you transition from one to the next but DO NOT roll off so cell tracer goes backward. This will cause incorrect trims. Watch cell tracer descend the table as you rev higher. Rev through the 0% throttle column to the 2% throttle column and keep going slow and steady into the 5% column DO NOT back off or you need to start over. Keep going, keep going…. when you hit the 10% column, try to hold it a second. The engine is turning 7000 rpm but this is necessary to get the trims you need. Let go of the throttle so it abruptly springs back to 0. Do not roll off smoothly as you do while riding. Run engine a short time at idle and then shut down. Definitely keep the box fan blowing on the engine. This whole run might take 50 seconds and the engine will get quite hot after shut down. When you have gained an understanding of how AutoTune works, you will discover techniques to do this faster and without making the engine so hot.

I would suggest 50 seconds to be the maximum duration for a tuning run in Neutral. The bike gets hot and if you cannot ride it to get a lot of air passing through the radiator, it’s not really possible to cool it down quick enough with a box fan. All you can do is shut the engine off which stops the liquid cooling and results in an even higher temperature but it would probably be worse if you let it idle. This can be stressful on gaskets and other rubber engine parts. You want to be careful to hit your “no load” cells to tune the fuel dump zone but if you open the throttle a bit too fast and hit some cells out of the stairway, that is no reason to scrap the run. All trims will still be valuable and you should accept them as you would after a perfect run. After learning this technique, I now do my Neutral tuning on the roadside. I tune one column at a time and then ride the bike to cool it off. I describe a few details for doing this in step 11.


9. WOW! Glad that’s done? Hope not, you’ll be doing it a few more times.

OK, Click Trims If you did not have the trims table open for the run.

Your trims table is still all 0s! WHAT? That is the trims table that is currently in the map folder on the laptop (the table you zeroed in step 7). The most recent trims are in the PCV.

Go to the tool panel and click Get Table.

There are the most recent trims.

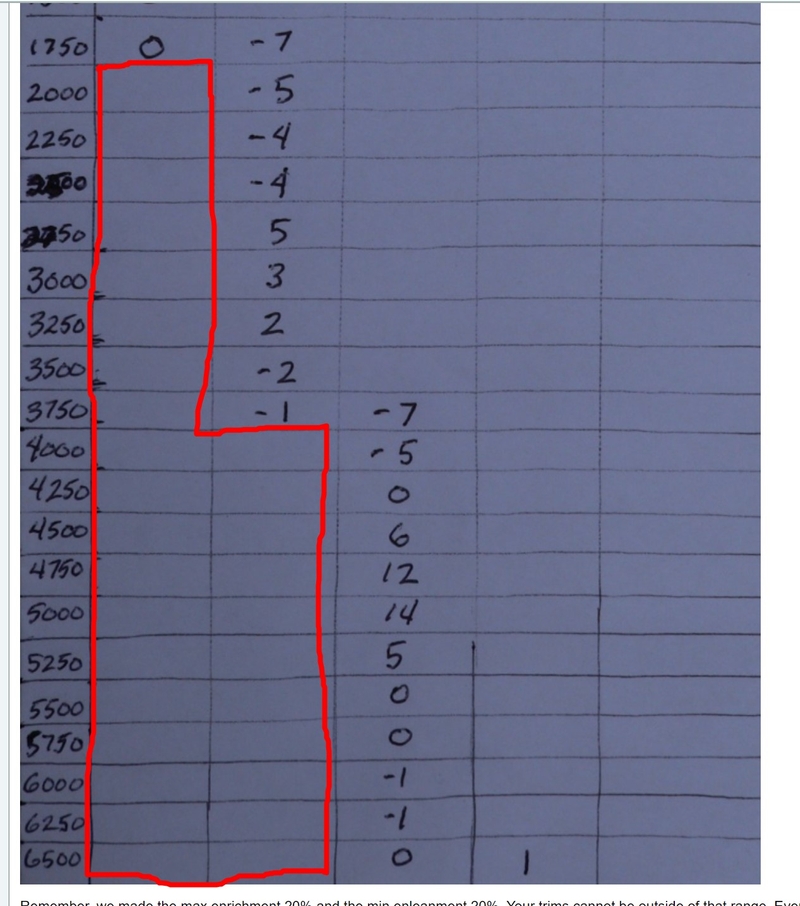
Before going any further, it is important to make a precise note right now of what cells these trims are in. What rpm does the 0% column go to before jumping to the 2% column and then what rpm does the 2% column go to before jumping to the 5%. Finally what rpm does the 5% column go to and what rpm does the run end at in the 10 % column? You need to know this staircase pattern for a little later on and it is very important so draw a diagram of it right now or take a screen shot. It is possible that cell tracer could have calculated 0 trim for a cell where the transition from one throttle position column to the next occurred. You will need to check for this during and after your second Neutral run to verify you have identified the location of the staircase pattern in your tables.

My staircase pattern is as follows and I presume other Gen1 ZX-14s are the same or similar.

0% TP: 1000 rpm-1750 rpm
2% TP: 1750 rpm-3500 rpm (if I advance throttle meticulously, I can get the rpm to max at 3700 rpm — I accept trims in either case).
5% TP: 3500 rpm-6500 rpm
10% TP: 6500 rpm

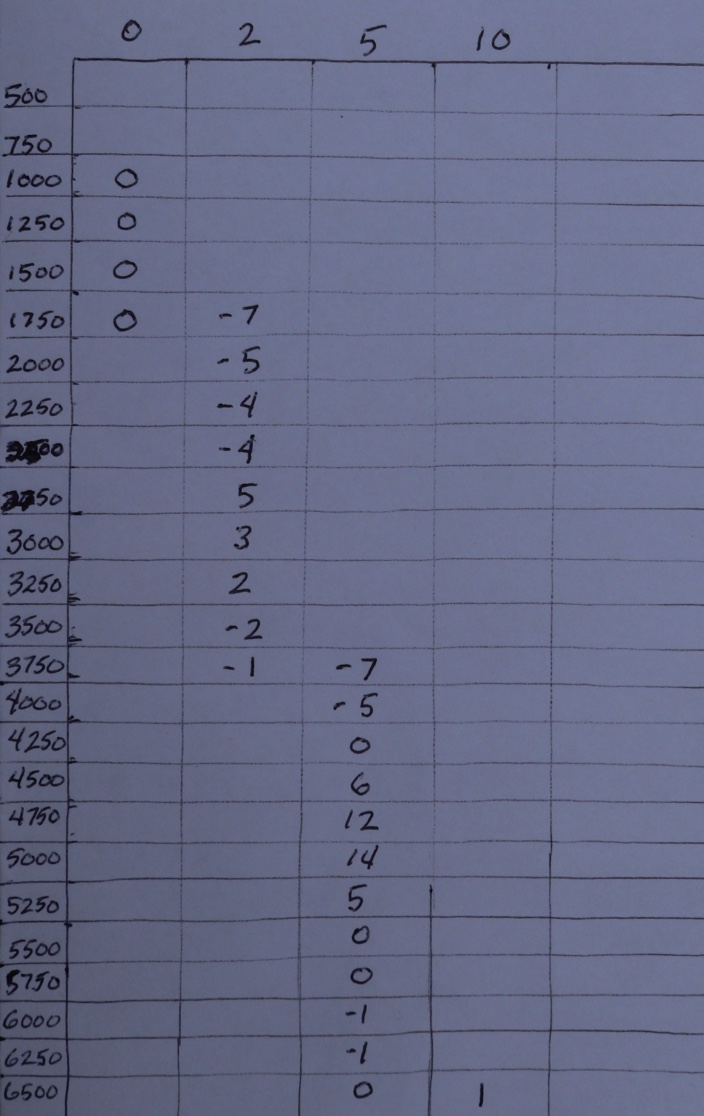
Remember, we made the max enrichment 20% and the min enleanment 20%. Your trims cannot be outside of that range. Even if Auto Tune determined a greater change was needed to approach the target AFR, it was restricted by the max/min% trim settings you entered. Look at your trims. Are any of them as rich as 20 or as lean as lean as -20 or close to +/-20? If so, note which cells those trims occur in. Look at the numbers in general. Are they mostly telling you to cut fuel? Are they mostly telling you to add fuel? Are they small numbers or are they all double digit? Are there a lot of zeros? These numbers are telling you what your engine wants for fueling.

If you have high numbers in a few cells, go back to the bike after it has sufficiently cooled and start it up. Rev to that cell and check what the AFR is on the software AFR gauge. If the AFR is a lot leaner than your target AFR, you should have a large trim to add fuel to the map. If your AFR for said cell is a lot richer than your target AFR, the trim should be a large trim to subtract fuel from the map. If your AFR looks pretty normal in the cell where you have the large trim, it was probably an anomaly caused by you being ham fisted on the throttle. If you feel any trims should be eliminated or if you think some are a little too drastic of a change based on the AFR you see while running the engine in that cell, you may manually edit the trims table. If you get a trim at 750 rpm, you can accept it. There often is a trim in that cell because as the video shows, the bike idles slow for a while after a high rpm run.

In the Trims table, click on the cell you wish to edit to highlight it.

Type in a number that seems more logical based on what you observed of your AFR. You will be safe as long as you stay within the +/-20% zone. This is not exact science yet.

Do this for each cell you wish to edit manually.

To save these changes to the PCV, click Send Table. Don’t forget, you must click Send Table with the edited trims table open or else the edits you made remain just an idea on the laptop.

10. If you have determine that all of your trims look pretty reasonable based on what your AFR was indicating on the gauge panel before and during the run, go ahead and apply the trims table to the fuel table.

Click the Trims icon in the table manager.
Click Get Table in the tool panel. Have one last look at the trims.
Click the Fuel icon in the table manager.

In the menu bar, go to Map Tools > Auto Tune Tables > Accept All Trims.
Click Yes in the confirmation box that comes up.

The trims are now accepted to the fuel table on the laptop. You will see the values in the fuel table adjust since the fuel table is open.

Click Send Table in the tool panel with the adjusted fuel table open. I hate to be redundant but you MUST have the fuel table open when you click Send Table. If any other table is open, you will send only that table and the fueling in the PCV will not change.

Your fueling is now adjusted.

TIP: not to confuse the issue, but as a failsafe, instead of clicking Send Table with the table open, you can always click Send Map instead. This will send all tables in the map that is open on the laptop to the PCV. In this case, it does matter what table is open on the laptop. They all got sent. Even if all you want to send is the Fuel table, there is no harm in resending the target AFR and trims table (which automatically clears after accepting trims). This is the method I normally use while tuning on the road.

Fuel > Get Table

The fuel table of your adjusted base map comes to the laptop from the PCV.

You can compare the adjusted fuel table to the original by opening the original map from the desktop.

You may notice that some of the cells in the Fuel table did not adjust by the exact number that was indicated in the corresponding cell of the Trims table. This is because the trims are applied by multiplication, not just by adding or subtracting the face value of the trim.

The ECU’s stock fuel table is expressed in units of fuel. There may be 78 units of fuel in one cell of the stock map and 120 units in another. The number of units in each cell causes the quantity of fuel to be delivered that Kawasaki deems proper for that rpm and throttle position when running a stock engine.

Dynojet Fuel tables and Trims tables are expressed in percentages of stock units of fuel. This explains why a fuel adjustment made by accepting a trim might not change the value in the Dynojet Fuel table by the exact value in the Trims table.

Let’s say the stock fuel quantity is 100 units. The Fuel table has a 20 (+20%). The Trim table has a 4 (+4%). The math would look something like this.
 
100 units x 1.20 = 120 units.
 
120 units x 1.04 = 125 units.
 
So if you accepted a +4 from the Trims table, what was a 20 in the Dynojet Fuel table would now be a 25, rather than a 24.

There is nothing wrong if your adjustments don’t seem to add up exactly as you might think they should. We’re not working with addition alone, it’s addition/subtraction of percentages of units and that process is compounded a second time when you adjust by a trim


11. Probably at least 30 minutes has transpired since your first run so the bike has cooled enough to do fuel dump zone run #2.

If your last trims were mostly less than +/-15, you may want to reduce the maximum and minimum trim percentages. This will prevent large trims if an error is made in sampling and it allows you to skip making manual edits.

If most trims were closer to +/-20 from the last run, you might as well leave the max/min trim % both at 20.

Power Commander Tools > Configure > Feature Enables and Input Selections
Click the Configure button for Auto Tune.
Highlight Max Enrichment and type in 10.
Highlight Max Enleanment and type in 10.
Click OK in the configure box.
Click OK in the Feature Enables and Inputs box.

Click Target AFR.

Check that your target AFR table is filled with the AFR number you chose.

Click Trims.

The trims table should be zeroed out after having accepted the last trims. If it is not Follow step 4 to clear all trims.

Do the second run as described in step 8. View the trims from the second run as described in step 9.

If you have not yet done so, make an exact note of the cells cell tracer is occupying in its path of the fuel dump zone. You will need this info for the next step or the bottom end of the map will become a disaster.

Edit your trims table if necessary as described in step 9 and accept all trims as described in step 10.

If your trims were smaller than +/- 8, set the min and max trim % to 5 as described above in this step. As you can see this gets the map closer to your target AFR in the beginning and protects you from making too big of a change as you are coming very close to the target AFR.

You need to have the fueling of the fuel dump zone as perfect as you can get it. Repeat this process until Auto Tune detects only some trims of +/-1 or +/-2 with mostly 0s. You will probably never get to the point of having all 0 trims because of minute changes in atmosphere and temperature. If most of the fuel dump zone is tuned, it is not necessary to rev higher than the cells that still need work when you do your runs. You may accept trims for partial runs. In fact, you can zero out the target AFR in the cells that are tuned to avoid changing them while you tune the rest. You may Tune just one column at a time if you wish so that the engine does not get so hot. I do this when tuning my fuel dump zone and then take the bike for a spin to cool it off.

After you are done, be sure to set the engine idle to 1100 rpm when the engine is running at normal operating temperature.


12. After you have completed tuning the fuel dump zone, refer to the diagram you made of it in step 9. Go to the target AFR table and manually edit the target AFR of each cell in the fuel dump stairway to 0.
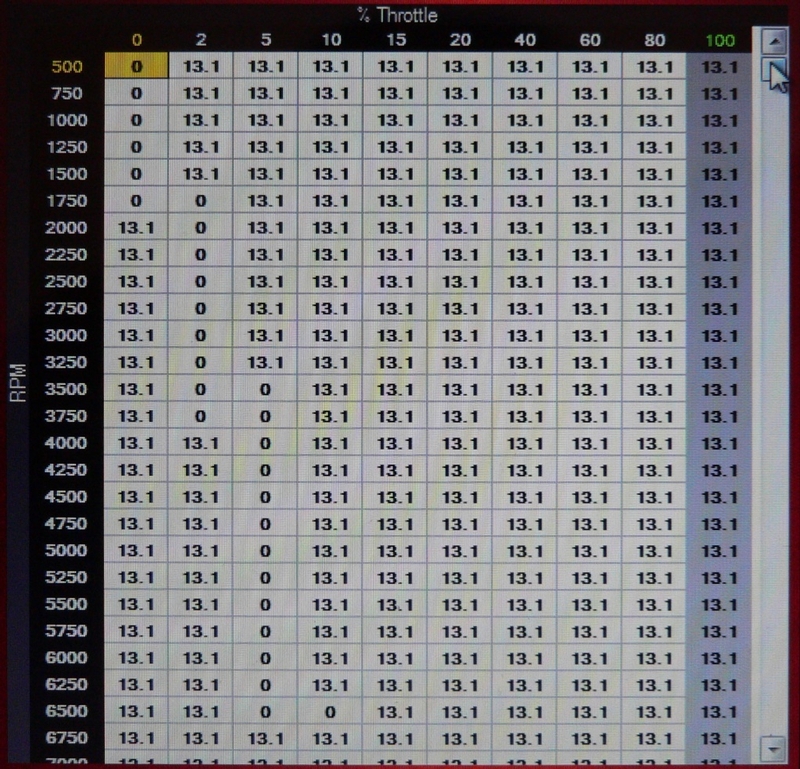
Click Send Table.

The new target AFR table is now in the PCV. Auto Tune will not generate trims for a cell with a target AFR of 0. The fuel dump stairway you just finished tuning is safe from being changed by trims generated during road tuning.

Why did we do this? Why not just road tune all cells instead of tuning the fuel dump stairway in Neutral and the rest of the map in gear? The fuel dump stairway is a special area of your fuel table. When you let off on the throttle, the fuel that was about to be used for acceleration under load is “dumped” into the engine with no way to burn all of it. The excess fuel ends up getting sucked into your exhaust where some of it may ignite causing the familiar deceleration pops often heard in aftermarket exhaust systems. The result is twofold. There are reverberations in the exhaust from the explosion of fuel and this adversely effects the O2 sensor readings. Also, a great deal of unburned fuel is blown into the exhaust which causes a false rich sampling of exhaust gases. Not only these but it seems Autotune is a bit slow to react to cutting throttle. Rather than following cell tracer back to the 0% TP/1000 rpm cell, it lags behind several milliseconds sampling exhaust AS THE FUEL DUMP IS HAPPENING.

The reason we tuned the fuel dump stairway in Neutral was because the fuel dump does not happen with the engine under no load. Tuning the fuel dump cells can’t be done accurately with the bike in gear. Now that we have the fuel dump zone tuned properly, we do not want to change those numbers under the same conditions as road tuning. We shut the fuel dump cells off by zeroing them in the target AFR table.


* Last updated by: Rook on 3/2/2018 @ 7:05 PM *


'08 MIDNIGHT SAPPHIRE BLUE Now Deceased

Link | Top | Bottom

Rook


Rook's Gravatar

Joined: 03/28/09

Posts: 20589

RE: AFR Tuning Basics with AutoTune
09/18/16 8:48 PM

Low RPM Tuning
Your base map probably has numbers in the fuel table that are very low in the powerband. Other than idle and applying throttle with the clutch partially disengaged, there is very little chance that you will require optimum fueling for these rpm. The extreme low end is still a part of the map however. If you tune it, it might actually have a bit more grunt and become more useable.

We will road tune one throttle position column at a time starting with the lowest throttle position and working to the highest. We will tune low rpm (1750-3000 rpm) separately from high rpm (2000 rpm and higher). The reason being that first gear is the only suitable gear to operate the bike at very low rpm and also probably the only gear you would use such low rpm. First gear however is much to quick and harsh for higher rpm tuning. We will use 5th or 6th gear for that.

As was the case with tuning the fuel dump stairway, you will need to keep cell tracer in the column you are tuning by holding the throttle steady or opening very slowly. You may turn the throttle a little higher than the designated throttle position for that column but if you go too far, cell tracer will jump to the next column. In this case, you may still get trims but they will be an average between the column cell tracer was actually in and the preceding column that you intended to tune. Do your best to keep cell tracer in the column you are tuning to get the most precise trims. If you fail at this, no harm. You accept trims anyway and have another shot at it.

Set Max Enrichment to 20 and Max Enleanment to 20 as described in step five.

Have the laptop set up and connected to the PCV as you had it when you did your tuning in Neutral. You may open any table you prefer to view when you do your tuning runs. I prefer the AFR table and I like to click on the cell of the column/rpm that the run will start at so it is highlighted for easy cell tracer orientation.

Warm the bike up and take the bike to your road tuning site. For low speed runs at small throttle positions, a road with little traffic and a low speed limit is ideal. You may find it best to start the runs a short distance before a long gentle hill to slow the acceleration. If so, start the run on a more or less level spot so the engine does not lug when you open the throttle. You will be starting these runs at the lowest rpm possible so please use judgement as to what rpm your bike will not run smoothly and avoid that. My bike has short gearing so it may tolerate very low rpm operation better than a bike with stock gearing. It is also important that there is a road close by where you can run the bike at a higher speed to cool it off. The low throttle runs are slow and the engine gets hot easily.

The 0% column starts at idle so there are no cells lower in the power band to tune here. All 0% TP cells have already been tuned in Neutral. Since operating the bike in the 0% column will be at low speed and the bike accelerates very gently at 0% throttle, you may find it helpful to do a few practice runs in the 0% column before moving to the columns that do have cells to tune. You can start by coasting at idle in first gear and slowly opening the throttle from 0% to 1% so all cells in the 0% TP column are entered before cell tracer moves to the 2% column. This will be very much like tuning the 0% column in Neutral except you will be riding the bike. You cannot collect any trims in the 0% column because you have zeroed out all target AFR cells that can be occupied in the 0% throttle position column.

Proceed by tuning the 2% column, the 5% column, the 10% column, the 15% column and the 20% column all in that order in the manner described as follows.

13. Go to Target AFR.

Zero out the entire target AFR table except for the column you are tuning. Type your target AFR only in the column you are tuning. If the fuel dump stairway enters a portion of the column you are tuning, be certain that you zero out those cells. The fuel dump stairway should have already been tuned in Neutral and we do not want to change any of those values with trims gathered while in gear. Accepting trims that were made while riding in the fuel dump zone will cause improper fueling.


This is a picture of my target AFR table set up to tune the 5% TP column. All columns are zeroed except for the 5% column. The target AFR remains in every cell of the 5% column except for the cells that are occupied by the fuel dump zone. The cells that the fuel dump zone occupies in the 5% column are zeroed. The only trims that can be gathered will be in the cells that have my target AFR.

Click Send Table.

Take off gently and speed up to about 20 mph in first gear. Roll off to 0% throttle and let the bike decelerate to 1200 rpm as indicated by the tachometer in the gauges display. Immediately snap the throttle to the desired throttle position (if this causes your engine to lug, just start at a higher rpm). This will take some practice. I find the best way to gauge how far to turn the throttle grip is to watch cell tracer to see that it immediately moves to the column that is being tuned. Then have a quick look at the % Throttle gauge to verify that the throttle position is very close or preferably exactly where it should be for the column you are tuning. Do not roll off throttle or shift gears, just hold steady throttle or roll on very slowly as if the bike was on a dynamometer doing a tuning run. If cell tracer moves beyond the column that is being tuned, the throttle has been opened too wide. You probably will still get “compromise trims” (as described in opening of this section) in the column you are tuning. The run may be started over or you may accept what trims you get before repeating the run. Do not roll off the throttle in an attempt to correct opening the throttle too wide. Backward moment of the throttle will produce unreliable trims. If you do this, you should simply return the throttle to 0% and start the run over. Autotune will overwrite whatever trims were last made.

With cell tracer having leapt to the column that is being tuned, watch as cell tracer climbs from one cell to the next. You may pause at each cell if you are able to hold the throttle absolutely steady. As you continue rolling back slowly on the throttle (as you did while tuning in Neutral), watch the throttle position display in the gauge panel. This will help you avoid opening too wide and sending cell tracer to the next column before all cells have been sampled in the column you are tuning. When 3000 to 3500 rpm is reached for the column being tuned, the run is done. Let the throttle spring back to 0% and coast to a stop, pulling in the clutch. It is ok to brake but do not touch the throttle or you will likely reenter the cells you just properly gathered trims for.

You may note that for the 2% column, there is no need to rev much higher than the fuel dump zone. It will not hurt to rev into the fuel dump zone since the target AFR has been zeroed out for those cells. No trims will be collected in them.


14. Shift into Neutral. I find it best to keep the bike running. It will only get hotter if you shut it down and all the stopping and starting is needless wear. Learn to view and accept your trims quickly with the bike running.

Click the Trims icon.
Click the Get Table button.

Assuming they are all reasonable, accept the trims you have. Refer to step 10 for accepting trims. Now that you are road tuning, I recommend that you start using the Send Map button rather than Send Table. This will prevent accidentally sending the wrong table to the PCV and loosing your trims. You probably have experienced this by now.

Take the bike for a ride at speed to cool the engine.


15. Repeat the same tuning run until you get negligible or no trims. Compare the AutoTune adjusted fuel table that you have sent to your PCV to the base map. Monitor the changes and also, be sure you are sending the adjustments to your PCV correctly. You should be seeing numbers in your AFR gauge that are closer to your target AFR but if you have most of the target AFR zeroed as recommended, Autotune is not able to make the closed loop adjustments that would bring it spot on. Don’t worry about this as long as your AFR is safe and the bike is running well. You will enable closed loop adjustments when tuning is finished.

I left the Min/Max % trim adjustments both at 20 for all of my road tuning runs. You may reduce the Min/Max trim % as you did for tuning in Neutral if you feel it is helpful.

Do steps 13, 14 and 15 for the 2%, 5%, 10%, 15% and 20% columns.

You probably will want to start the 10%, 15% and 20% throttle position runs at a little higher rpm to avoid lugging too hard.

You could continue tuning low rpm at the higher throttle positions but you will find that snapping open the throttle below 2000 rpm is very harsh not to mention tire spinning and wheelies. Also, the rpm will rise very fast at wide throttle openings in first gear which makes it difficult for Autotune to calculate good trims. You may wish to tune these large throttle / low rpm cells later by whatever means you may contrive. These cells may come into play while in the clutch but it is very doubtful you would use them for anything else other than stunt riding. You will be doing your high speed tuning starting at 2000 rpm (which is plenty low in the powerband) so I suggest doing only high speed runs for columns higher than 20%.

High Speed Tuning
Now that you have experienced low speed tuning, you probably have learned how to use Autotune fairly well. High speed tuning is conducted in exactly the same way as low speed tuning except for using 6th gear and starting at a little higher rpm. With high speed tuning, you will be tuning the cells that are in the areas of the powerband that are more important for performance.

The best trims will be gotten by doing the tuning runs in 6th gear. The rpm rises more slowly in 6th gear so Autotune has time to calculate more exact trims. The problems with 6th gear are:

1) You need to do very high speed to tune all rpm
2) 6th gear is a bit weak on the extreme bottom end to be snapping to large throttle positions.
3) At smaller throttle positions, 6th gear will not pull the bike to the highest potential rpm without a run that covers a very long distance and requires a considerable amount of time.

Your chances of being spotted by someone or having an accident increases exponentially. Under these conditions, I think using 5th gear is a reasonable alternative to 6th gear runs. I seemed to get as good of results using 5th gear as I did using 6th and the problems associated with 6th gear were all reduced. The speed will still be just as high but you’ll get there quicker. You will probably hit the max potential rpm for each throttle position much easier too but you may need to do more runs to get negligible trims. You may wish to try doing runs in both 5th and 6th gears to see what works best for your particular situation.

You may also try splitting your runs into two or three sections. You may tune a range of 3000 rpm at a time which will reduce the distance and duration of the runs. You may zero out all but the cells you wish to tune in the target AFR table to avoid errant trims. I seemed to have pretty good results with this though it requires many more runs, obviously. The only problem is that Autotune seems to be confused at the very beginning of a run. You may have noticed that cell tracer bounces down and up between cells when when you first stab the throttle. I have yet to verify, but it seems likely that the trims are not always very good in the first 1000 rpm cells of a run. It seems like Autotune will fix this area if it is run through enough times. Either that or make sure the trims at the end of each run are favored over the overlapping beginning trims of the next higher run. Whenever possible, doing one full run will simplify the process of tuning.

You will be using 6th gear and starting the run at 2000 rpm. In this way, the low speed runs you made will be overlapped between 2000 and 3000 rpm. This ensures that no cells are overlooked. Probably the cells between 2000 and 3000 rpm will require little adjustment since they were already tuned at low speed. There may be some change in fueling because of the difference in ECU mapping for 1st gear and 6th gear. Don’t worry about that. If you wish, you can resolve this by tuning per gear with Autotune and I will be covering that at a later date. For now, your very low rpm cells will not be touched by high speed tuning and the 2000 rpm cells and higher will all be tuned in 6th gear.

You will certainly be doing speeds well over 100 mph if you wish to adjust all cells. You may start to feel that more road is necessary to sample all cells in one run. Roads with rises will limit vision and corners at the end of the straight stretches might require lower speed. The roads with over one mile long stretches may offer a better view of what lays ahead but you too will be visible from a long way away. If you choose to proceed do so at your own risk. Finding as many different safe places to do these runs as possible may be the best idea. Doing them on the same stretch of road makes your activities more predictable if any police catch wind of you and decide to watch. I can attest, I have seen a police car appear after doing high speed in remote areas while in sight of other motorists. Don’t think people won’t jump at the chance to grab their cel phones and complain to police.

Chances are you know enough about how to use Auto Tune at this point to finish the whole fuel table. If your base map is close to perfect, it takes somewhere in the neighborhood of 30 fifth or 6th gear runs —all over 100 mph. Some of these will need to be done on a very long stretch of road. If you do it, make sure you have as much stopping distance as acceleration distance and also make sure no one who might see you will object. I know of no such road except for a land speed race course.

Finishing Touches
When you have tuned the portion of your fuel table you wish to have perfect or perhaps the entire table, your fueling should bring your measured AFR closer to your target AFR. Don’t dismay if you see the measured AFR registering slightly richer than your target AFR. I noticed that mine did this and I believe it may be that Autotune actually makes trims slightly to the side of richer than what is indicated in the target AFR table. This may be a backup safety margin since going too rich is safe but too lean can be disastrous to the engine.

What will bring your fueling right where it should be is enabling AutoTune to make closed loop adjustments. Up to now, you have been making open loop adjustments by permanently accepting trims to the fuel table. This fueling cannot be perfect for every condition the engine is run under but closed loop adjustments will adjust for these conditions while you ride! All you need to do to enable Autotune to make closed loop adjustments is to leave Autotune ON and fill the entire target AFR table with the proper target AFR. You should even enter the target AFR in the fuel dump zone. Autotune will now adjust any cell as that cell is used according to throttle position and rpm. The map stays the same but the adjustments will be ever changing and none of them will be permanent. This will happen on an ongoing basis unless Autotune is shut off. I suggest reducing the min/max % trims as low as possible (10-15%). As long as you see your measured AFR balancing out to where it should be, the min/max % trims are high enough. If conditions change drastically enough, you may need to increase the min/max % trims or better, create a new map for the situation you are operating in.

One final note, after entering an AFR number in every cell of the target AFR table, you will see trims in areas of the columns that are at higher rpm than that throttle position is able to achieve. For example, if after filling in your entire target AFR table and you Get Trims, you will definitely see trims in the 4000 rpm cell and higher of the 0% column. These and all such trims in the other columns are trims made while decelerating. You should not accept them nor should you attempt to tune the deceleration portion of the map. There is absolutely no reason at all to tune this area unless you have decel popping problems. If you do tune some deceleration cells to reduce decel pop, this should be done by making manual adjustments and testing the results.

This matter of tuning continues….tuning/gear, boost, clutch, multiple target AFRs, different maps, ignition timing….there will be much more.

Data logging is next and if you are not already using a POD-300 or LCD-200 to help with tuning, you may want to go to that one step further to make sure your AFR is as perfect as it can be. Stay tuned for my LCD-200 tutorial.


* Last updated by: Rook on 1/12/2018 @ 6:34 PM *


'08 MIDNIGHT SAPPHIRE BLUE Now Deceased

Link | Top | Bottom

Rook


Rook's Gravatar

Joined: 03/28/09

Posts: 20589

RE: AFR Tuning Basics with AutoTune
09/18/16 8:48 PM

more


'08 MIDNIGHT SAPPHIRE BLUE Now Deceased

Link | Top | Bottom

Rook


Rook's Gravatar

Joined: 03/28/09

Posts: 20589

RE: AFR Tuning Basics with AutoTune
09/18/16 8:49 PM

and maybe some more


'08 MIDNIGHT SAPPHIRE BLUE Now Deceased

Link | Top | Bottom

Rook


Rook's Gravatar

Joined: 03/28/09

Posts: 20589

RE: AFR Tuning Basics with AutoTune
01/12/18 6:37 PM

done again.


'08 MIDNIGHT SAPPHIRE BLUE Now Deceased

Link | Top | Bottom

ironheadmike


ironheadmike's Gravatar

Location: Illinois, USA

Joined: 12/22/17

Posts: 204

RE: AFR Tuning Basics with AutoTune
01/13/18 8:47 PM

Rook!
First, awesome tutorial man. A reader would tend to believe you are a teacher by trade.
I am wondering where you got those ideal afr ranges for gen 1 vs gen 2 machines?
Further, do you know or can you guess why the gen 1 machines would like a slightly leaner afr?
Slightly off topic now; I spy a set of Diablo Superbikes on that beast. The short sleeved attire youre sporting either means that pic is from an earlier warmer time, or that is right now in your heated garage.
My two part question is: are those on your bike right now? And- did you run those on the track as well as the street?


'12 Golden Blaze Green, pc5, at200, POD300, Brock's CT Single, Brocks clutch spring kit, Bazzaz QS4, Carrozerria wheels, Traxxion Dynamics revalve & spring of forks, Penske triple adjust rear shock, Vortex rearsets, Braketech Axis Iron 320mm front rotors, Brembo 24 Carat calipers from a '14 GSXR1000, Core Moto green braided steel brake and clutch lines,Brembo RCS19 frt master cyl, Saddlemen Tech style seat, hand made can backet for exhaust.

Link | Top | Bottom

Rook


Rook's Gravatar

Joined: 03/28/09

Posts: 20589

RE: AFR Tuning Basics with AutoTune
01/13/18 10:15 PM

First, awesome tutorial man. A reader would tend to believe you are a teacher by trade.

Thanks, Mike. I'm trying darndest.

I am wondering where you got those ideal afr ranges for gen 1 vs gen 2 machines?

Rick Romans from around Toronto somewhere off in the Great White Nort. He's totally reliable. You'll find gobs of posts by him here. Shame he can't post as much as he once did. He's built a good number of turbo 14s Gen1 and Gen2. He said the 14's AFR is common knowledge to tuners.

Further, do you know or can you guess why the gen 1 machines would like a slightly leaner afr?

It is the Gen2s that have the leaner AFR. I don't know why but lean makes better power and my guess is that has something to do with it.

I spy a set of Diablo Superbikes on that beast. The short sleeved attire youre sporting either means that pic is from an earlier warmer time, or that is right now in your heated garage.

Yeah, that was summer 2016.

My two part question is: are those on your bike right now? And- did you run those on the track as well as the street?

1) Yeah, they're still there because I couldn't afford new tires! Got a couple spots straight through to the carcass but still feel nice and smooth. I did not ride the 14 much at all last summer and don't plan to until I get new tires.

2) on the street. No problem at all. Only slips I had were when it was damp. I never used them when it was cold. On a hot day, I pushed them as hard as any tire I have used and they stuck like glue. I got that rear chicken strip down to a quarter inch and that's something for me, especially with the extra tire diameter. They are designed for no tire warmers and cold track. Same compound as the Super Corsa, I would bet. They were the shortest lived tires I have ever used but I only did sport riding on them. I did a lot of tuning runs which are harsh on tires but they stayed pretty round even so. I kept at the corners most of the time. 4000 miles is what I think I got and they are past worn out. Most would get 2000 with the same riding.

Pirelli quit making them or I'd get them again. I have been told this Metzler is similar. Might try it but it takes about a month to come from Britain.


'08 MIDNIGHT SAPPHIRE BLUE Now Deceased

Link | Top | Bottom

Rook


Rook's Gravatar

Joined: 03/28/09

Posts: 20589

RE: AFR Tuning Basics with AutoTune
01/13/18 10:28 PM

Yes, the Gen2 is leaner:

Type in the target AFR of your choosing.
13.1~13.3 AFR for a Gen1; 13.7~13.9 AFR for a Gen2.


An AFR number of 13 would indicate a ratio of 13 parts air : 1 part fuel. An AFR of 12.8 would indicate 12.8 parts of air : 1 part fuel. A higher amount of air is called leaner (less fuel dense). A lower amount of air is richer (more fuel dense).

max lean on the Gen2 is 13.9 air/1 fuel. Max lean on the Gen1 is 13.3 I have run 13.5 and no problem. Not at high rpm but You can get away with a few tenths this way or that. The AFR is never stable anyway. All it takes is a little humidity, hot air, hot engine....The AFR is always fluctuating by a few tenths. You wouldn't see it on an analogue much but digital is jumping back and forth all the time. UNLESS you are cruising and have AutoTune ON. That will keep it very stable as long as you stay at one throttle position and one rpm. Not possible to do thatfor sport riding unfortunately. AutTune is affordable and it is awesome but it is not as advanced as some systems that are used on cars which sample 300x/second compared to AutoTune's 10x/second. It will tune though as long as you do a few runs to make up the difference in sample rate.


'08 MIDNIGHT SAPPHIRE BLUE Now Deceased

Link | Top | Bottom

Rook


Rook's Gravatar

Joined: 03/28/09

Posts: 20589

RE: AFR Tuning Basics with AutoTune
01/13/18 10:37 PM

At some points, I saw 14.somethings on my AFR gauge before I got it tuned. No problems. IDK where the danger mark is but best to keep it where Romans suggests at high rpm. I saw 17 when my bike was idling with Autotune fighting the ECU cold start fueling (best to set AT for 30 second delay at startup and better to zero the 0% TP/idle speed rpm cells so no correction can occur at cold start). The engine stumbled a second until Autotune honed in. Not a big deal at idle but I don't want to see that at high rpm or even midrange.


* Last updated by: Rook on 1/13/2018 @ 10:38 PM *


'08 MIDNIGHT SAPPHIRE BLUE Now Deceased

Link | Top | Bottom

Rook


Rook's Gravatar

Joined: 03/28/09

Posts: 20589

RE: AFR Tuning Basics with AutoTune
01/13/18 10:39 PM

LOL when you shut the bike down, the AFR goes to 99.9!! NO fuel, all air! normal.


'08 MIDNIGHT SAPPHIRE BLUE Now Deceased

Link | Top | Bottom

ironheadmike


ironheadmike's Gravatar

Location: Illinois, USA

Joined: 12/22/17

Posts: 204

RE: AFR Tuning Basics with AutoTune
01/13/18 11:50 PM

Yessir, higher air value is leaner. I miss typed. I swear I've read that optimum afr for internal combustion is 14 to 1. That of course would not be the only determining factor in optimum health or power output in a given engine design, I get that. So, I'm now $200 deep into my new Probolt addiction. They really are a top shelf outfit. Love their product, packaging, website, the whole tamale. Thank you for the hook up.


'12 Golden Blaze Green, pc5, at200, POD300, Brock's CT Single, Brocks clutch spring kit, Bazzaz QS4, Carrozerria wheels, Traxxion Dynamics revalve & spring of forks, Penske triple adjust rear shock, Vortex rearsets, Braketech Axis Iron 320mm front rotors, Brembo 24 Carat calipers from a '14 GSXR1000, Core Moto green braided steel brake and clutch lines,Brembo RCS19 frt master cyl, Saddlemen Tech style seat, hand made can backet for exhaust.

Link | Top | Bottom

Rook


Rook's Gravatar

Joined: 03/28/09

Posts: 20589

RE: AFR Tuning Basics with AutoTune
01/14/18 8:58 AM

I swear I've read that optimum afr for internal combustion is 14 to 1. That of course would not be the only determining factor in optimum health or power output in a given engine design

I've heard that since high school. I believe that relates to cars more than bikes. Bikes and small engines might rely on extra fuel to cool them or maybe it's something else. One of those things I just leave to the experts.

People do tune for lean AFRs at cruising range to save gas. If it's not high rpm, it shouldn't hurt as long as it's not TOO lean.

I'm now $200 deep into my new Probolt addiction. They really are a top shelf outfit. Love their product, packaging, website, the whole tamale. Thank you for the hook up.

Only complaint I have is that they are very slow to ship. Two weeks or better. Also, use the wish list. If you put items in your basket, it will clear after a week if you don't visit.


'08 MIDNIGHT SAPPHIRE BLUE Now Deceased

Link | Top | Bottom

afch


Joined: 09/21/21

Posts: 1

RE: AFR Tuning Basics with AutoTune
09/21/21 1:32 AM

Can anyone advise me how to setting up an area from these cells?

I ask because I hear very loud shots every time I drop the throttle (with gear engaged).
I suspect that the problem is in these cells, am I right?

Link | Top | Bottom

Rook


Rook's Gravatar

Joined: 03/28/09

Posts: 20589

RE: AFR Tuning Basics with AutoTune
09/22/21 7:56 PM

There is one member of this forum who said he stopped decel popping by adjusting his fueling in the 0% column. I don't remember who it was or exactly what he did but I think it was to manually input -100 to the 0% column or something extreme like that.

Good luck if you try it. I guess the idea was to cut of all fuel on decel. Does the engine need fuel on decel? The engine isn't actually running. It goes super lean whenever you decel at 0% throttle anyway. So if you go all air and no fuel will that hurt anything? You got me. You might find the post where this member mentions his decel pop eliminating tuning technique in the posts on this thread. I can't remember where it was posted but it's on the forum somewhere. I loved the decel popping. I only considered it to be too much when I still had the PAIR on the bike. If you have a Gen1, you can block the clean air hose or remove the whole PAIR and install blockoff plates. In my experience, that reduced decel popping by about 25%.

I never adjusted the fueling in the zone where the engine idles. It looks like I only put a target AFR from 2000 rpm on up. Above that, I let Autotune suggest trims and I accepted them.

You might be able to put a TRE on the bike. There's one kind of TRE that eliminates decel popping.


'08 MIDNIGHT SAPPHIRE BLUE Now Deceased

Link | Top | Bottom


Welcome to zx14ninjaform.com!
 
New Topic Reply
Next Page

Page: 1

Previous Page

New Post

Please login to post a response.