Move Close
Welcome to zx14ninjaform.com!

You are not logged in.
New Topic Reply
Next Page

Page: 1

Previous Page

Thread: Top Engine Wires

Created on: 12/28/11 06:42 PM

Replies: 14

Rook


Rook's Gravatar

Joined: 03/28/09

Posts: 20577

Stick Coil Subharness-Gen1
12/28/11 6:42 PM

Stick Coil Subharness—Gen1

It is a good idea to label each half of the leads as soon as you disconnect them. Use a marking pen and masking tape to identify the leads.

All leads are disconnected by pressing the tab down and pulling simultaneously.

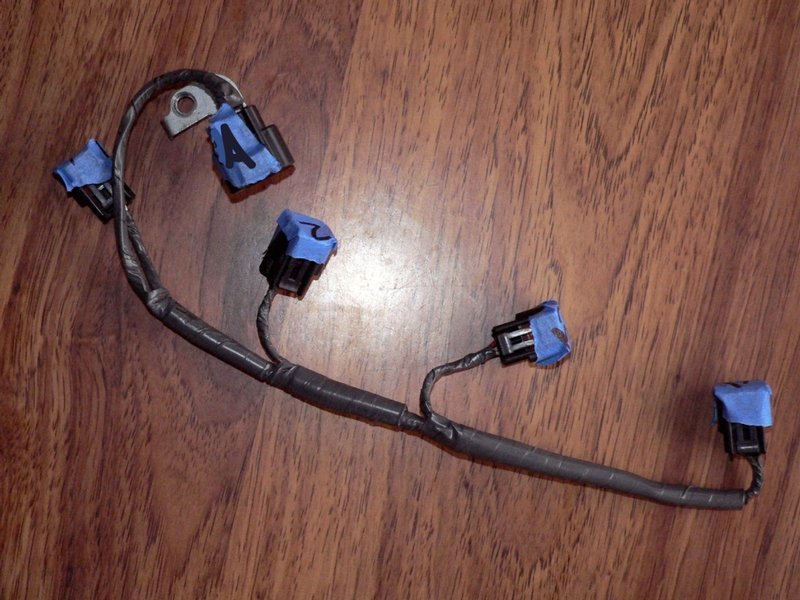
The stick coil subharness is the small grey taped wire branch that goes to the stick coils. It lays on top of the the engine sub harness which is the black taped branch of wires.

Do first:
Remove the battery negative cable from the ground screw on frame (Battery Removal, steps 1, 2 and 3).

Wire Identification
Left side connector leads
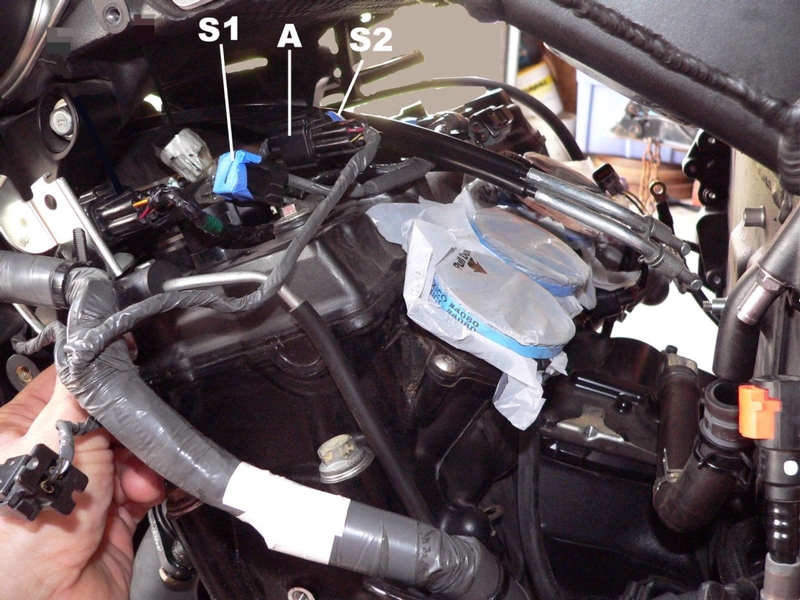
[A] Stick Coil Subharness lead
[S1] Stick coil 1 lead
[S2] Stick coil 2 lead

Right side connector leads.
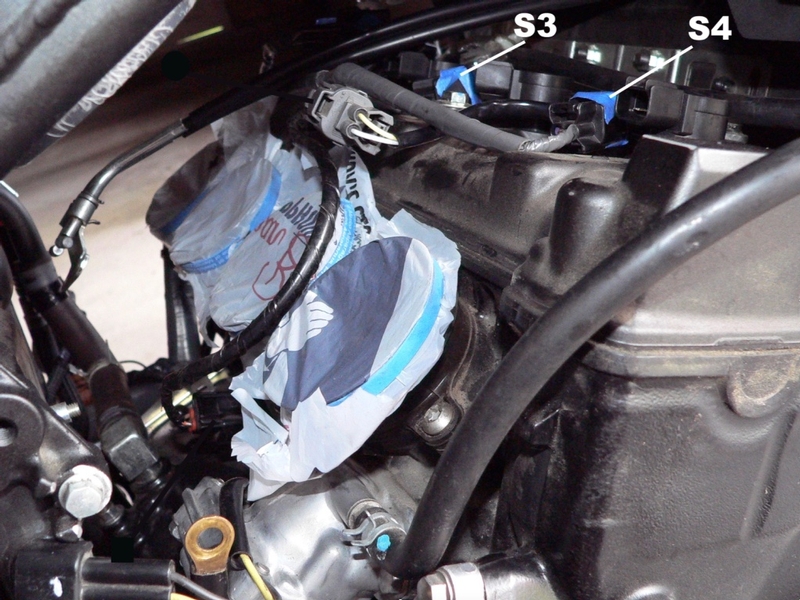
[S3] Stick coil 3 lead connector
[S4] Stick coil 4 lead connector

Tools
tape
marking pen

Removal
1. Disconnect lead [A] from the stick coil subharness by pressing the tab while pulling back.

Pull it out of the engine compartment to the left.
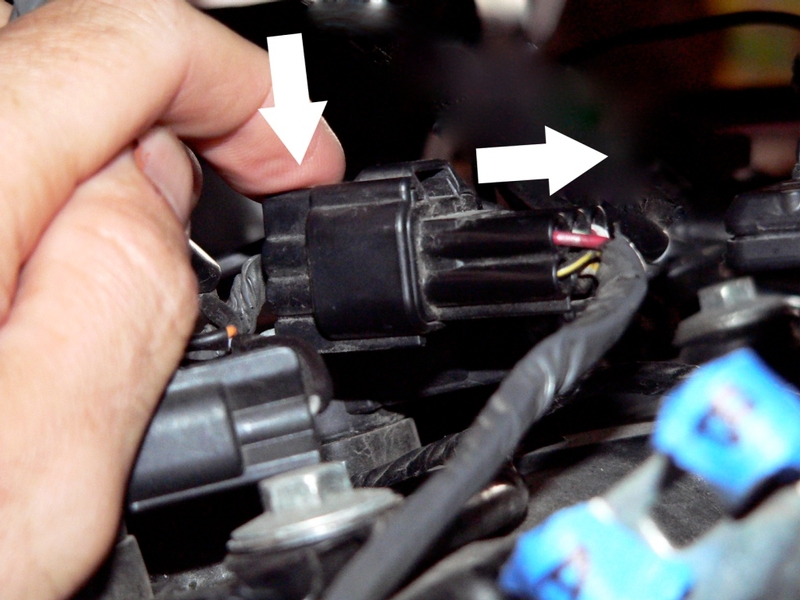

2. Remove the connector lead from each stick coil [S1], [S2], [S3] and [S4] as shown. Press the tab while pulling back.
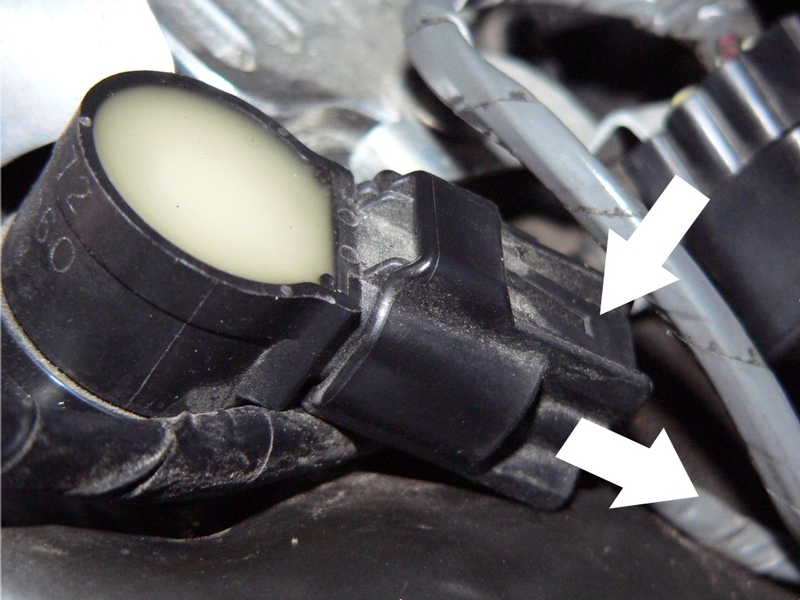
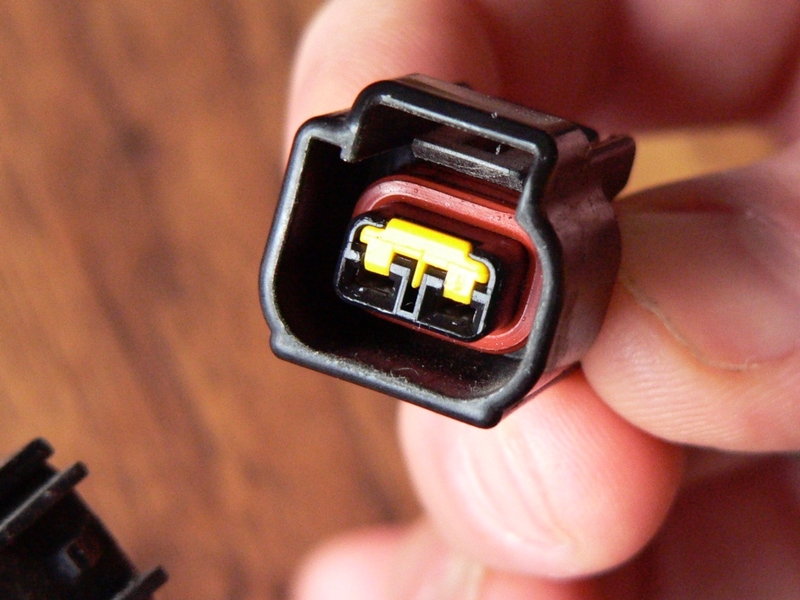
Be careful that the red grommet inside of each female stick coil connector does not fall out (conversation below in the first ten replies to this thread).


3. Clear the stick coil subharness to the outside left of the engine compartment.

If it is necessary to separate it from the engine, you will need to remove the LH rear reed valve cover screw to free the bracket to lead connector [A] (see also PAIR Removal, step 5, Left reed valve cover rear bolt).
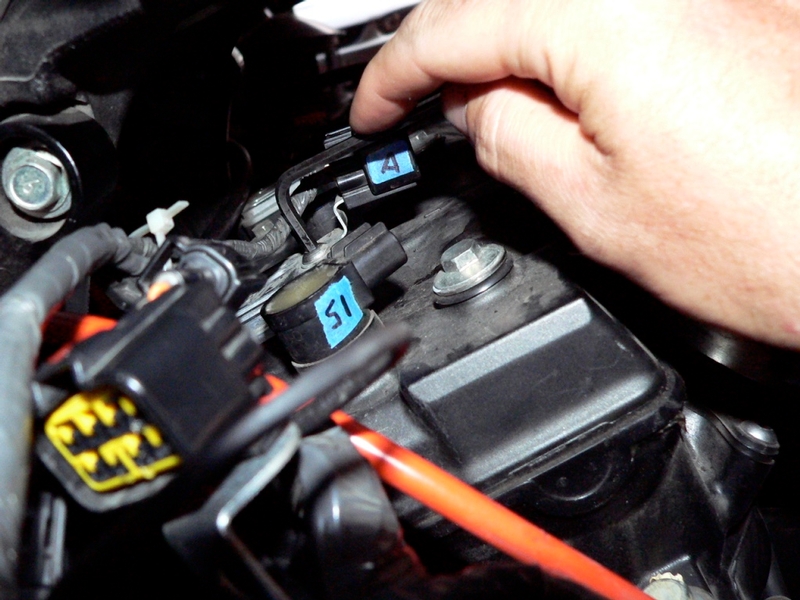

This picture shows blockoff plates installed instead of a stock reed valve cover.
Installation
For most procedures, the stick coil subharness usually can remain fastened to the retainer at the left reed valve cover. If the stick coil subharness was completely removed from the motor, install it to the the retainer along with the LH rear reed valve cover bolt (see PAIR Removal, step 8).

4. Connect stick coil leads [S1], [S2], [S3] and [S4].
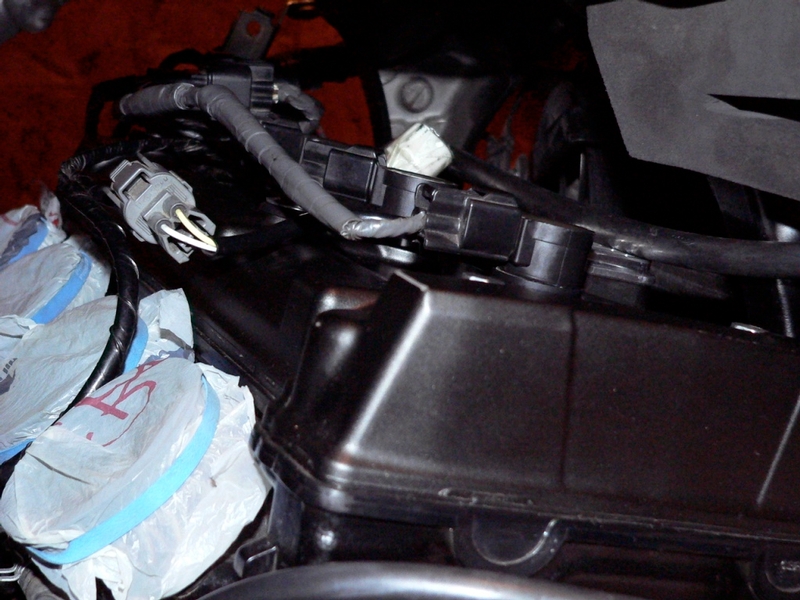

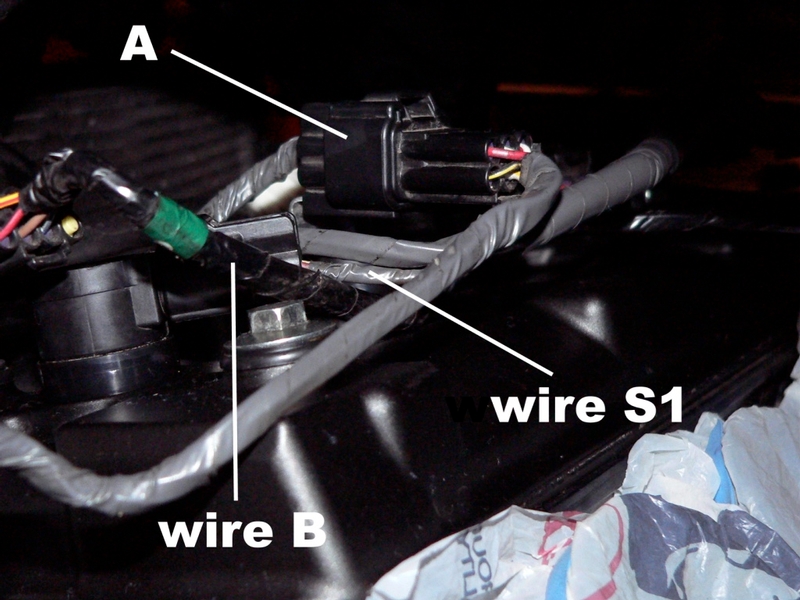
5. Connect the small black leads [A] at the bracket on the left reed valve cover. Wire
[A] is routed over the top of the wire [S1]. S1 is routed over the engine harness lead, wire [B].

Connect the battery negative cable to the ground screw on frame and reinstall the fairings (Battery Removal, step 11).


* Last updated by: Rook on 1/3/2018 @ 6:55 AM *



'08 MIDNIGHT SAPPHIRE BLUE Now Deceased

Link | Top | Bottom

yannih


yannih's Gravatar

Location:

Queenstown New Zealand

Joined: 11/08/12

Posts: 2163

RE: Top Engine Wires
11/16/14 2:36 AM

Hi Rook,
It's probably me but this is the first of your tutorials where I have had a little bit of a problem.
I recently installed a new Annitori quickshifter and needed to get to the stick coil lead connectors.
After removing the foremans and side + lower fairings as stated, I did not have the room you show to work with the stick coils and their connectors. Everything was extremely tight and hard to get to.
Did I miss removing something?
Should the tank have come off?
Your pics show so much room and I struggled to get to these connections due to lack of space.
Also a possible suggestion.
Perhaps a helpful additive in your instructions is when disconnecting the leads from the coil sticks is to watch out for the little red/orange oval rubber grommets that are installed in the female lead connectors to seal against moisture. These are very loosely fitted and have a tendency to unknowingly fall out. It happened to me and luckily I noticed one of the little buggers on the floor and could replace. I know I'm not the first as there was a thread asking what one of these little grommets was from and by chance I had read it so was fortunate to know exactly what was happening straight away.

Not trying to be disrespectful regarding your amazing efforts but just a couple of points I thought might help.

Thanks again for all these how to's Rook.
They have really helped me so much when working on my bike.


* Last updated by: yannih on 11/16/2014 @ 2:48 AM *


2012 Metalic Spark Black Kawasaki ZX-14R. Yoshimura carbon R-77 slip ons,Custom dyno ECU flash,Striker rearsets,Hyperpro RSC steering damper,HM Plus quickshifter,ASV C5 levers,Hel SS transparent red front/rear brake and clutch lines,Kawasaki/MRA vented spoiler screen,Carbon heel guards,R&G radiator guard,Powerbronze carbon rear hugger,ZX-10 front fender with fender extender,Yoshimura frame sliders,M-Factory rear stand stoppers,Escort Redline radar detector,Techspec tank grips and tank protector,Versys 1000 fender eliminator,Kaoko cruise control,Moto red oil cap,Oxford heated grips,Red magnetic oil drain plug,Red and black Bagster Spider rear seat bag (for touring only).

Link | Top | Bottom

toledoUPSguy


toledoUPSguy's Gravatar

Joined: 06/17/12

Posts: 512

RE: Top Engine Wires
11/16/14 3:48 AM

It looks like his PAIR valve is removed which would give more room.


The man on top of the mountain didn't fall there.
2014 zx14r in nuclear sunset orange and black

Link | Top | Bottom

Rook


Rook's Gravatar

Joined: 03/28/09

Posts: 20577

RE: Top Engine Wires
11/16/14 7:34 AM

After removing the foremans and side + lower fairings as stated, I did not have the room you show to work with the stick coils and their connectors. Everything was extremely tight and hard to get to.
Did I miss removing something?

Like tUg said, the PAIR is removed from my bike. One of the inherent problems with doing tutorials on a modded bike is that the bike looks less and less like a stock bike as time progresses. I included a pic of the air switch valve lead to the PAIR in step 9 so people who have not done the PAIR removal mod would have something to refer to. The switch valve was not actually on the bike anymore when I made this tutorial, however.

Also, the throttle bodies are removed in this tutorial which opens up a lot of space but it is not necessary to remove that. It was already off so I just shot the pics as is.


Should the tank have come off?

Nope. Not for this. The airbox would still be right over the top of the engine so no benefit to fuel tank removal.

Perhaps a helpful additive in your instructions is when disconnecting the leads from the coil sticks is to watch out for the little red/orange oval rubber grommets that are installed in the female lead connectors to seal against moisture. These are very loosely fitted and have a tendency to unknowingly fall out.

I do not have those in the stock female lead connector (which is the top of the stick coil). I see I have them in the HM female connectors that goes to the gray wire. Yes, one of them was pulled forward when I disconnected but the other three are still pushed down in there. I will add a comment with a pic on the HM quickshifter installation tutorial.

You don't have a similar seal in you stick coil connectors , do you? I don't.


* Last updated by: Rook on 11/16/2014 @ 11:11 AM *


'08 MIDNIGHT SAPPHIRE BLUE Now Deceased

Link | Top | Bottom

VicThing


VicThing's Gravatar

Joined: 07/17/14

Posts: 2361

RE: Top Engine Wires
11/16/14 12:54 PM

If you have a service manual, look up the process for changing spark plugs (which will lead to stick coil removal). This should allow you to get to the stick coil connectors (obviously stick coils need removed to change plugs). I just changed my spark plugs and it's tight but doable.


* Last updated by: VicThing on 11/16/2014 @ 12:56 PM *

Link | Top | Bottom

yannih


yannih's Gravatar

Location:

Queenstown New Zealand

Joined: 11/08/12

Posts: 2163

RE: Top Engine Wires
11/16/14 1:17 PM

"You don't have a similar seal in you stick coil connectors , do you? I don't."

Now you mention it I'm not sure because I never checked. I just assumed they were there.
So are you saying the stock connector to the coil stick has no sealing grommet, only the quickshifter connections?
If this is so why are the grommets supplied in the quickshifter connections at all if the stock connections don't have them?
Or am I missing something?


2012 Metalic Spark Black Kawasaki ZX-14R. Yoshimura carbon R-77 slip ons,Custom dyno ECU flash,Striker rearsets,Hyperpro RSC steering damper,HM Plus quickshifter,ASV C5 levers,Hel SS transparent red front/rear brake and clutch lines,Kawasaki/MRA vented spoiler screen,Carbon heel guards,R&G radiator guard,Powerbronze carbon rear hugger,ZX-10 front fender with fender extender,Yoshimura frame sliders,M-Factory rear stand stoppers,Escort Redline radar detector,Techspec tank grips and tank protector,Versys 1000 fender eliminator,Kaoko cruise control,Moto red oil cap,Oxford heated grips,Red magnetic oil drain plug,Red and black Bagster Spider rear seat bag (for touring only).

Link | Top | Bottom

Rook


Rook's Gravatar

Joined: 03/28/09

Posts: 20577

RE: Top Engine Wires
11/16/14 3:16 PM

So are you saying the stock connector to the coil stick has no sealing grommet,

So it appears.

only the quickshifter connections?

Yup.

If this is so why are the grommets supplied in the quickshifter connections at all if the stock connections don't have them?

IDK? Maybe the female connector of the HM wire is deeper than the connector on the stick coil? The little gaskets seem like a nice touch but I have a feeling the HM connectors would work fine without them. I'm not going for that weight loss mod though.


'08 MIDNIGHT SAPPHIRE BLUE Now Deceased

Link | Top | Bottom

Grn14


Grn14's Gravatar

Location: Montana

Joined: 02/25/09

Posts: 15511

RE: Top Engine Wires
11/16/14 4:58 PM

The stick coils DO have the grommet in there...if they're gone...something isn't right.

Link | Top | Bottom

Rook


Rook's Gravatar

Joined: 03/28/09

Posts: 20577

RE: Top Engine Wires
11/16/14 6:51 PM

Oh CRAP! You'reright Green. ..and your wrong. I'm all screwed up. I just brought my wire and stick coils in. The stick coil is the MALE connector, not the female. The female connectors on the HM have the grommet and they go to stick coils. I just pulled one of the male HM connectors from the females on the wire...the female on the wire has a grommet.

SImply put, ALL the female connectors, HM harness and stock stick coil wire, have the grommet. OOPS. sorry. Glad I got it figured out. I'll add a pic and explanation to this thread when I get a chance. I never lost one but some people have.


'08 MIDNIGHT SAPPHIRE BLUE Now Deceased

Link | Top | Bottom

yannih


yannih's Gravatar

Location:

Queenstown New Zealand

Joined: 11/08/12

Posts: 2163

RE: Top Engine Wires
11/16/14 6:54 PM

Ah, I feel better now.
I thought I was going nuts and certainly didn't want to argue with the experienced boys...


2012 Metalic Spark Black Kawasaki ZX-14R. Yoshimura carbon R-77 slip ons,Custom dyno ECU flash,Striker rearsets,Hyperpro RSC steering damper,HM Plus quickshifter,ASV C5 levers,Hel SS transparent red front/rear brake and clutch lines,Kawasaki/MRA vented spoiler screen,Carbon heel guards,R&G radiator guard,Powerbronze carbon rear hugger,ZX-10 front fender with fender extender,Yoshimura frame sliders,M-Factory rear stand stoppers,Escort Redline radar detector,Techspec tank grips and tank protector,Versys 1000 fender eliminator,Kaoko cruise control,Moto red oil cap,Oxford heated grips,Red magnetic oil drain plug,Red and black Bagster Spider rear seat bag (for touring only).

Link | Top | Bottom

Grn14


Grn14's Gravatar

Location: Montana

Joined: 02/25/09

Posts: 15511

RE: Top Engine Wires
11/16/14 7:06 PM

Tell ya the truth...actually...the only way I remembered that...was one time I changed my plugs in my 07...and yep...you guessed it...AFTER I had EVERYTHING back in place...Fairings...all of it...I noticed this little red grommet sitting under the bike.I immediately recognized it as a moisture barrier...and it could have only come from ONE place.So basically...I had to do the whole thing OVER again.....I was pissed(at the moment anyway)LOL!!!..I think MOST of the electrical connectors that carry decent voltage and amps or whatever HAVE these in there...lamps...coils...those things.


"The stick coil is the MALE"...ya..I couldn't remember which plug(male or female) had that in there...but one of em does...it's there...or supposed to be.


* Last updated by: Grn14 on 11/16/2014 @ 7:08 PM *

Link | Top | Bottom

yannih


yannih's Gravatar

Location:

Queenstown New Zealand

Joined: 11/08/12

Posts: 2163

RE: Top Engine Wires
11/16/14 7:07 PM

Yep, they fall out quite easily...
Beware all!!!


* Last updated by: yannih on 11/16/2014 @ 7:08 PM *


2012 Metalic Spark Black Kawasaki ZX-14R. Yoshimura carbon R-77 slip ons,Custom dyno ECU flash,Striker rearsets,Hyperpro RSC steering damper,HM Plus quickshifter,ASV C5 levers,Hel SS transparent red front/rear brake and clutch lines,Kawasaki/MRA vented spoiler screen,Carbon heel guards,R&G radiator guard,Powerbronze carbon rear hugger,ZX-10 front fender with fender extender,Yoshimura frame sliders,M-Factory rear stand stoppers,Escort Redline radar detector,Techspec tank grips and tank protector,Versys 1000 fender eliminator,Kaoko cruise control,Moto red oil cap,Oxford heated grips,Red magnetic oil drain plug,Red and black Bagster Spider rear seat bag (for touring only).

Link | Top | Bottom

Rook


Rook's Gravatar

Joined: 03/28/09

Posts: 20577

RE: Top Engine Wires
11/18/14 8:01 AM

I updated this thread and the HM install thread with a pic and explanation of the grommet situation. Thanks for pointing this out, yannih.


'08 MIDNIGHT SAPPHIRE BLUE Now Deceased

Link | Top | Bottom

Rook


Rook's Gravatar

Joined: 03/28/09

Posts: 20577

RE: Top Engine Wires
04/18/17 8:38 PM

Updated and I made this JUST the stick coil subharness. The other top engine wires will be in separate tutorials which I will post in the next few days.

ENGINE SUBHARNESS


* Last updated by: Rook on 1/3/2018 @ 7:01 AM *


'08 MIDNIGHT SAPPHIRE BLUE Now Deceased

Link | Top | Bottom

Rook


Rook's Gravatar

Joined: 03/28/09

Posts: 20577

RE: Top Engine Wires
01/03/18 6:59 AM

DONE


'08 MIDNIGHT SAPPHIRE BLUE Now Deceased

Link | Top | Bottom


Welcome to zx14ninjaform.com!
 
New Topic Reply
Next Page

Page: 1

Previous Page

New Post

Please login to post a response.