Move Close
Welcome to zx14ninjaform.com!

You are not logged in.
New Topic Reply
Next Page

Page: 1

Previous Page

Thread: SW Motech / Givi V35 Installation

Created on: 07/21/12 01:04 PM

Replies: 17

kb377


Location: B'ham, AL

Joined: 06/06/12

Posts: 122

SW Motech / Givi V35 Installation
07/21/12 1:04 PM

These are fairly easy to install, but I figured I'd complete a "How-To" to give anyone looking at these racks an idea of what's involved.

I recently scored a set of used Givi V35 bags off eBay. They already had the Street Magic Genesis LED light kit installed, and I added some black 3M reflective tape to the rear and sides, and some red 3M reflective tape behind the lenses to give 'em a little more visibilty (the black 3M tape is virtually invisible until you shine a light source on it)...


The racks were ordered from Twisted Throttle, and they arrived 3 days later. On a scale of 1 - 10 for packing, I'll give TT a 15...these things were packed in enough bubble wrap that I could probably use it to completely swathe the bike and run it off a cliff without damage. It literally took me 20 minutes to unwrap all the pieces/hardware.

Racks, brackets, and hardware...

Before starting, you have to "pre-assemble" the racks...attaching the latch, plastic sleeves, and rubber bumpers on each one...

First step, remove seat to gain access to fasteners holding tail halves on...

Then remove screws holding the small, rear center section and pull it to the rear, disengaging the post from the rubber grommet in the taillight housing...

Now remove the three 4mm hex bolts and one plastic retaining clip from each tailpiece half...

And remove each half, disconnecting the turn signal...

The instruction sheet includes a couple of templates for the required trimming of the undertray in order to install some of the bracketry...

And I thought I'd never put my Kindergarten cutting skills to use! (Notice the Band-Aid...this was a result of using a flat blade screwdriver to push the small rubber bumpers into their holes in the racks as mentioned above...Doh!)

Next, break out the trusty Dremel and trim away according to the template...I found out that although the racks are designed/made in Germany, the templates apparently don't have the usual Teutonic precision. After test fitting the brackets, I had to trim a good bit more...I also found out on the other side that a utility knife works better than a Dremel for cutting the plastic.

Remove four 4mm hex bolts securing the toolbox, remove, and pull the ECU of it's mouning tabs and set aside...

This is in order to access this bolt on the rear subframe that will be replaced...

Replace with the bolt, bracket, and spacer supplied in the kit, and secure using the OEM nut from the removed bolt...

I used the opportunity while I was in the area to re-route the wiring for my Hyper-Lites and tidy it up abit.

Next, we remove the passenger peg hanger bolts in order to install the upper bracket and spacer supplied...

And remove exhaust hanger bolt to install lower bracket...

Use medium-strength thread lock on all bolts, and leave them loose to facilitate lining the racks up.

Test fit rack and tighten bolts...

Test run to ensure electrics work before buttoning up the plastics...

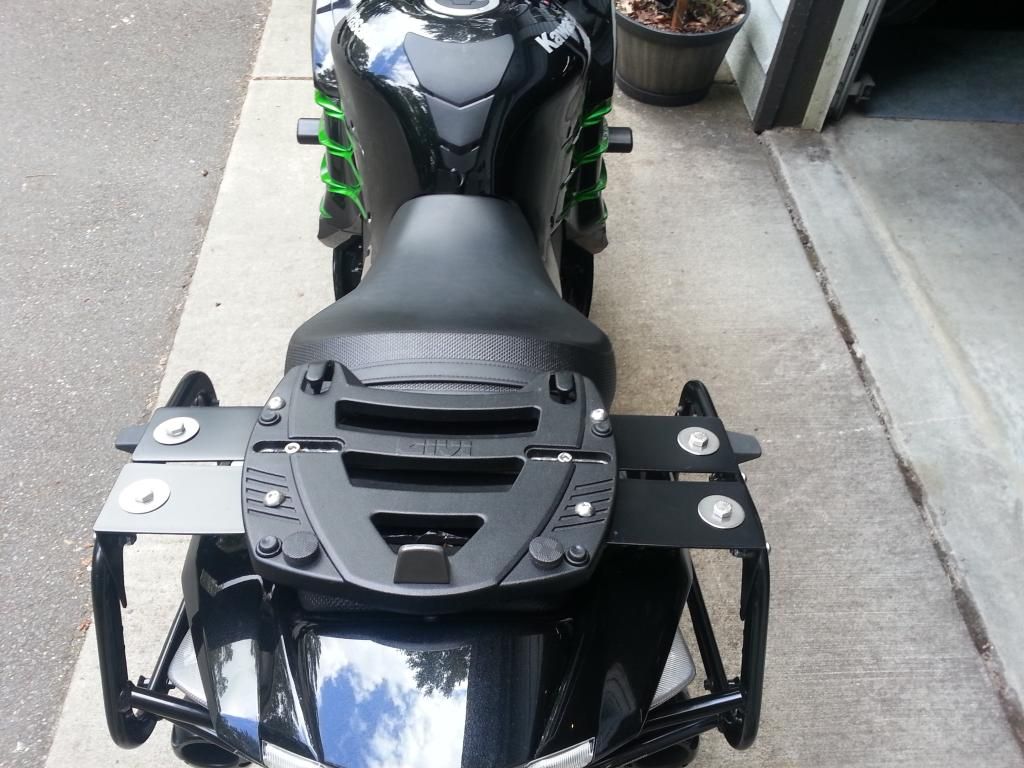
Reinstall plastics, and this is what the finished brackets will look like...


* Last updated by: kb377 on 7/21/2012 @ 1:08 PM *

Link | Top | Bottom

kb377


Location: B'ham, AL

Joined: 06/06/12

Posts: 122

RE: SW Motech / Givi V35 Installation
07/21/12 1:04 PM

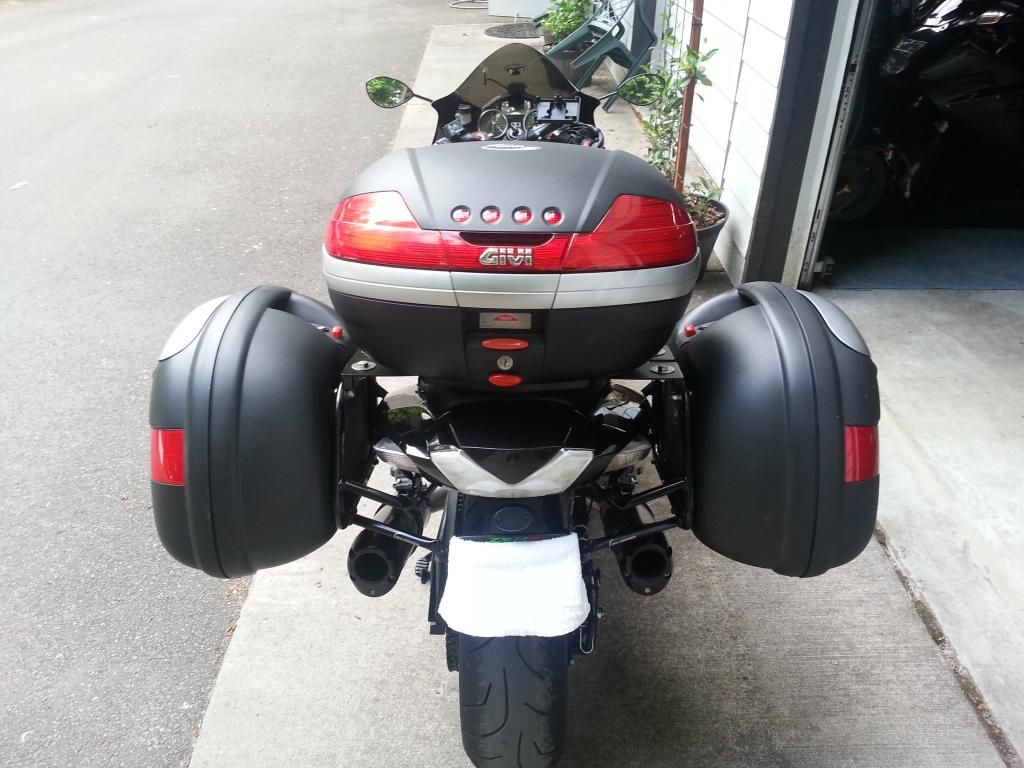
Now wheel her outside for some better pics...

3M tape with camera flash...

I also put a couple of 3M strips on the forks and subframe (behind bags)...

The I.C.B.S.T. (Intra-Continental Ballistic Sport Tourer)

Link | Top | Bottom

JC


Location: Sherbrooke

Joined: 10/26/12

Posts: 12

RE: SW Motech / Givi V35 Installation
11/05/12 5:11 PM

Do you think it would work with original exhaust? For a 2013 model do we have to buy from Twisted Throttle the bracket for the 2011 model?


From CB450 28 year ago to ZX14 now!
... But I have really enjoy my CB450!

Link | Top | Bottom

Rook


Rook's Gravatar

Joined: 03/28/09

Posts: 20589

RE: SW Motech / Givi V35 Installation
11/06/12 7:20 AM

NICE writeup, kb! I did not know the entire ECU/fusebox and rubber boot came out...much easier and safer than pulling the plugs and removing the units from the rubber.

As for removing the side tail pieces, thought the labeling in this pic might help clarify how that piece is held on (since it mysteriousl clings to the bike after removing the fasteners).

Gromet [G] slides over pin [P].


* Last updated by: Rook on 11/6/2012 @ 7:21 AM *


'08 MIDNIGHT SAPPHIRE BLUE Now Deceased

Link | Top | Bottom

Danno


Danno's Gravatar

Location:

Southwestern Illinois

Joined: 12/18/11

Posts: 2142

RE: SW Motech / Givi V35 Installation
11/10/12 6:40 PM

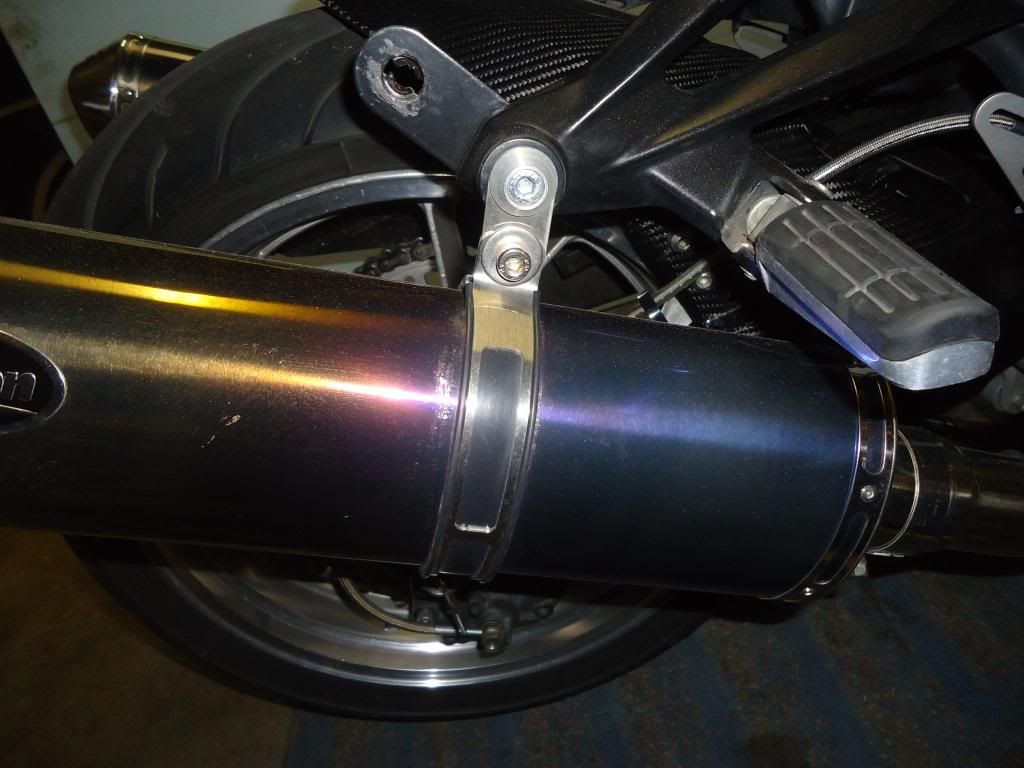
I had to make some small flat brackets and drop the pipe hangers 1 1/4" so the Scorpion slip-ons would clear the V35s. Then, I broke one of the plastic can loops and decided to get some stainless neoprene-lined loops from Muzzys. I told the guy there what I had done and he included some stainless brackets to replace the plain steel ones I had made. They definitely run a 1st-class operation at Muzzys.


'07 CPB Blue; ZGST windscreen with MRA X-screen adjustable spoiler, tube bar adaptor, PC III, ATRE,BMC air filter, modified stock seat with 2nd Look cover,Scorpion Flame Ti slip-ons, Galfer rotors front and rear, braided-stainless lines, C-F 10R front fender, C-F hugger, C-F inner fairing panels, painted foreman's fins with faux C-F inlay, polished rim lips wired for heated gear and accessories, Givi V35 side bags and E41 topcase with SW-Motech qd mounts

Link | Top | Bottom

JC


Location: Sherbrooke

Joined: 10/26/12

Posts: 12

RE: SW Motech / Givi V35 Installation
11/11/12 7:19 PM

Danno, do you have so closeup pictures of that?


From CB450 28 year ago to ZX14 now!
... But I have really enjoy my CB450!

Link | Top | Bottom

Danno


Danno's Gravatar

Location:

Southwestern Illinois

Joined: 12/18/11

Posts: 2142

RE: SW Motech / Givi V35 Installation
11/12/12 12:25 AM

I can take some tomorrow and post them. Also have the original steel brackets I made if anyone needs to use them as a pattern. They are just flat stock with holes drilled 1 1/4" on center.


* Last updated by: Danno on 11/12/2012 @ 12:25 AM *


'07 CPB Blue; ZGST windscreen with MRA X-screen adjustable spoiler, tube bar adaptor, PC III, ATRE,BMC air filter, modified stock seat with 2nd Look cover,Scorpion Flame Ti slip-ons, Galfer rotors front and rear, braided-stainless lines, C-F 10R front fender, C-F hugger, C-F inner fairing panels, painted foreman's fins with faux C-F inlay, polished rim lips wired for heated gear and accessories, Givi V35 side bags and E41 topcase with SW-Motech qd mounts

Link | Top | Bottom

Danno


Danno's Gravatar

Location:

Southwestern Illinois

Joined: 12/18/11

Posts: 2142

RE: SW Motech / Givi V35 Installation
11/12/12 7:31 PM

Here's a couple of pics. First, the homebrew steel brackets on the original plastic loops:

And the much nicer Muzzys examples:


'07 CPB Blue; ZGST windscreen with MRA X-screen adjustable spoiler, tube bar adaptor, PC III, ATRE,BMC air filter, modified stock seat with 2nd Look cover,Scorpion Flame Ti slip-ons, Galfer rotors front and rear, braided-stainless lines, C-F 10R front fender, C-F hugger, C-F inner fairing panels, painted foreman's fins with faux C-F inlay, polished rim lips wired for heated gear and accessories, Givi V35 side bags and E41 topcase with SW-Motech qd mounts

Link | Top | Bottom

Lumiera


Joined: 02/10/13

Posts: 24

RE: SW Motech / Givi V35 Installation
02/10/13 2:30 AM

Has anyone managed this install on a 12/13 yet?

Thanks!

Link | Top | Bottom

Lumiera


Joined: 02/10/13

Posts: 24

RE: SW Motech / Givi V35 Installation
07/01/13 6:59 AM

Bump for a 2012/2013 installation???

...anybody?!

Link | Top | Bottom

Danno


Danno's Gravatar

Location:

Southwestern Illinois

Joined: 12/18/11

Posts: 2142

RE: SW Motech / Givi V35 Installation
07/02/13 6:11 PM

I would think installation on the 14Rs would be the same. The only issue would be the giant blooey pipes they come out of the factory with.


'07 CPB Blue; ZGST windscreen with MRA X-screen adjustable spoiler, tube bar adaptor, PC III, ATRE,BMC air filter, modified stock seat with 2nd Look cover,Scorpion Flame Ti slip-ons, Galfer rotors front and rear, braided-stainless lines, C-F 10R front fender, C-F hugger, C-F inner fairing panels, painted foreman's fins with faux C-F inlay, polished rim lips wired for heated gear and accessories, Givi V35 side bags and E41 topcase with SW-Motech qd mounts

Link | Top | Bottom

kevin47


kevin47's Gravatar

Joined: 09/05/13

Posts: 1

RE: SW Motech / Givi V35 Installation
09/05/13 3:40 PM

For those interested I bought this exact set from KB 377 and it fits the 2012, 2013, But you either have to have different pipes that are smaller or make small drop-down brackets to lower the stock ones, but it works.

Link | Top | Bottom

Bradley427


Bradley427's Gravatar

Joined: 02/28/14

Posts: 218

RE: SW Motech / Givi V35 Installation
05/16/14 8:15 PM

Just to confirm for those who use the search function:

I have installed the SW-Motech racks and Givi V35 cases onto my 2012 ZX14R successfully. All the hardware and brackets line up just perfectly. Securing the racks is a very positive engagement to all pins, and seems pretty strong all things considered. My only issue was the bags once installed are too close to my pipes. I have Two Bros carbon slip-ons and the right side allows only ΒΌ" of clearance, while the left side actually comes into contact with the pipe. Just barely, however, I can probably slide a piece of paper through the space... I'm off to make some muffler lowering links and I'll be in business. All other aspects - 10/10 awesome product.

Logan


Sold: 2012 Kawasaki Ninja ZX14R
Next: _________ ????

Link | Top | Bottom

NeedForSpeed


NeedForSpeed's Gravatar

Location: PNW

Joined: 08/29/13

Posts: 217

RE: SW Motech / Givi V35 Installation
07/23/14 11:15 AM

FYI, I used the 2nd gen racks for the pre '12-'14 "R" models. Does not require dropping the exhaust, simple bolt on procedure.

I added a home made top box mount that puts the top box on the passenger seat. Perfect capacity for road trips, I had all 3 bags full on my latest excursion.


* Last updated by: NeedForSpeed on 7/23/2014 @ 11:17 AM *


'99 XX, '12 ZX10R, '13 ZX14R, '16 701 '17 FZ-10 - life is very good!

It's the journey, NOT the destination!

Link | Top | Bottom

Lobofox


Lobofox's Gravatar

Location:

PNW, tacoma/auburn wa.

Joined: 08/25/14

Posts: 6

RE: SW Motech / Givi V35 Installation
08/25/14 7:09 PM

@NeedForSpeed

i have a 2011 14 and am looking to set up the same way you have yours, would you mind pm or emailing me the specific parts you used to set up your bird and how you did it? Any communication would be great cause ive got 14k miles on mine so far and am honestly tired of backpacks and duffel bags.


2011 zx14 black, two brothers black series 4int1 carbon fiber exhaust, pilot road3's, zg screen, and little slices of the baby jesus..

Link | Top | Bottom

SlowmoZX14


SlowmoZX14's Gravatar

Location:

IN THE LAND OF PEACE

Joined: 07/30/14

Posts: 401

RE: SW Motech / Givi V35 Installation
09/02/14 5:09 PM

I don't know about you all but not one picture came out in the open post

Link | Top | Bottom

Rook


Rook's Gravatar

Joined: 03/28/09

Posts: 20589

RE: SW Motech / Givi V35 Installation
09/02/14 6:41 PM

yaeh, nothing here either. Might be something new with the forum. Photobucket works for my pics as long as people don't look at them too much LOL Then my free bandwidth gets exceeded and the pics go down until the first of the month.


'08 MIDNIGHT SAPPHIRE BLUE Now Deceased

Link | Top | Bottom

IdellKarpel


Joined: 09/09/14

Posts: 1

RE: SW Motech / Givi V35 Installation
09/09/14 2:58 AM

The activity of the animal beings has become acutely active everywhere on this earth. Bodies do not get time to booty a blow for a while. With the accretion use of altered gadgets of Gps Jammer, the possibilities of accepting the aboriginal of blow accept absolutely finished. The adaptable phones or the corpuscle phones are some of these accessories that accumulate the bodies consistently in blow with the alfresco world. The adaptable building are additionally accessible about everywhere these canicule and due to this the accessibility of the Cell Phone Jammer has become alike added quick and authentic. Today, you cannot break out of ability of these adaptable building as their signals can bolt your about anywhere. The bearings of bodies who accord to altered business professions has become actual analytical of XM Signal Jammer as their authorities bolt them anywhere any moment.


* Last updated by: IdellKarpel on 9/11/2014 @ 10:13 PM *

Link | Top | Bottom


Welcome to zx14ninjaform.com!
 
New Topic Reply
Next Page

Page: 1

Previous Page

New Post

Please login to post a response.