Move Close
Welcome to zx14ninjaform.com!

You are not logged in.
New Topic Reply
Next Page

Page: 1 2 3 4

Previous Page

Thread: Sprocket/Drive Chain Replacement

Created on: 03/24/11 10:03 PM

Replies: 98

Rook


Rook's Gravatar

Joined: 03/28/09

Posts: 20579

Sprocket/Drive Chain Replacement
03/24/11 10:03 PM

Sprockets and Drive Chain Replacement

Ideas About Sprockets, Gearing and Chains
I received numerous pieces of advice regarding my choice in sprockets and chain. I also read promotional material from a couple of different companies regarding sprockets and chains. Sprocket and gearing choices should be based on riding style. I chose my setup for sport riding. As far as the materials are concerned, I was looking for light weight. The sprockets are not large parts but they are rotating mass so several ounces could amount to a few pounds at speed. The rear sprocket I chose will probably not wear as long as a steel sprocket but my new 45 tooth aluminum sprocket is over 1/3 lighter than the OEM steel 41 tooth (it also looks pretty cool). I have not noticed my aftermarket 17 tooth output sprocket to be noisier than the OEM 17 tooth with vibe absorbing rubber inserts. The aftermarket output sprocket is about 25% lighter than the OEM output sprocket.

Gearing is something that is difficult to choose without trying various setups. There are a couple of websites that can help you make choices based on speed and rpm in various gears. Go to

to use the popular gearing Commander site. Several considerations came into play before I chose 17/45 gearing. The biggest reason was that I wanted to experience a definite change in the acceleration and overall character in the bike. My 14 is primarily a sport riding machine so comfort, smoothness and appearance come somewhere behind performance in priority. As I see it, it doesn’t make much sense to go through all of the work of re-gearing to get a small change in performance. After several years of using 17/45 gearing, I have observed that the bike accelerates and runs at the same rpm as it would one gear lower with 17/41 gearing. The bike will still top out at about 190 mph with 17/45 gearing. I have heard that most 16T sprockets will make a whining noise on the ZX-14 because of the smaller radius the chain turns and the lack of a vibration damper like the OEM engine sprocket has. I chose to remain at 17T for the output sprocket.

In keeping with my sport riding approach to modding, I considered a non-o-ring chain but was almost unanimously advised that it would not be a practical choice for the street. Non-o-ring chains are normally lubed every 50 miles or so as they are primarily for closed course use. I was told a non-o-ring chain would be noisy and cause more friction instead of less if not maintained as it would for drag racing or LSR. Furthermore, a lot of racers don’t even use non-o-ring chains because the advantage is too small to justify the additional maintenance.

I chose an x-ring chain, the brand and model of which seemed to be the chain most commonly recommended by ZX-14 racing enthusiasts. The chain is listed as having a higher tensile strength than other chains. Researching the material published, it seemed the chain would be the strongest and probably also be light in weight. What I found is that the chain I chose is about identical in weight to the OEM chain.

Converting chain pitch is something that might be worth considering if rotating mass reduction is of importance. The ZX-14 sprockets and chain are 530 pitch. Liter bikes are using 525 pitch chains and sprockets and may be enjoying a significant reduction in rotating mass (I have been told about 1.5 pounds less) over the larger sport bikes. Some companies (Vortex, for one) will convert ZX-14 sprockets to 525 pitch. Boosted liter bikes are making as much torque as a 14 without converting to 530 pitch sprockets. I stayed with 530 pitch. That seems to be what most other owners have done regardless of riding style.

Changing gearing will cause speedo/odo error. Shorter gearing will make the speedo register faster and the odo will indicate more miles, accordingly. An electronic speedo corrector is a desirable mod to compliment gearing changes.

Threads About Chains, Gearing and Sprockets
ENGINE SPROCKET

SPEEDO CORRECTION

SPROCKETS AND GEARING

CHAIN


Precautions
I completed all work with the bike on a Pit Bull Rear stand. It is not difficult to lever the bike over when breaking free the rear axle nut and rear sprocket nuts if they have been overtightened. The countershaft head nut also often requires a great deal of force to break loose. Placing the bike on its side stand may be safer. At least the bike would be closer to the ground if it fell.

Because of the tip over hazard, an impact wrench may be the safest tool for use on stubborn bolts. Long handled tools do not require extreme power or abruptness as smaller tools might. By using leverage instead of strength, you will have much more control. It will be easier to feel if the bike is starting to lift off its support.

Materials and Tools
I purchased the EK chain tool. It is a more expensive chain tool but I found it very reliable and expect it will last a lifetime. The smaller chain tool by MotionPro is more appropriate for lighter chains than are used on motorcycles. Some have used the less expensive MotionPro with success but often their review contains some comments about the tool breaking or just barely being up to the task. If the chain tool has a thick pipe for a handle like a hammer does, it is probably adequate.

The chain I chose was an EK ZZZ 530, 130 pins. The stock chain is 116 pins. I used 118 pins for my 17/45 gearing and that put my adjusters at two and one-half marks. I do not know if it would be possible to go to 117 pins on 17/45 gearing. It seemed out of the question to go with 116 pins.

The rear sprocket i used is a ZX-14 Vortex 45T 530 pitch aluminum sprocket.

The output sprocket was a ZX-14 Supersprox 17T 530 pitch case hardened chrome-moly.

All of my comments regarding chain tools pertain to the EK chain tool and the EK ZZZ chain. Instructions for other chains and chain tools may differ slightly.

Do First:
Place the transmission in Neutral.

Remove the sprocket cover (see Sprocket Cover Removal, steps 1, 2 and 3).

Remove the belly pan fairing (see FAIRINGS REMOVAL).

Remove the chain cover from the swing arm using a phillips screwdriver. There is also a plastic catch on the chain guard that must be unclipped.

Using a 5mm hex tool socket and ratchet, remove the rear brake line retainer bracket screw.
Slide the bracket forward on the brake line and away from the rear wheel.

Tools:
hammer
thin edged, small tipped screw driver
broad tipped screwdriver
11 13/16” (or longer) steal pipe, 7/8” or larger diameter large rag
large rag
27mm (1 1/16” ) 6 point socket,1/2” drive (impact socket)
24” breaker bar, 1/2” drive or impact driver, 1/2” drive
protective goggles or safety glasses
grinding stone drill bit
electric hand drill
EK chain tool
19mm 3/8 drive socket
3/8” drive ratchet
3/8” drive 14mm six point socket
3/8” drive impact wrench or a 14mm 6 point box end wrench with a pipe
3/8” drive 1” extension
3/8” drive ratchet
19mm socket, 3/8” drive
new rear sprocket
new countershaft sprocket
new sprocket nuts
molybdenum disulfide grease
new EK ZZZ chain, 530 pitch, 120 pin, connecting link, o-rings, white lithium lube, spacers, rivet gauge
marking paint
channel lock pliers
3/8” drive 19mm socket
engine sprocket nut lock washer
3/8” drive 3” extension
torque wrench 51 ft lbs-92ft lbs

Engine Sprocket Nut Removal
The engine sprocket nut is seated against a washer which engages the splines of the countershaft below it. The edge of the washer is bent up as shown in the photo to prevent the head nut from turning. The washer must first be bent flat as indicated by the arrows so that the nut may be loosened. The smaller 27mm hexagonal flats are the proper ones to turn on with a socket. The larger outer flats are for bending the washer against but a 34mm-35mm socket will fit, I am told.

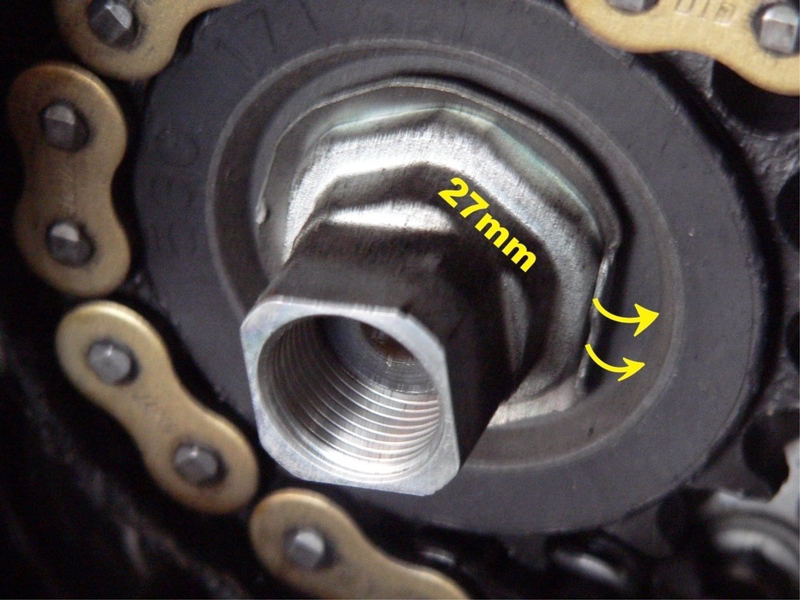
I used a deep well 6 point 27mm impact socket and 24” breaker bar to remove the engine sprocket nut. The engine sprocket nut is often very tight so a hardened steel impact socket is the only safe socket to use. Some have used an impact wrench to remove the engine sprocket nut. In that case, it is not acceptable to use anything but an impact socket. A 1 1/16” socket is identical to a 27mm socket so either will work fine. A 12 point socket may strip the points on the nut so use only a 6 point and it must be a deep well.

1. Use a hammer and thin edged, small tipped screw driver to gently tap between the flat of the nut and the washer. After the washer is wedged out a bit from the flat of the nut, a broad tipped screwdriver will work better, gently tapping the back of the handle to press the washer against the face of the output sprocket.


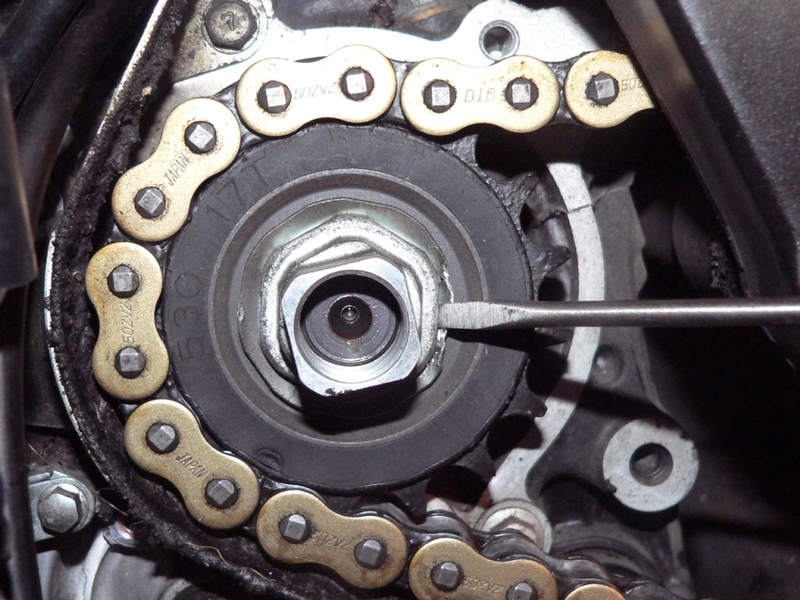
2. Lock the back wheel by placing a 7/8” or larger diameter steal pipe over the swing arm and through the spokes of the rear wheel. Wrap the bar in a large rag to protect the painted surface of wheel.

You can hang weight on the rear brake pedal to hold the rear wheel from moving but the added down force may increase the likelihood of levering the bike off the stand.

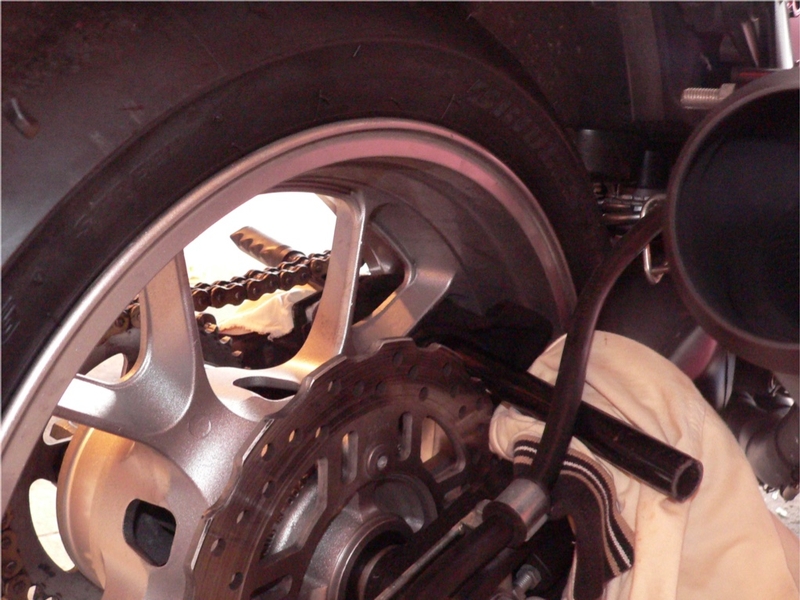
EDIT: There have been a couple of comments made about this technique causing damage to the paint or perhaps even the wheel. I believe it is the safest technique to lock the driveline but if the sprocket nut is very tight, this may not be the best technique for you. You may consider using both the rear brake and the bar in the spokes or some other method of holding the engine sprocket still while breaking the nut free.


3. Use a 24” breaker bar or an impact wrench, either with half-inch drive and a 27mm deep well impact socket to remove engine sprocket nut. If using a breaker bar, apply force gradually and be prepared to remove force if the bike starts to tip.

Remove the engine sprocket nut and the retainer washer.

Chain Cutting
4. Wear eye protection. Using a grinding stone drill bit and an electric handheld drill, remove most of the head of one outside facing rivet. It is easier to perform the grinding procedure on a link that is engaged with the rear sprocket as shown. It is not necessary to grind the rivet flush to the outer plate.


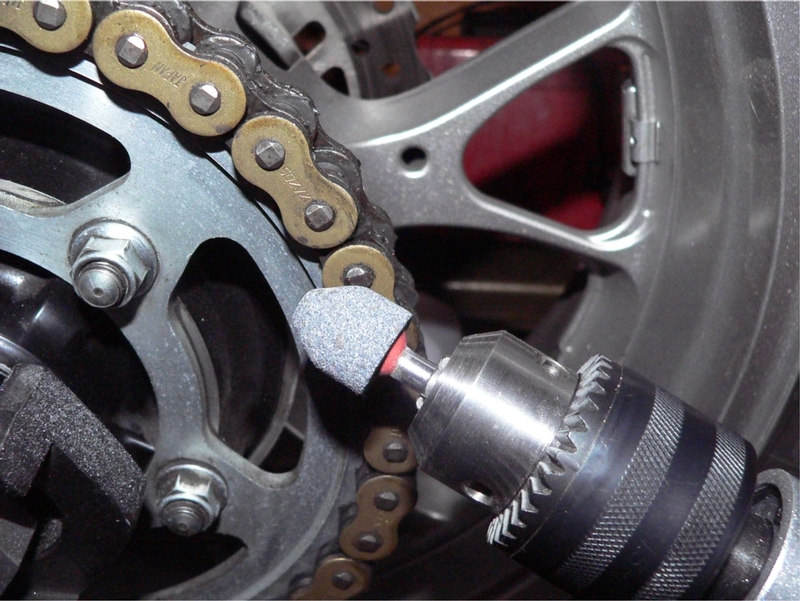
5. Insert the breaker pin into the chain tool.


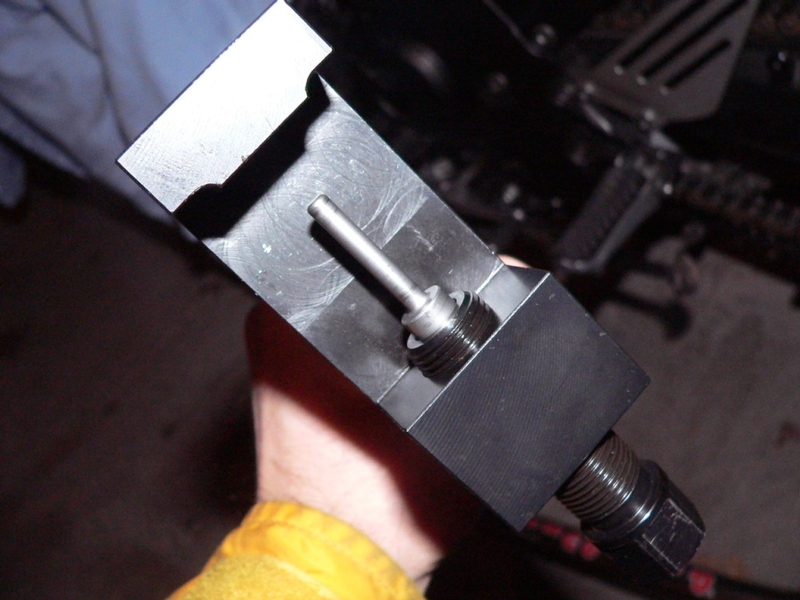
6. Center the LH rivet head in the exit hole of the chain tool.

Using a 19mm socket and 3/8” drive ratchet, tighten the breaker pin against the RH facing rivet which was ground in step 5. Continue tightening until the pin is pushed all the way through the link and the exit hole in the chain tool.


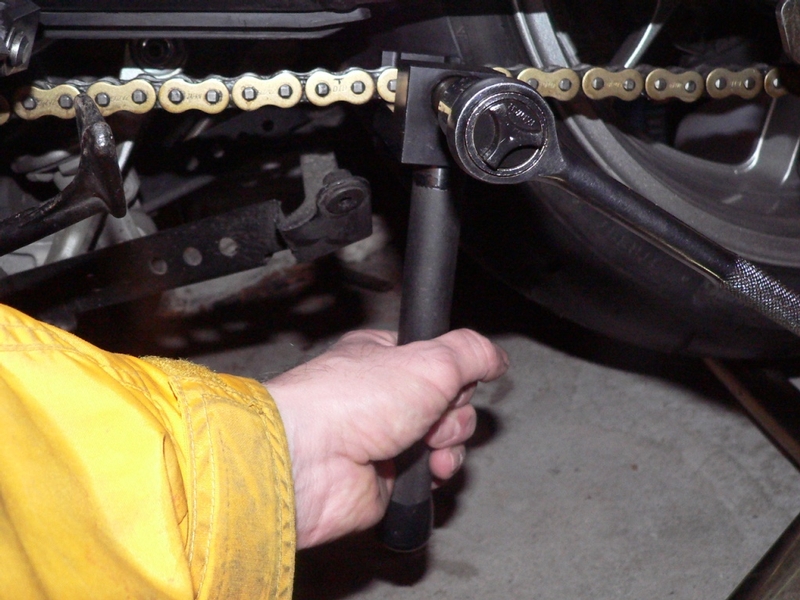
7. Pull the chain link apart.

Grasp the bottom run of the chain. Carefully pull the chain over the sprockets and out of the bottom run.


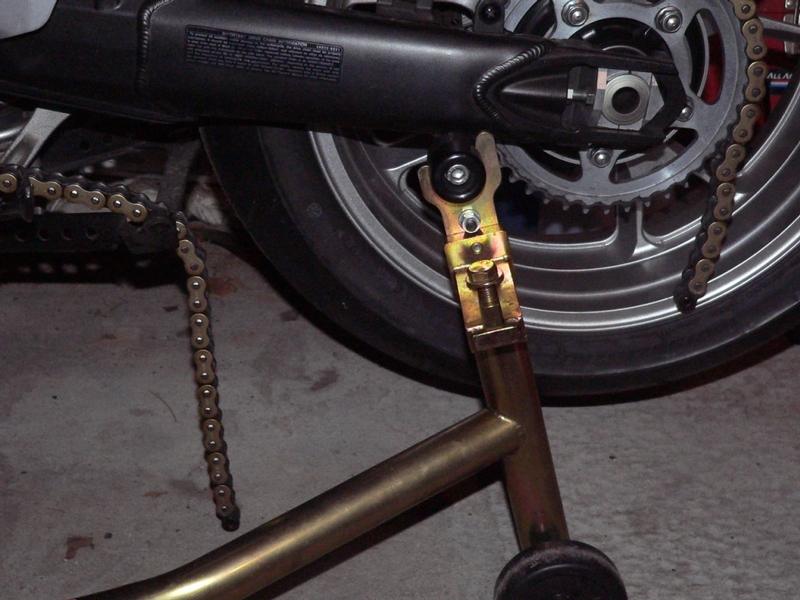
8. After the chain has been freed, slide the engine sprocket off of the counter shaft splines.

Rear Sprocket Removal


9. Leave the rag covered bar from step 2 in the rear wheel. Use an impact wrench with a 3/8” drive 14mm six point socket or a 6 point box end wrench with a pipe to break loose the 5 rear sprocket nuts. Be mindful of the bikes vulnerability to to tipping when applying leverage to the rear wheel hub.

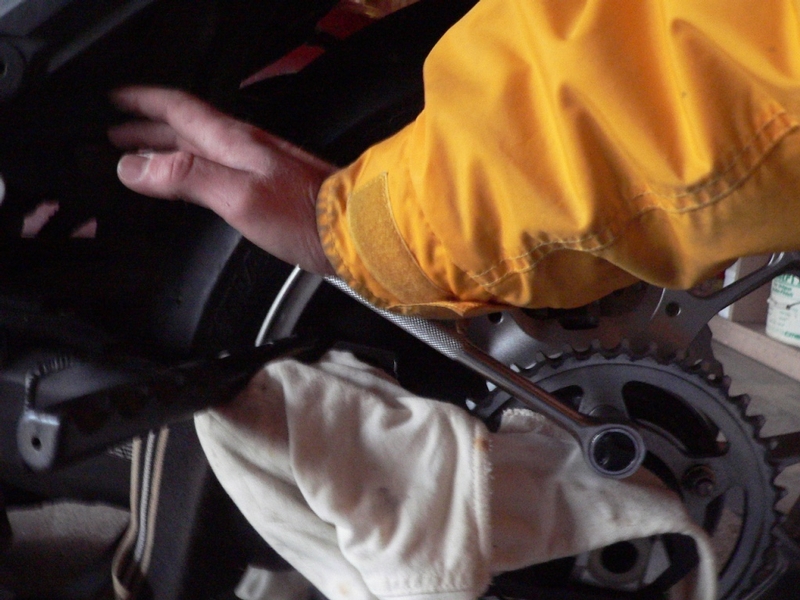
Pushing down on the top nut or bottom nut is less of a tip over hazard than lifting. A long handled 6 point box end wrench with a pipe for leverage is best used if an impact wrench is not available. Do not remove the sprocket nuts completely.

10. Remove the rear wheel (see Wheel Removal, steps 20 through 32, skip step 24 because the chain has been removed already).


11. Use a ratchet and 14mm socket with 1” extension to remove all five rear sprocket nuts and OEM rear sprocket.

Sprocket nuts are only supposed to be torqued once. If you intend to reuse them, it’s best to mark the sprocket nuts and sprocket to the studs.

Install a new rear sprocket and snug the sprocket nuts.


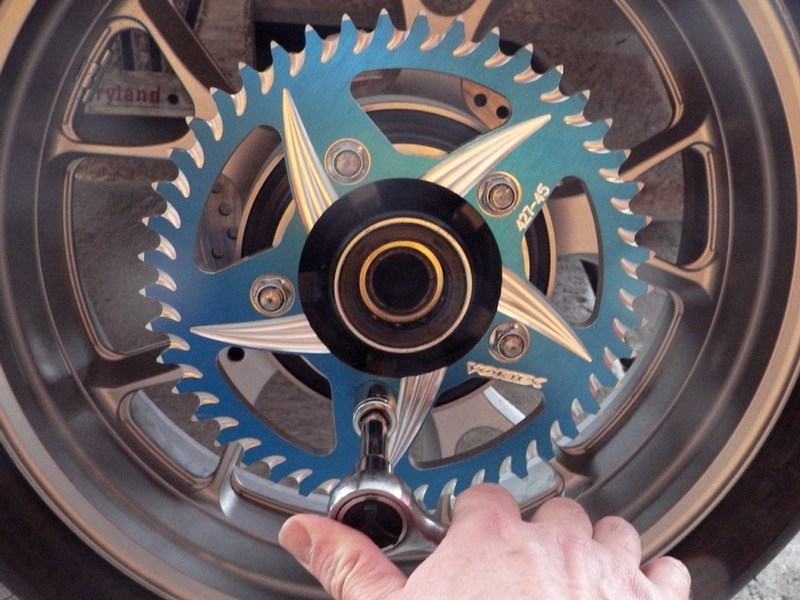
Engine Sprocket and Rear Sprocket Installation
12. Install the new countershaft sprocket and snug up the sprocket nuts. The service manual recommends replacing the sprocket nuts each time they are removed.


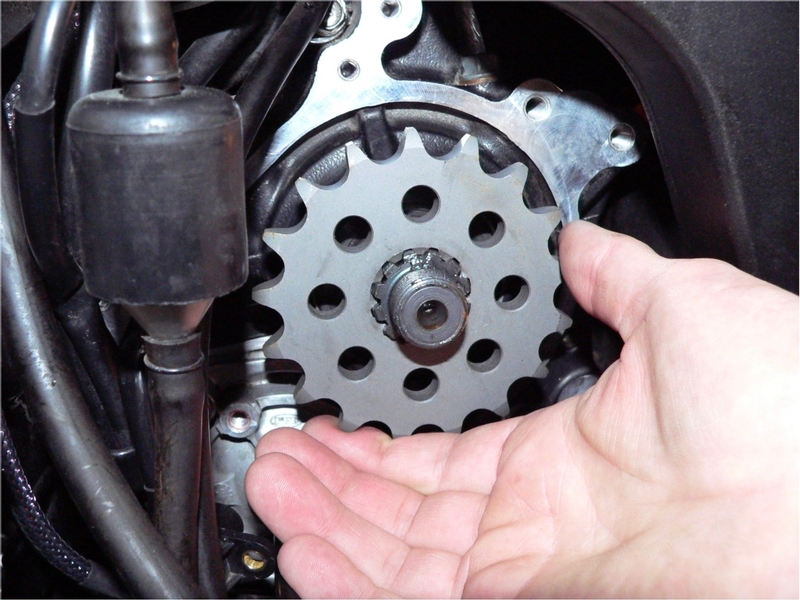
13. Install the rear wheel (see Wheel Removal, steps 33 through 41 skipping chain installation steps).

Snug the axle nut by hand to hold the axle in place.

The sprocket nuts and axle nut will be torqued after the chain is installed (see steps 32 through 35 of this tutorial).


14. Apply molybdenum disulfide grease to the countershaft splines and all other surfaces that
output sprocket seats against.

Line up the splines of the countershaft and the new output sprocket. Slide the output sprocket onto countershaft. No force should be required. Once aligned, it will slide on easily.

Chain Installation
15. Place one end of the new chain over the top of the rear sprocket and top chain guide.

Roll the rear wheel forward so that the top run of chain is pushed forward to the output sprocket.

Engage the chain to the teeth around the front of the output sprocket.

Pull the bottom run of chain back tightly to the rear sprocket approximating proper chain slack and wrap the bottom run of chain over the back of the rear sprocket.

Roll the rear wheel to a position where the chain will stay in place under its own weight.


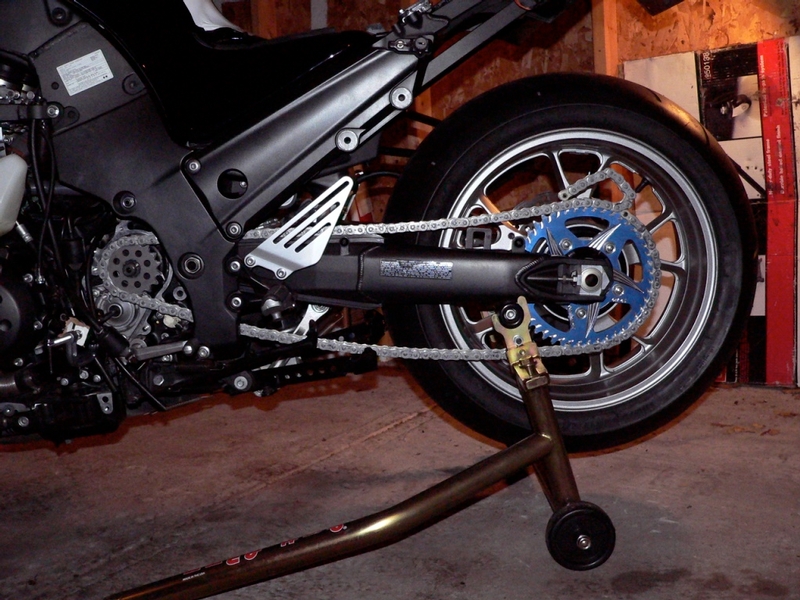
16. Check the chain slack in the new chain (see DRIVE CHAIN ADJUSTMENT, steps 1,2 and 3).

Loosen the adjuster locknuts and turn the adjuster screws to move axle forward or back as necessary (see DRIVE CHAIN ADJUSTMENT, steps 7 through 10).


17. Using a spot of paint to mark the pin that will need to be removed to shorten the chain to the proper number of links.

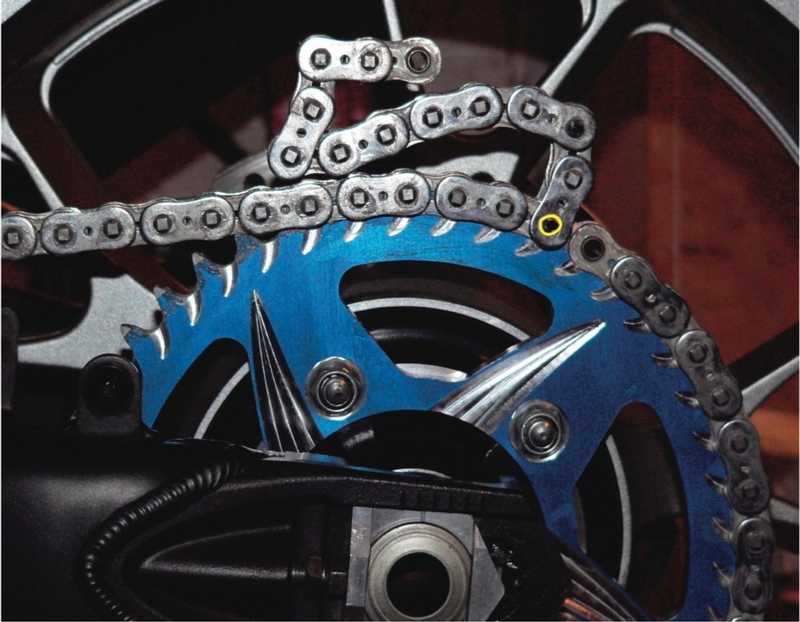
The pin that I removed is circled in yellow in the picture above.


18. Take the chain off of the bike and fasten it securely in some manner so that the marked pin head may be ground down as when the old chain was removed.

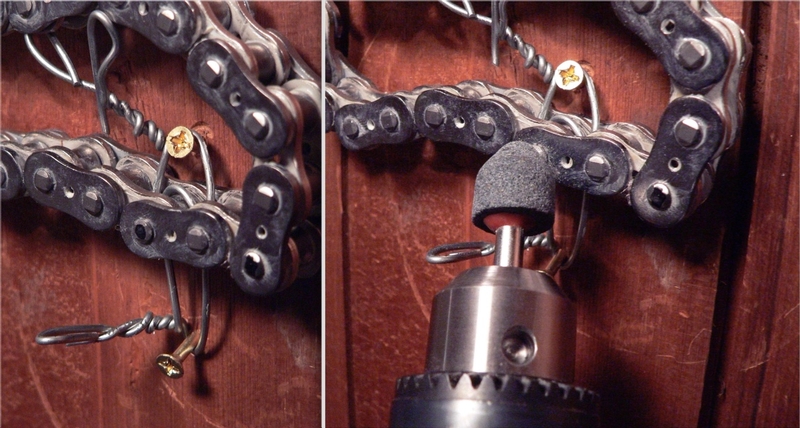
I did not feel it was safe to grind an unjoined chain on the sprocket. I placed two screws in an old wall and wired the link I was working on as shown. The rest of the chain was suspended from the ceiling and wrapped in plastic to prevent dust from the grinding stone being blown on it.


19. Grind the pin that was marked so that it is almost flush with outer plate as in step 4.


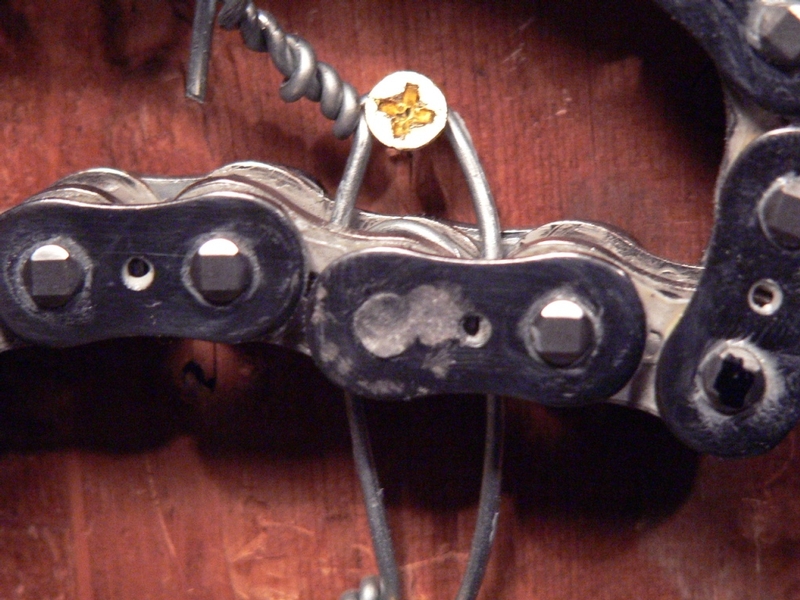
20. Place the breaking pin in the chain tool and use 19mm socket to force pin out of link (same procedure as steps 5 and 6 of this tutorial).

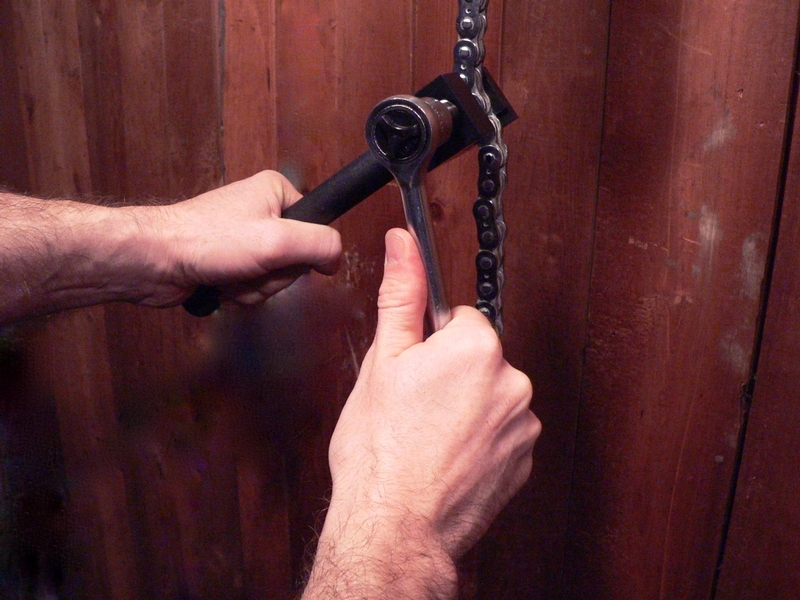
Remove the excess links of chain.


21. Position the chain on the sprockets again as in step 15. Arrange the ends of the chain at the back of the rear sprocket (yellow arrows in pic below) as in step 17.


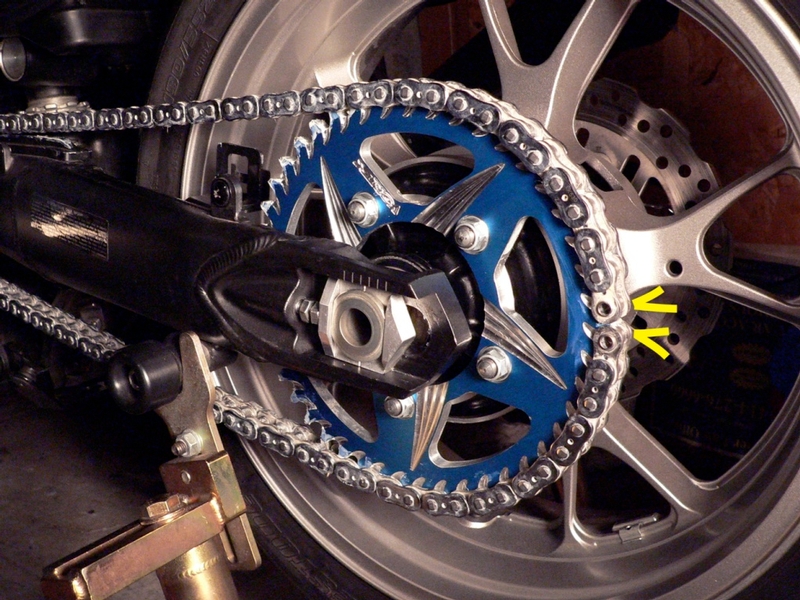
22. Grease the connecting link with white lithium lube (included with EK chain) and place a lubed x-ring over each pin.

Fill the hole in the end links of the chain with white lithium lube.


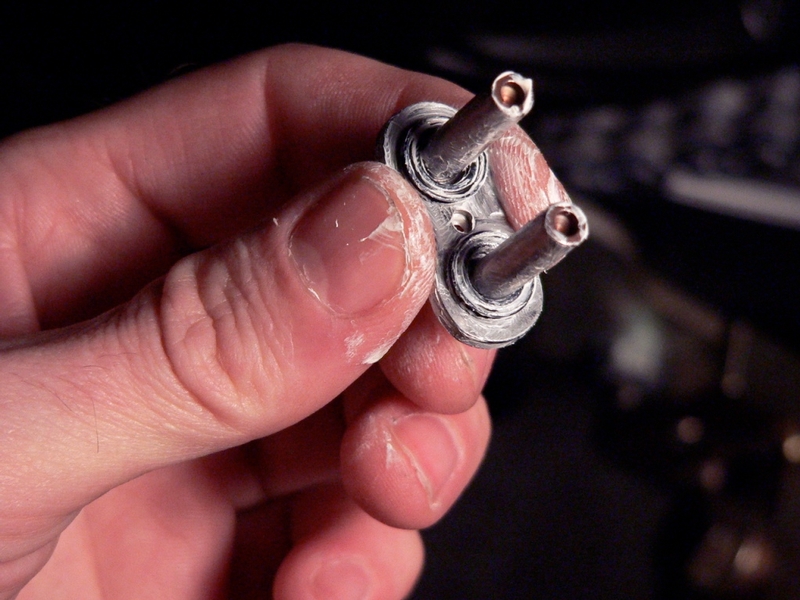
23. Insert the pins of the connecting link from the RH side the rear sprocket through the holes in the ends of chain.

Place lubed x-rings over the pin heads on the LH side of the chain.

Press the outer plate of the connecting link onto the pin heads with your fingers.

Using a channel lock pliers, squeeze the connecting link together enough for it to remain in place.


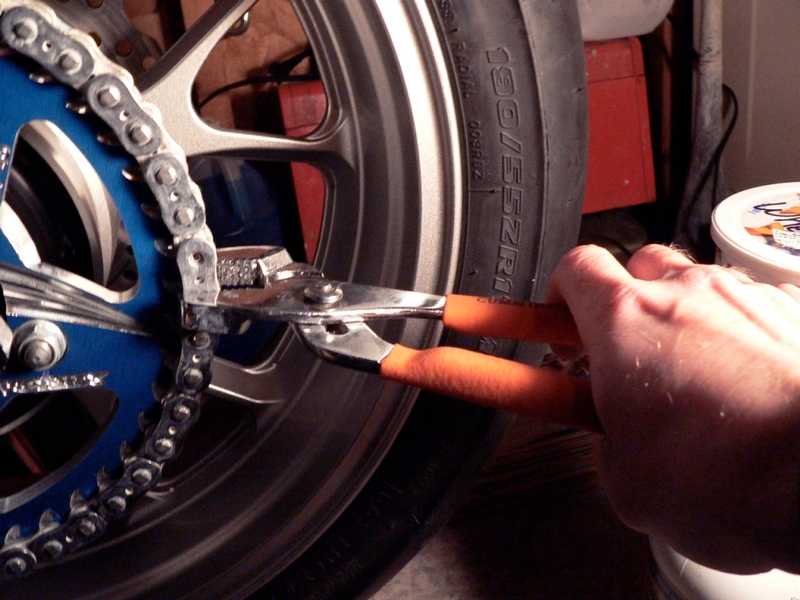
24. Press the spacers over the top edges of the x-rings on the left and right between the inner and outer plates of the connecting link.


25. Place the plate holders in the chain tool.


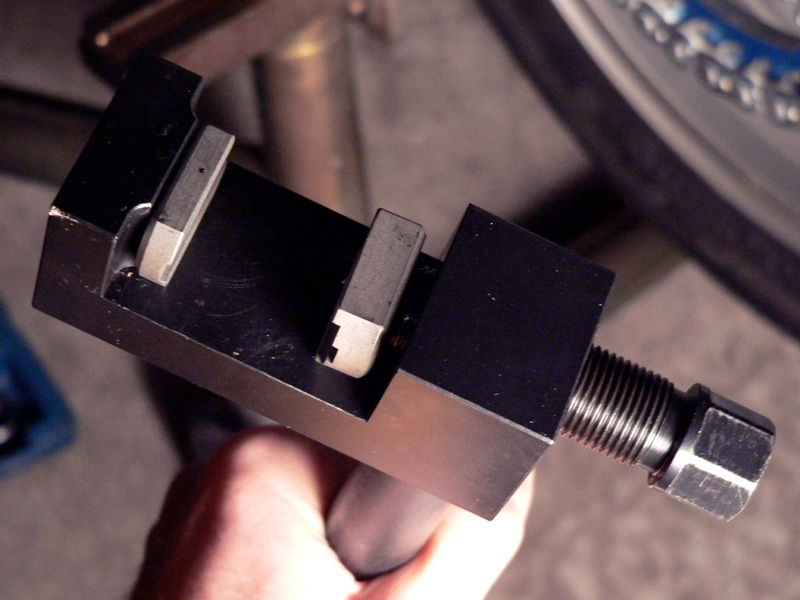
26. Make sure the pin heads will line up with the channel in the plate holders.

Screw closed the jaws with a 19mm socket and 3/8” drive ratchet (1/2” drive will offer better leverage).


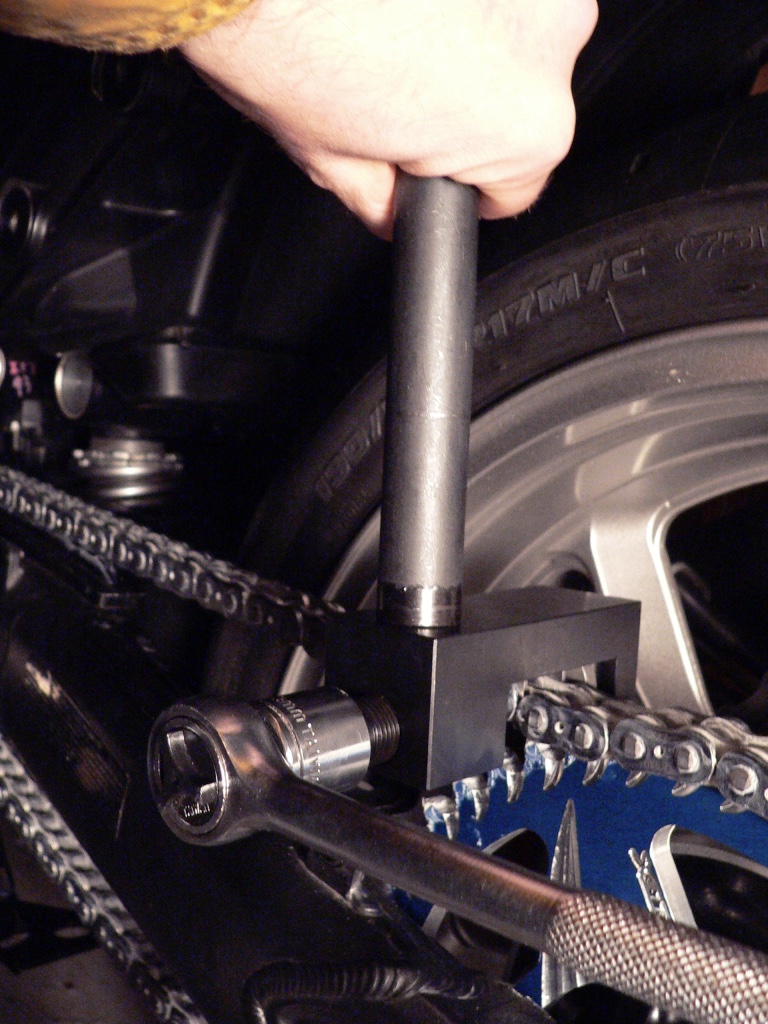
27. Compress the outer plates until the pins are driven through the links and touch the inside of the channels in the holder plates.

It is acceptable to remove the chain tool to observe the pin heads. You can reposition the chain tool and continue.

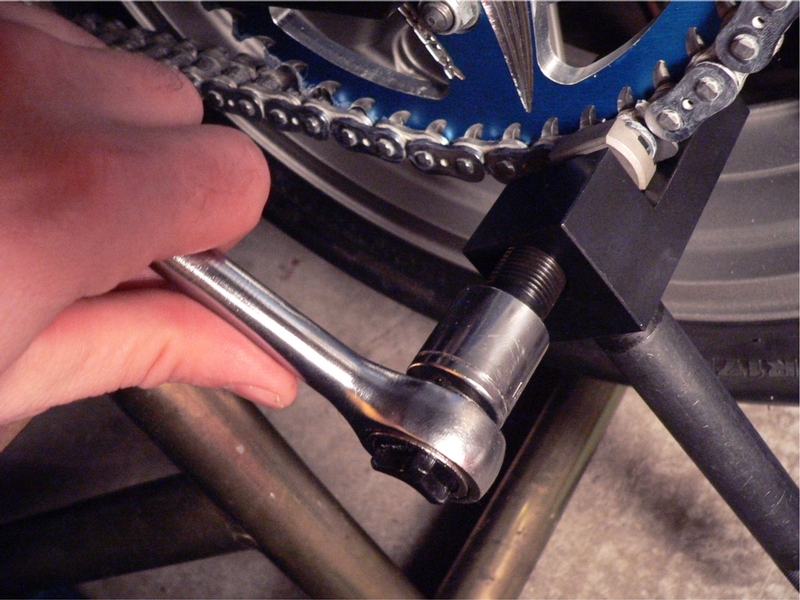
The pins’ heads are all the way through when the chain tool cannot be tightened any more.

These pin heads are fully driven through the plates.


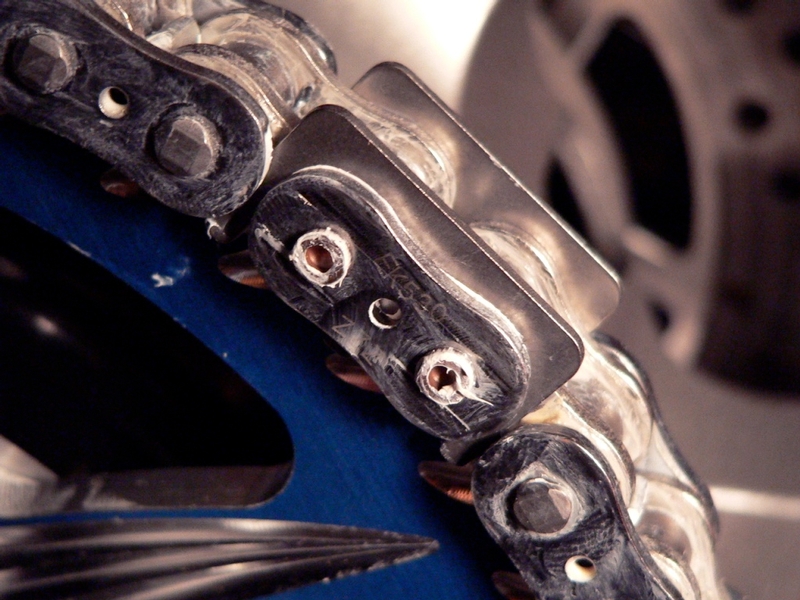
28. Place the RH plate holder and rivet pin in the chain tool.


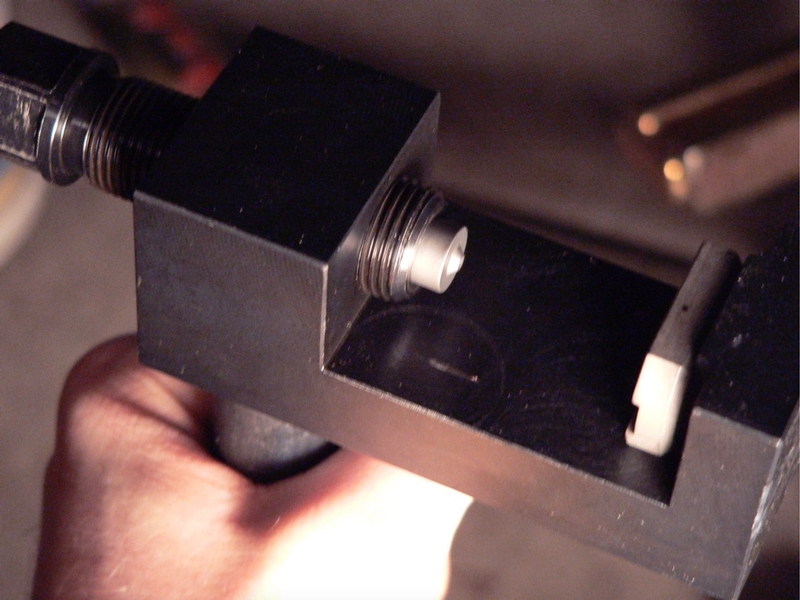
29. Position the center protrusion on the rivet pin in the hole of either pin head.

Tighten the chain tool so that the rivet pin presses into the hole in the pin head and expands it into a rivet.

The pin on the right has been riveted.


30. EK provides this rivet gauge to check the diameter of you rivets. If the rivet has not been compressed enough, the rivet head will fit through the straight portion of the gauge.

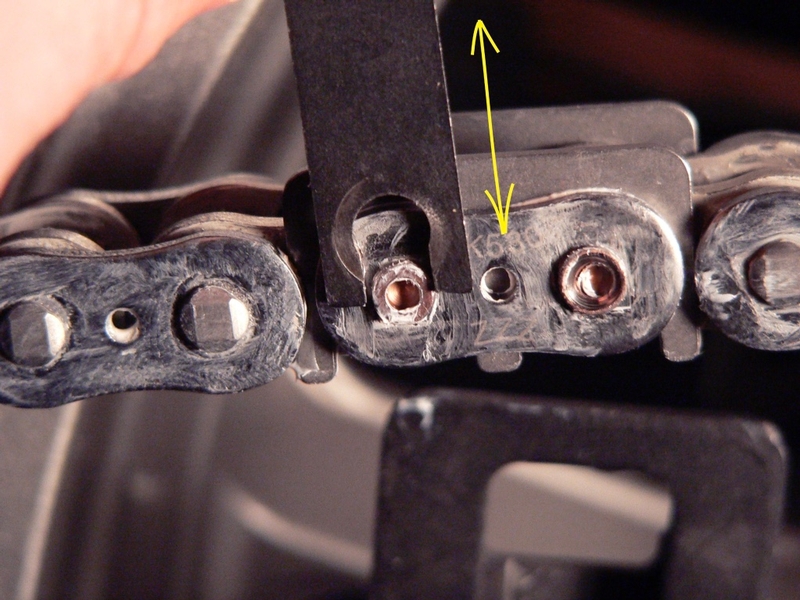
Rivet needs to be compressed more. Passes through smaller part of gauge.

When the rivet will not pass through the smaller portion of the gauge, the rivet head has been mushroomed adequately.

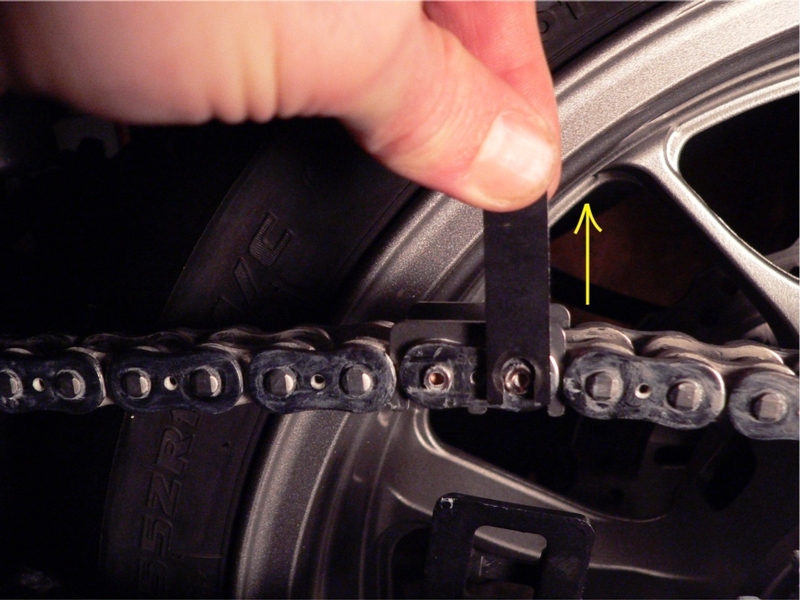
Good rivet. Will not fit through bottom of gauge.


31. Rivet both pin heads.

Remove the spacers from the chain using channel lock pliers.

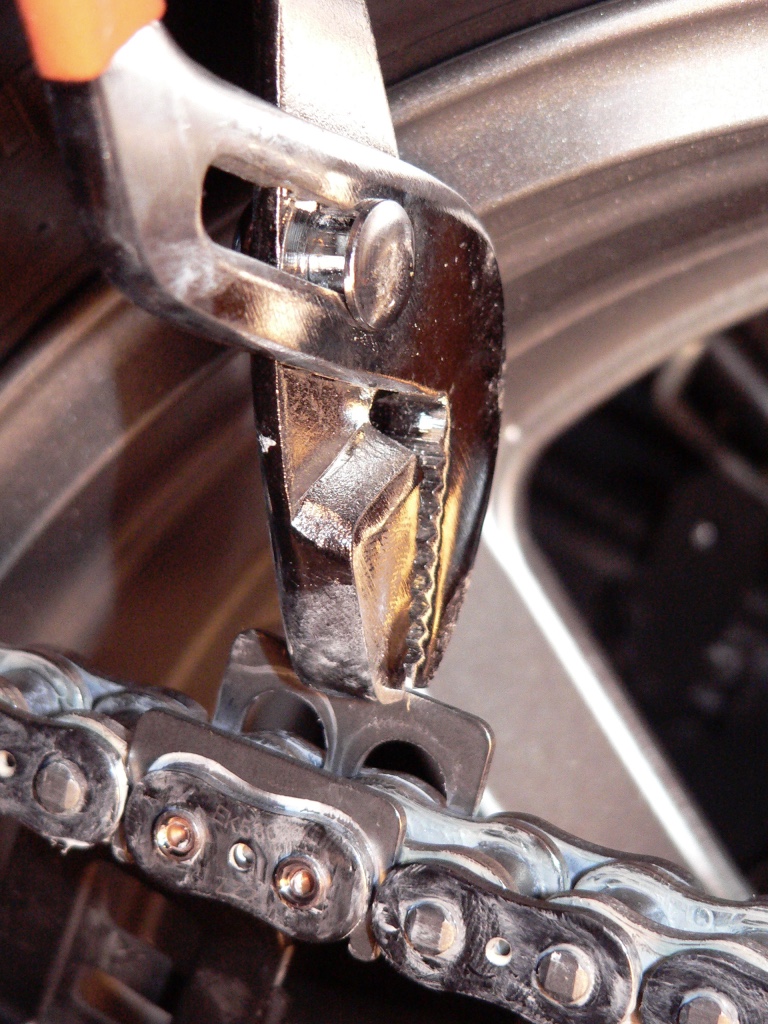
Adjusting, Torquing and Reinstalling Additional Parts
32. Apply molybdenum disulfide grease to the countershaft threads, lock washer and adjoining surfaces of the engine sprocket nut.

The service manual recommends that the engine sprocket nut lock washer be replaced but I reused the original.

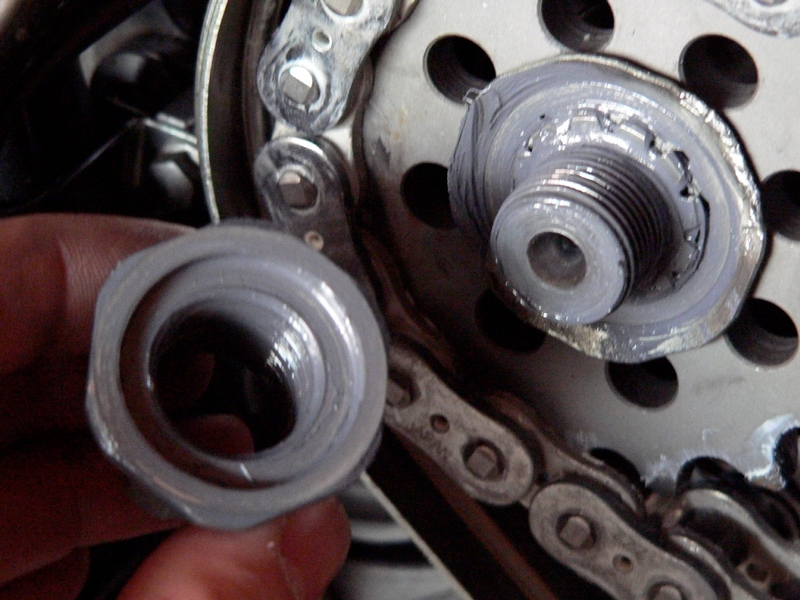
Install the engine sprocket nut hand tight.


33. Place the bar wrapped in a rag under the swing arm and through rear wheel spokes.

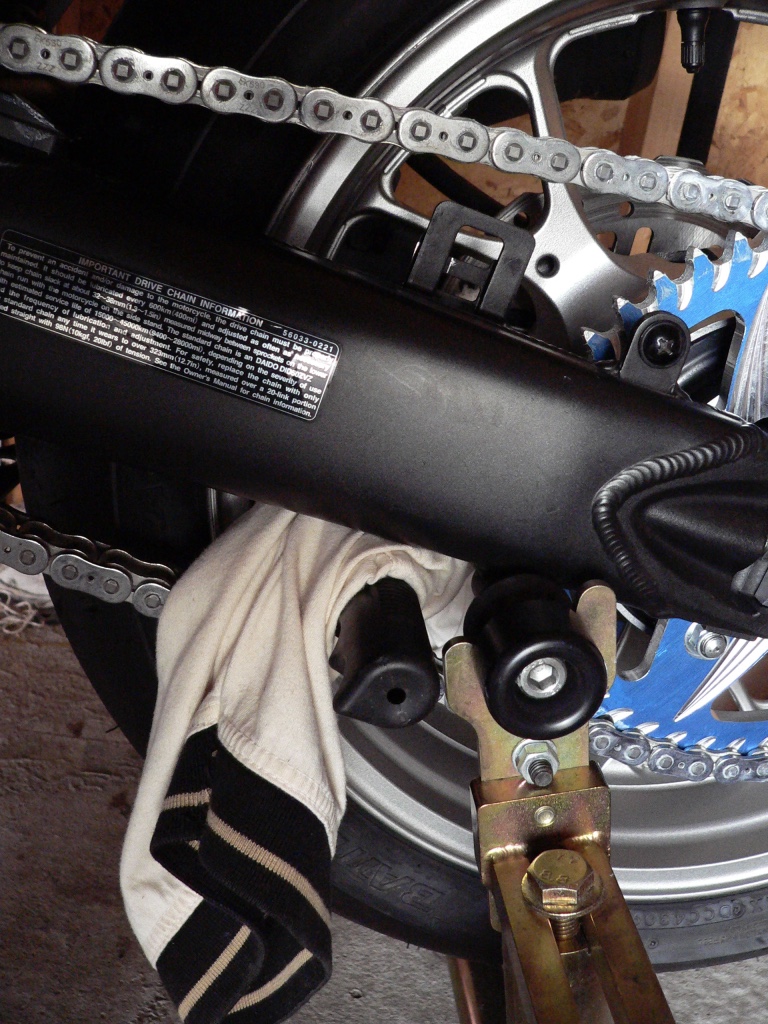
Use a 27mm impact socket to torque the engine sprocket nut to 92 ft lbs.

34. Use a hammer to drive a straight slot screwdriver between the countershaft sprocket and the engine sprocket nut lock washer.

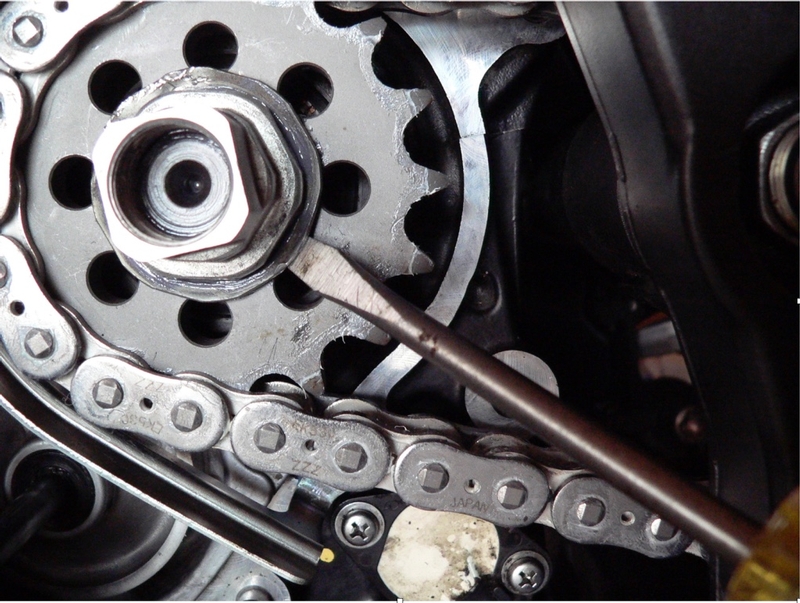
Bend a fresh section of the lock washer up at one outer flat on the countershaft head nut.

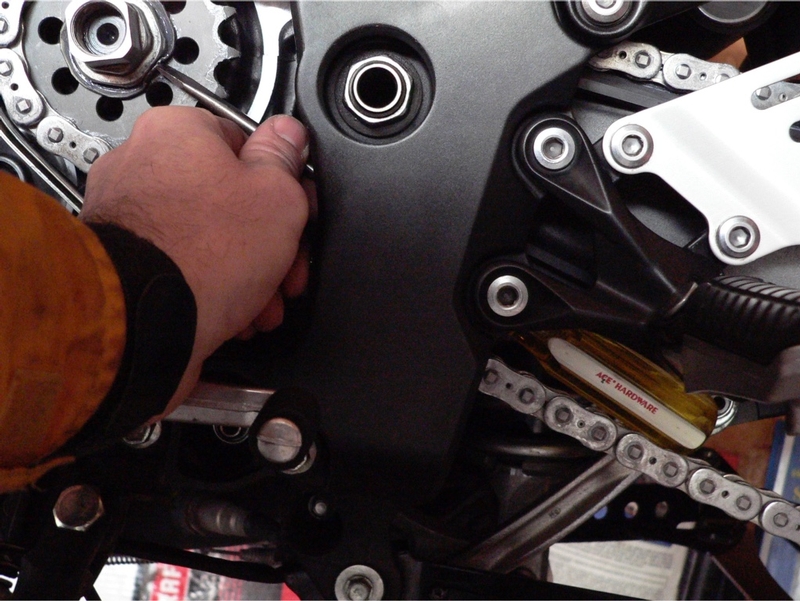
Placing a 10” or longer (shaft and handle) screwdriver with a broad tip under the swing arm offers a good angle for this job. Tap the back of the screwdriver handle with a hammer to fold the lock washer against the flat on the head nut.


35. Using a 14mm socket and 3” extension, draw the rear sprocket nuts up evenly.

Then use a torque wrench to tighten sprocket nuts to 51 foot lbs.

Recheck torque of all rear sprocket nuts 2 more times and tighten as necessary.


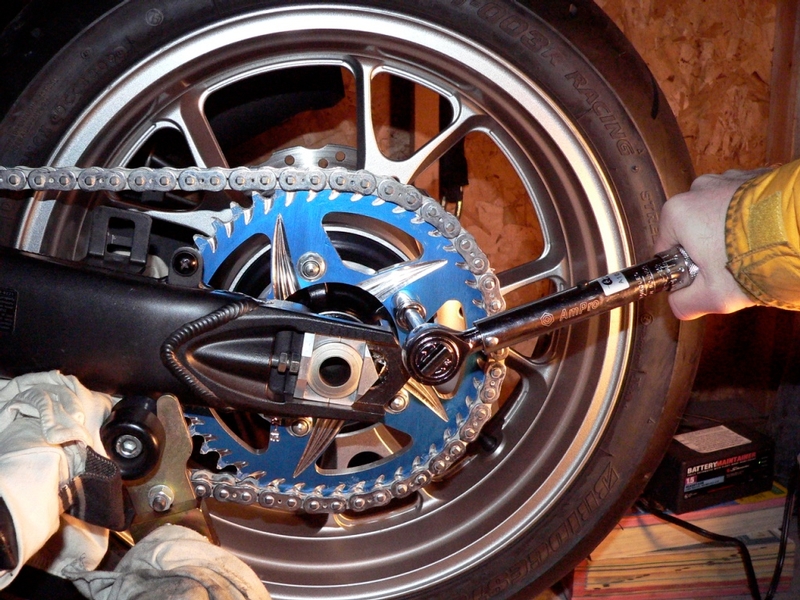
36. Now that the sprockets are fully installed, recheck chain slack (see DRIVE CHAIN ADJUSTMENT, steps 1, 2 and 3).

Adjust the chain slack if needed ((see DRIVE CHAIN ADJUSTMENT, steps 4 through 13).
The chain slack will tighten by about 1/8” after the axle nut is tightened.

Install the sprocket cover (see Sprocket Cover Removal, steps 4 through 7).

Install the belly pan fairing (see FAIRINGS REMOVAL).

Install the chain cover to the swing arm using a phillips screwdriver.

Install the rear brake line retainer bracket screw using a 5mm hex tool socket and ratchet.


Weights

OEM Countershaft Sprocket: 12.30 oz

OEM Rear Sprocket: 2 lbs

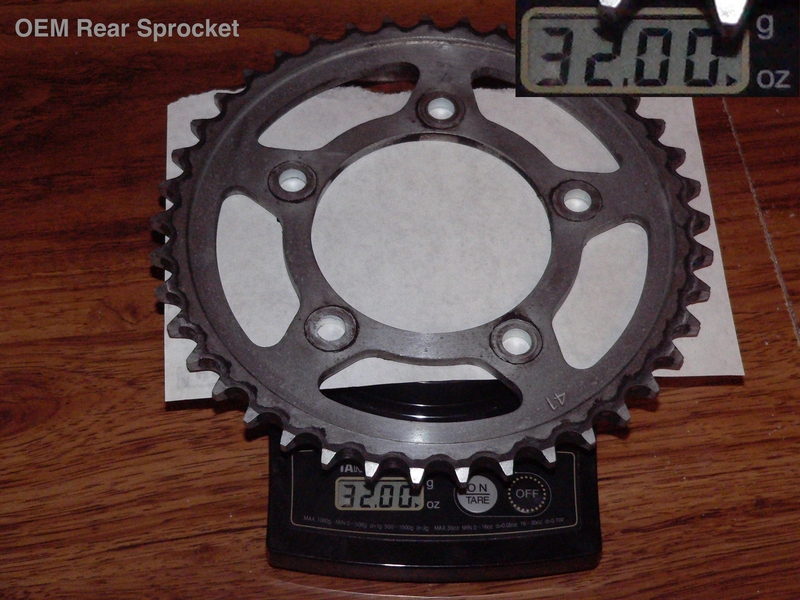
OEM Sprocket nuts: 1.55 oz

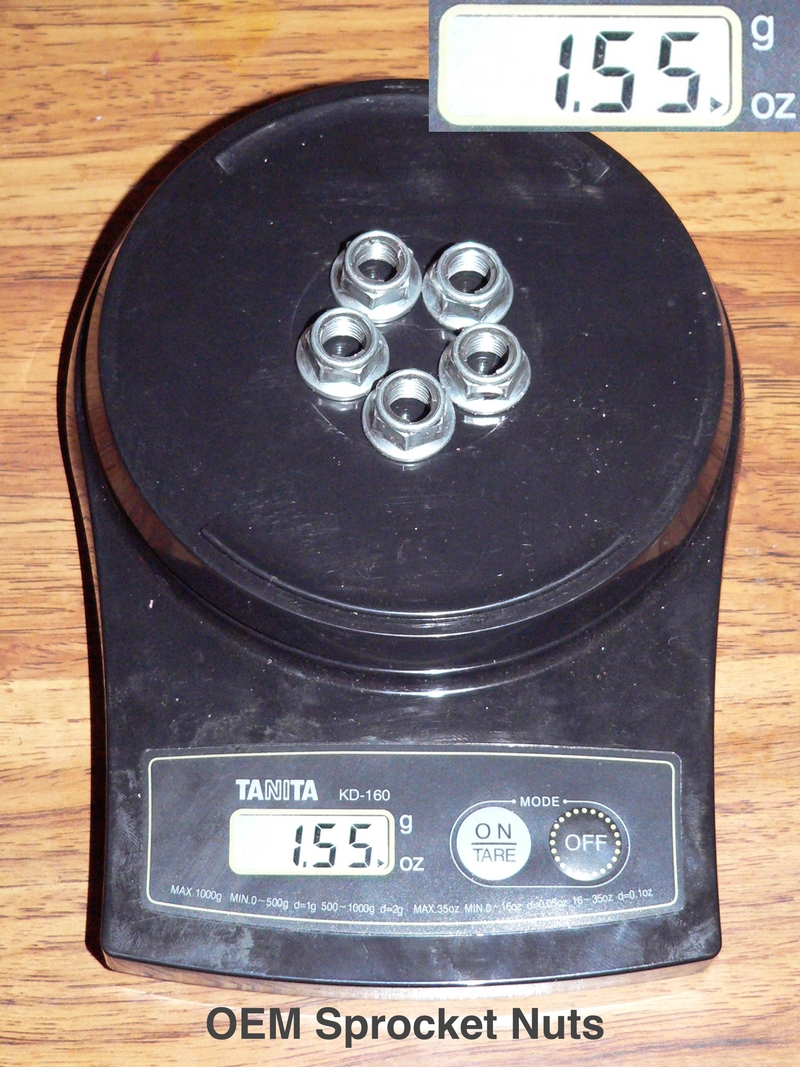
OEM Drive Chain: 5 lb, 10.3 oz (1.5568oz/link) -I forgot to include the removed pins so that probably puts it another half oz heavier.

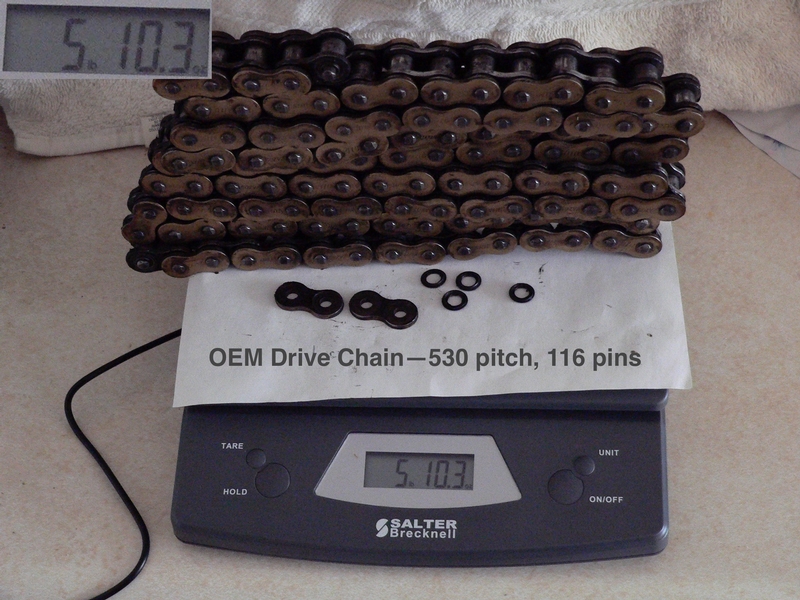
Total OEM Chain and Sprockets weight: 8 lb, 8.15 oz

SuperSprox 17 T Countershaft Sprocket: 9.75 oz

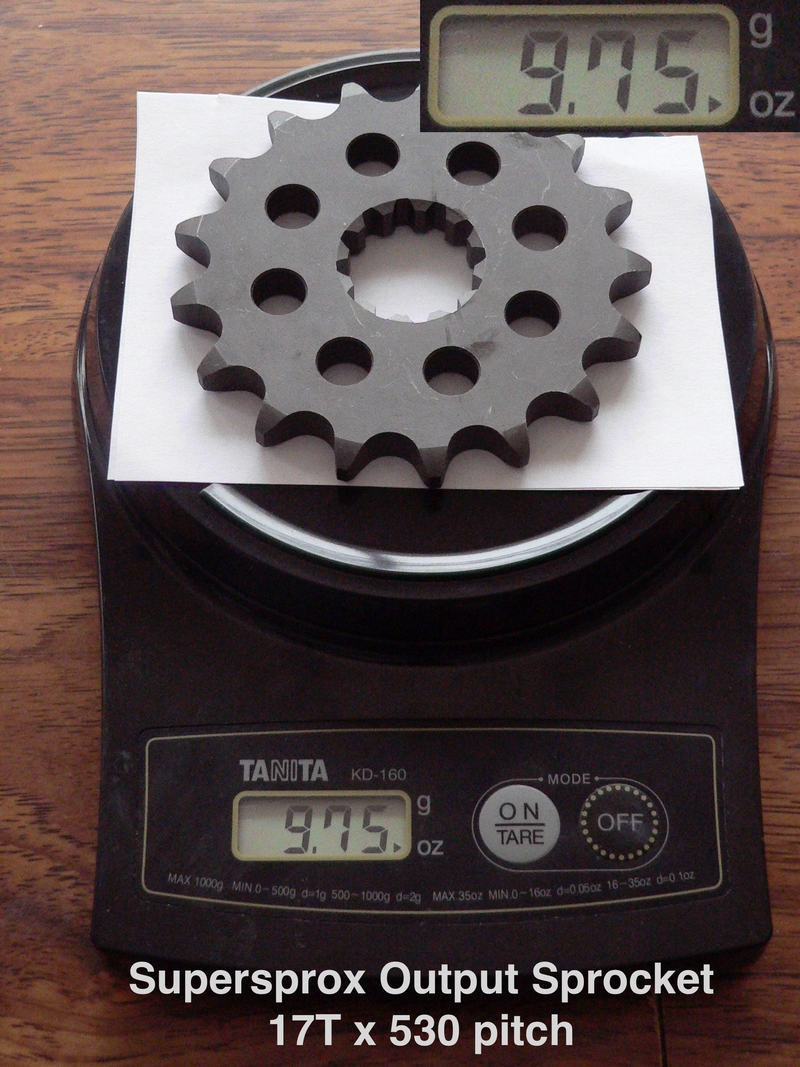
Vortex Aluminum 45 T Rear Sprocket: 1 lb, 3.3 oz +4 teeth and still a little more than half the weight of OEM.

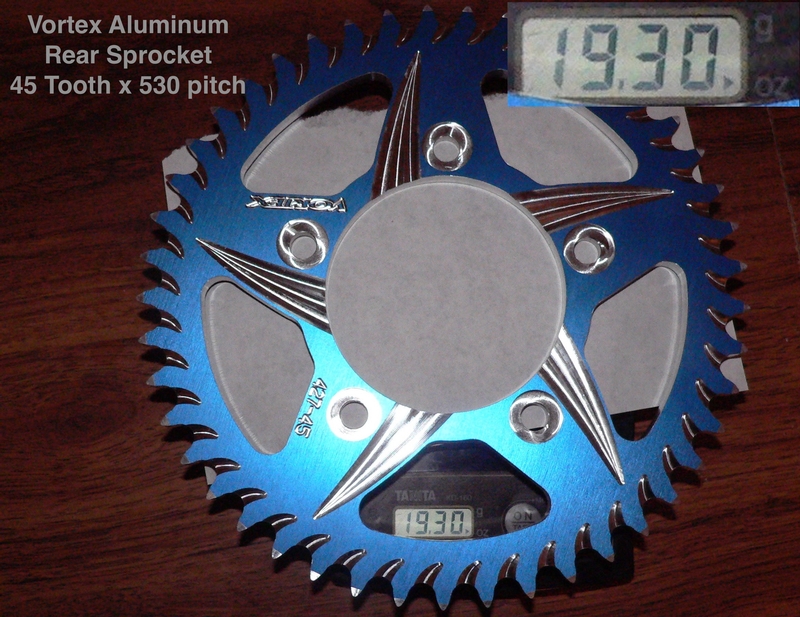
Pro-Bolt Aluminum Sprocket Nuts with Steel Helicoil Threads: 1.05 oz

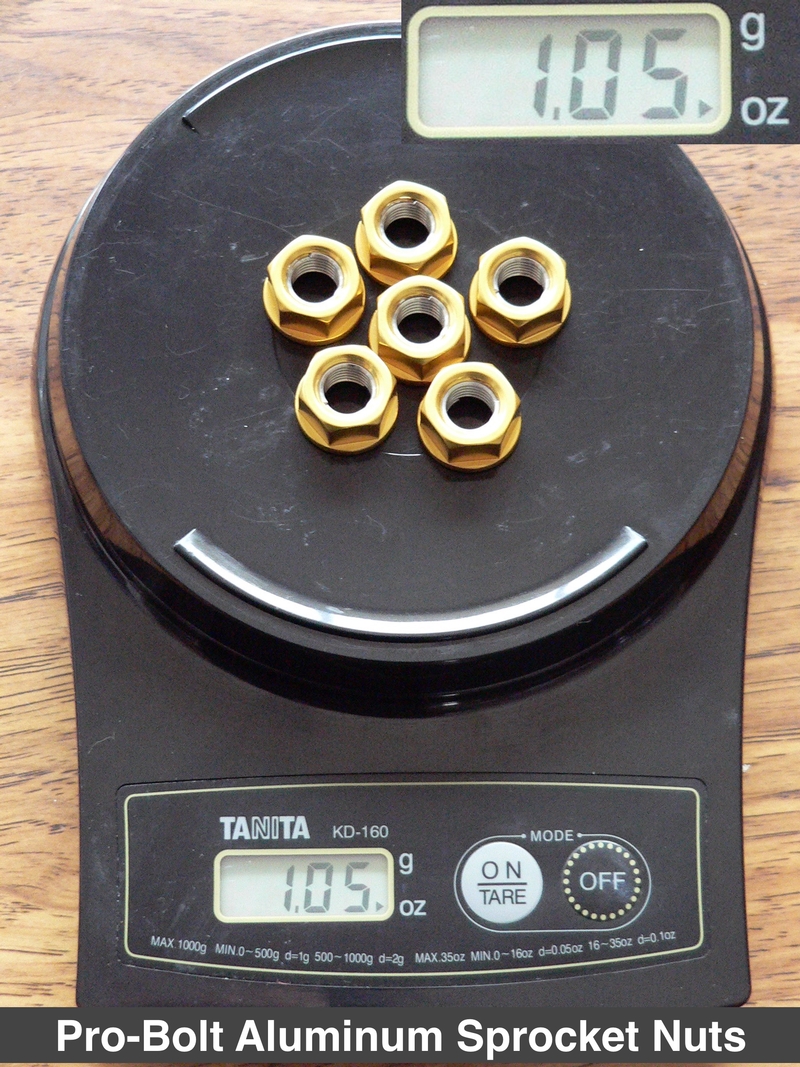
EK ZZZ Drive Chain with one extra link: 5 lbs, 11.9 oz (1.5576 oz/link) — The EK chain is a tiny bit lighter than the OEM chain but a lot stronger.


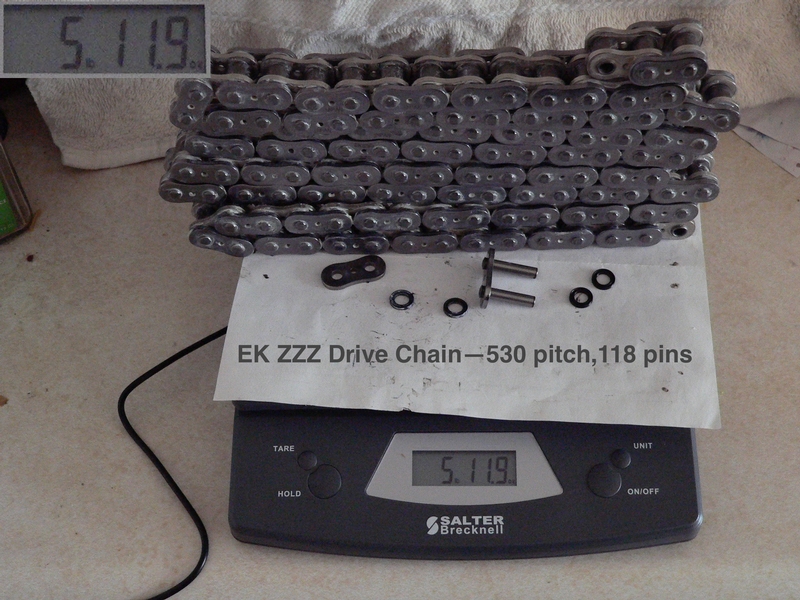
Total Aftermarket Chain and Sprockets weight: 7 lb, 10 oz

Net Weight Loss: 14.15 oz of rotating mass.


* Last updated by: Rook on 2/23/2018 @ 11:14 PM *


'08 MIDNIGHT SAPPHIRE BLUE Now Deceased

Link | Top | Bottom

Grn14


Grn14's Gravatar

Location: Montana

Joined: 02/25/09

Posts: 15511

RE: Sprocket/Drive Chain Replacement
03/24/11 10:56 PM

WRONG...NOT DONE!!!!You didn't take er for a test ride my man!!!!!EXCELLENT WRITE UP>>>great clear instructions....perfect pics!Way to go Rookster...you should be working at Kawasaki!!


I really couldn't add anything useful to what you have layed out there...perfecto....ONLY THIS...Pump rear brake BEFORE moving off.I surprised the shi^ outta myself by forgetting that(not only me,but the mechanic didn't do it either!)

Again Bro...you did excellent!This post is gonna really help alot of owners here and elsewhere.Kawasaki Service Manual....updated by...the ROOKSTER!!!

Now...how bout some instructions for removing upper cowl,stuff like that?


* Last updated by: blue07 on 3/24/2011 @ 11:04 PM *

Link | Top | Bottom

Rook


Rook's Gravatar

Joined: 03/28/09

Posts: 20579

RE: Sprocket/Drive Chain Replacement
03/25/11 12:05 AM

Can't wait for the test ride and thanks for the reminder to pump the brakes up.

Upper cowl? I have been thinking about doing a total fairings removal how-to.. Have to see what we already have here on that--might already be covered. Have a Fuel tank removal started and a SpeedoHealer install too.

Thanks for the kind words, blue. I see there are a couple typos--I wrote "sprocket" instead of "SOCKET" at least once and I see I need to go back and check the exact size of a couple tools that are named but should give the right idea.

Just really have to warn everyone about tipping the bike when they do this. Gotta be very careful and slowly feel what is happening--especially when reefing on the back wheel area. I don't know if it is such a great idea to have someone sit on the bike. Pick someone other than your wife if you do. LOL If you're going top tip the bike over, this will be the time you are going to do it. I came close once and I think that taught me my lesson.


* Last updated by: Rook on 2/23/2018 @ 11:01 PM *


'08 MIDNIGHT SAPPHIRE BLUE Now Deceased

Link | Top | Bottom

Grn14


Grn14's Gravatar

Location: Montana

Joined: 02/25/09

Posts: 15511

RE: Sprocket/Drive Chain Replacement
03/25/11 12:45 AM

Ya...it's EASY to do on those rear stands.I always break the axle nut loose on the kickstand.And that sprocket nut...sometimes,I'll use the kickstand deal,but once you've removed that nut,then next time,she's normally easier to break loose...so I generally keep er on a rear stand,and pay extreme attention.Awesome stuff Rook...truly a great add on to this forum!

BTW...have been gettin some nice Vids with my HD Hero.Better still to come...when it's a tad warmer and there's NO danger of slick stuff.My bike is rippin as usual...every year she seems to run better.Baby wheelies WAY more now than ever before...probably just me gettin more used to her(or gettin stupider...IDK).She'll begin to loft nicely in second when rollin on the fuel hard.Haven't tried 3rd yet...Just gotta get my throttle down some more...for the landings.Once she passes a certain point rpm wise,the loft is pretty friggin strong and quick.Catch me offguard sometimes!!!


* Last updated by: blue07 on 3/25/2011 @ 12:50 AM *

Link | Top | Bottom

Brenny


Brenny's Gravatar

Location:

Perth, Western Australia

Joined: 02/14/11

Posts: 143

RE: Sprocket/Drive Chain Replacement
03/26/11 9:35 PM

That's really impressive Rook, I do this sort of stuff for work (write technical instructions) and I can appreciate just how much work and effort have gone into this post-------Two thumbs up!!


* Last updated by: Brenny on 3/26/2011 @ 9:35 PM *


"Life begins when you get one"

Link | Top | Bottom

Rook


Rook's Gravatar

Joined: 03/28/09

Posts: 20579

RE: Sprocket/Drive Chain Replacement
03/29/11 11:38 AM

Thanks Brenny, I enjoy doing this sort of thing but I am positive that in reality, it is not ever possible to rely as heavily on photos as I have. Probably pretty unusual to detail a relativly uncomplicated procedure as I have done. It looks a lot more difficult than it is because of the volume of info but my thinking is that for a first timer, this is about as close as can be gotten to delivering everything that you will come up against. No surprises. For a wrencher with only some experience like I have, this is really a job to devote a weekend to. I think this might save it from stretching over to the following weekend. I know how that goes. However, best policy is "DON"T RUSH IT" --IMO.


* Last updated by: Rook on 3/29/2011 @ 11:39 AM *


'08 MIDNIGHT SAPPHIRE BLUE Now Deceased

Link | Top | Bottom

Grn14


Grn14's Gravatar

Location: Montana

Joined: 02/25/09

Posts: 15511

RE: Sprocket/Drive Chain Replacement
03/29/11 3:23 PM

The pics and descriptions are excellent.WAY more informative than the service manual IMO."Uncomplicated"...well...personally,I'd say it really IS quite complicated to do what you did..the maintenance thing there and sprocket/chain switch.That job is certainly not for someone that only wants to ride and never work on their bike.LOTS can go wrong.Everytime I go ride...I find myself thinking "this aint no toy".Sounds silly I know.But my bike is so darn reliable I can forget sometimes how everything has to be working okay and together and hanging in there through all the different scenarios I put mine through.Anyone thinking these "rice burners" are somehow cheap..cheaply made...is kidding themselves.

Link | Top | Bottom

Rook


Rook's Gravatar

Joined: 03/28/09

Posts: 20579

RE: Sprocket/Drive Chain Replacement
03/29/11 5:45 PM

+1 on that. I guess if a guy cleans his chain and lubes and changes oil adjusts all the stuff that can be adjusted, installs a PVC and exhaust all the basics---this would be something to take on----if you have interest. It's not like cracking the engine case open but yes, things can go wrong. Anyone who is considering doing the work, just read the whole tutorial and estimate time generously. then double your estimate and that is really about how long it will take. That seems to be an accurate way to estimate time on things I am unfamiliar with.


'08 MIDNIGHT SAPPHIRE BLUE Now Deceased

Link | Top | Bottom

Rook


Rook's Gravatar

Joined: 03/28/09

Posts: 20579

RE: Sprocket/Drive Chain Replacement
04/07/11 7:21 PM

Had no clutch. I never lost any gfluid but something must have happened during the clutch slaave cylinder removal allowed some air in or something? I bled the clutch at the slave and the master cylinder. All went back to perfect. Clutch works good now.

Have not had the 14 on the road but have to say the 45 T doesn't make the bike feel a lot dif than stock --at least not at the mild rpm I have run in the driveway at. She still seems to be asking for a little gas rolling at an idle. I was sort of expecting she would almost take off with no throttle applied. Be interesting to find out how she feels at higher rpm.


'08 MIDNIGHT SAPPHIRE BLUE Now Deceased

Link | Top | Bottom

SnuffyZX


SnuffyZX's Gravatar

Location: New York City

Joined: 03/16/09

Posts: 1080

RE: Sprocket/Drive Chain Replacement
04/07/11 8:39 PM

WoW Rook

Great write right up as usual, Thanks for all the info You post on this sight it really helps me out when I wanna learn how to do my own work on my bike so I can avoid going to the stealership. It was your post on how to install a PC5 that gave me the info to remove my gas tank and remove the flies last week. Keep up the great work it is very much apprieciated.

Snuffy


2012 Golden Blazed Green SE
Brocks Titanium Alloy CT Dual's
CBLASTED!
Brocks Ohlins Steering Dampner
Ohlins KA544 Rear Shock
MRA Touring Windscreen
Power Bronze Hugger
Muzzy Fender Eliminator
DDM 55w HID's
COX Radiator Guard
Clear Alternatives Intergrated Tailight
HyperLight Flashing Brake lights
Radar/Laser Detection & GPS with Radar Screamer


2007 Candy Plasma Blue (Retired)

Link | Top | Bottom

Rook


Rook's Gravatar

Joined: 03/28/09

Posts: 20579

RE: Sprocket/Drive Chain Replacement
04/07/11 10:58 PM

Hey cool. Thanks, Snuff. Always let me know if when there is something you see that might need to be changed. PM would work best because I will definitely see that. I'm not much more than a beginner myself----but that is how I try to write this stuff, from one beginner to another.


'08 MIDNIGHT SAPPHIRE BLUE Now Deceased

Link | Top | Bottom

COOTER


COOTER's Gravatar

Location:

South West Florida

Joined: 04/27/11

Posts: 1342

RE: Sprocket/Drive Chain Replacement
05/17/11 2:17 AM

Thanks Rook just did this over the weekend looked over your how-to before i started very helpfull.


Team panda (ride safe ride sober)

Link | Top | Bottom

Edgecrusher


Edgecrusher's Gravatar

Joined: 02/22/11

Posts: 1272

RE: Sprocket/Drive Chain Replacement
05/27/11 6:59 AM

Rook, I'm shopping for a new setup due to sharktoothing of OEM. So far do you think the Vortex sprocket was worth it from a longevity stand point? That's all I'm really worried about. You can't argue with the 15K miles I've got on the original chain and sprocks!
Your ratio for the 17/45 is .37 and stock is .39 which isn't too radical. If you were to do the 16/45 it'd be a more progressive .35 which I'd think would be quite different. So now that you've been riding on it what do you think about the 17/45? I like the stock gearing for the most part but would like to make power wheelies in second a little more effortless than they already are. And I'll never use all the top-end of the stock gearing anyways. Hopefully I can get my parts ordered soon. Anything you'd do different?


RIP 08 Special ED ZX-14
2004 Electra-Glide Classic Peace Officer Black, Rineheart true-duals, HID with Hella headlight bucket, Goodridge SS brake lines, saving for DJ PowerVision FI controller and K&N large cap. kit.
2004 Suzuki Katana 750 (wife's but doesn't ride anymore) (fo sale), Hindle exhaust, K&N air, Dark metallic blue w/ blue led accent lighting.
1983 Suzuki GS750ES under construction(perpetually)

Link | Top | Bottom

Grn14


Grn14's Gravatar

Location: Montana

Joined: 02/25/09

Posts: 15511

RE: Sprocket/Drive Chain Replacement
05/27/11 12:23 PM

"power wheelies in second a little less effortless than they already are"....you wicked wicked monkey.

Link | Top | Bottom

Rook


Rook's Gravatar

Joined: 03/28/09

Posts: 20579

RE: Sprocket/Drive Chain Replacement
05/27/11 11:37 PM

Anything you'd do different?

Only ting I would have done different is to go with a shorter chain. I left mine as long as possible because I thought the extra wheel base might be beneficial controlling the extra power. the extra 1/2" wheelbase not needed or desireable for much of my riding. I can salways cut a bit out and reconnect with a new master link.

I think the choice to stick to a 17 T front was a good decision because it will be possible to switch over to stock gearing if I want. So far, I do not think I will do that until next sprocket change maybe. The increase in rpm is not huge. The additional ;power is there. It is less controllable close/open throttle but not at all unmanageable. I'm sure you will get your second gear wheelie every time. I have gotten a little bit vertical in third for a moment on the stock gearing so I imagine that will be more of an occurrence.

Still a little chicken sht to go crazy as I did last summer. No first gear WOT. I think the upcomming track day will be a better place to relax and explore the 45T potential.

Have seen no teeth missing yet in 1500 miles. Have not been riding as agressive as previous year, though.

I see no change in shape of teeth but there is a blackish film that covers the chain. I think tht is aluminum dust from sprocket ware. WTF? a sprocket costs 70$. There is nothing to worry about. You no like, replace it>


'08 MIDNIGHT SAPPHIRE BLUE Now Deceased

Link | Top | Bottom

conneaut14


conneaut14's Gravatar

Location: Conneaut, OH

Joined: 04/05/09

Posts: 418

RE: Sprocket/Drive Chain Replacement
05/29/11 6:27 AM

Hey Rook thanks for the write up.
I followed this and changed my chain and sprockets but when removing the cover I only removed the long bolt in the slave cylinder and left the other ones so the slave cylinder remained attached to the cover. Did not lose any fluid and clutch works great.


2009 Victory Vision Tour Premium
www.ohioriders.net

Link | Top | Bottom

Rook


Rook's Gravatar

Joined: 03/28/09

Posts: 20579

RE: Sprocket/Drive Chain Replacement
05/29/11 10:03 PM

^^Thanks for letting me know about that time /hassle saver, conneaut14. Only thing, then you have the whole cover hanging there but that should not hurt. Could wire it so it does not hang on hose if that is a concern.

I would go back and edit this valuable tip in but at this point, I'm not about to redo pics. Thanks. Next time I will have to try that.

With your method, I think you would still get air in the clutch if the lever was pulled. That was the mistake I made and the reason I had to bleed clutch.


* Last updated by: Rook on 5/29/2011 @ 10:07 PM *


'08 MIDNIGHT SAPPHIRE BLUE Now Deceased

Link | Top | Bottom

conneaut14


conneaut14's Gravatar

Location: Conneaut, OH

Joined: 04/05/09

Posts: 418

RE: Sprocket/Drive Chain Replacement
05/30/11 5:53 AM

Yes the cover does hang right there I wrapped a couple rags around it and tied it back.
Thanks again for your write ups they are a life saver


2009 Victory Vision Tour Premium
www.ohioriders.net

Link | Top | Bottom

Edgecrusher


Edgecrusher's Gravatar

Joined: 02/22/11

Posts: 1272

RE: Sprocket/Drive Chain Replacement
06/09/11 6:30 PM

Holy SHmoly! I just had a breaker bar with four foot of pipe on it to turn the front sprock nut and it didn't budge! The bike was strapped down and was still leaning halfway over I was pushing so hard. Ridiculous for a nut with a lock washer behind it to be this tight.

There's no chance it's reverse threaded is there? Well the 27MM part of the nut is wasted. Now I have to buy a 34 and 35 and make the outside of the nut work. Is there some reason why they couldn't make some deeper damn shoulders on that thing? I am really pissed about this fuggin engineering BS. SOOOOO PISSED!!!


RIP 08 Special ED ZX-14
2004 Electra-Glide Classic Peace Officer Black, Rineheart true-duals, HID with Hella headlight bucket, Goodridge SS brake lines, saving for DJ PowerVision FI controller and K&N large cap. kit.
2004 Suzuki Katana 750 (wife's but doesn't ride anymore) (fo sale), Hindle exhaust, K&N air, Dark metallic blue w/ blue led accent lighting.
1983 Suzuki GS750ES under construction(perpetually)

Link | Top | Bottom

Rook


Rook's Gravatar

Joined: 03/28/09

Posts: 20579

RE: Sprocket/Drive Chain Replacement
06/09/11 9:52 PM

It is not reverse thread. I would have definitely noted that Crush. Lots of others have had trouble getting this thing off. An impact wrench is the last expedient. get a big one.


'08 MIDNIGHT SAPPHIRE BLUE Now Deceased

Link | Top | Bottom

Hub


Hub's Gravatar

Joined: 02/05/09

Posts: 13709

RE: Sprocket/Drive Chain Replacement
06/09/11 10:10 PM

You no make ha wise crack, roundeye. We make ha special tool. Around engineeroom, we call you west torn fools! Tore off our parts? Hee-Hee << Here is Kruz watching this.

You get a crack wise guy now you sancho pee ya! Pea ye be picking up more tools? How about an air gun like zipithe fug off!

Hammer a socket on that and air it off. Buy a new nut or you'll be splitting or disc cutting it down the middle to crack it open like an egg.


Tormenting the motorcycling community one post at a time

Link | Top | Bottom

COOTER


COOTER's Gravatar

Location:

South West Florida

Joined: 04/27/11

Posts: 1342

RE: Sprocket/Drive Chain Replacement
06/09/11 11:13 PM

I had to use my impact gun they put that nut on tight as hell but I could not get a bar in there to hold the tire so I used the break just try not to get to frustrated that’s when you break sh!t.


Team panda (ride safe ride sober)

Link | Top | Bottom

Edgecrusher


Edgecrusher's Gravatar

Joined: 02/22/11

Posts: 1272

RE: Sprocket/Drive Chain Replacement
06/10/11 5:12 AM

Yeah my high power impact didn't even touch it. I even had to put a mark on the washer and nut just because I couldn't believe they weren't moving at all. Used a torch a bit too. Ridiculous I tell you. I might just go to a shop and pay for them to loosen it up and put it back on till I can order a new $25 nut,lol. Tell me they didn't know that nut was a joke when they mark it up like that? Good thing is I didn't cut the chain yet so if I put everything back together I can ride it. Today I'll be looking for some better sockets...


RIP 08 Special ED ZX-14
2004 Electra-Glide Classic Peace Officer Black, Rineheart true-duals, HID with Hella headlight bucket, Goodridge SS brake lines, saving for DJ PowerVision FI controller and K&N large cap. kit.
2004 Suzuki Katana 750 (wife's but doesn't ride anymore) (fo sale), Hindle exhaust, K&N air, Dark metallic blue w/ blue led accent lighting.
1983 Suzuki GS750ES under construction(perpetually)

Link | Top | Bottom

Edgecrusher


Edgecrusher's Gravatar

Joined: 02/22/11

Posts: 1272

RE: Sprocket/Drive Chain Replacement
06/11/11 8:31 PM

Ok bought a 600lb impact. didn't budge. today bought a 800 lb 3/4" impact. No budge. I don't know how you can get this thing so tight. From the factory like this. I don't know what to do now? Take it to a dealer I guess and let them strip the nut.


RIP 08 Special ED ZX-14
2004 Electra-Glide Classic Peace Officer Black, Rineheart true-duals, HID with Hella headlight bucket, Goodridge SS brake lines, saving for DJ PowerVision FI controller and K&N large cap. kit.
2004 Suzuki Katana 750 (wife's but doesn't ride anymore) (fo sale), Hindle exhaust, K&N air, Dark metallic blue w/ blue led accent lighting.
1983 Suzuki GS750ES under construction(perpetually)

Link | Top | Bottom

Hub


Hub's Gravatar

Joined: 02/05/09

Posts: 13709

RE: Sprocket/Drive Chain Replacement
06/12/11 6:54 AM

As long as that nut can stay locked in the socket, heat the nut and spin it in N. That will melt the locker some and goo it off; now try again.

1. Expands the nut is one.
2. Can tumble that locker with the nut threads farther away.
3. Free wheel the back wheel in N so that shock can slide on the brake discs.
4. Set some rubber hammer end under the back brake so it locks it down.
5. You don't want to load the chain on two pins [one on each end] of the rungs all locked but can move not bend a pin.
6. You don't want it in gear because it runs all the way up the gear shaft, the other shaft, clutch basket, crank tooth to tooth.
7. See that trail of damage you using 1st gear?
8. Hold and air hammer on @ 100psi. If the pump comes on, stop hammering. Let the tank fill and stop. Meanwhile;
9. Propane more heat on the nut as the air tank catches up.
10. Stop giving up! You're almost there.


Tormenting the motorcycling community one post at a time

Link | Top | Bottom


Welcome to zx14ninjaform.com!
 
New Topic Reply
Next Page

Page: 1 2 3 4

Previous Page

New Post

Please login to post a response.