Move Close
Welcome to zx14ninjaform.com!

You are not logged in.
New Topic Reply
Next Page

Page: 1 2 3 4

Previous Page

Thread: Sprocket/Drive Chain Replacement

Created on: 03/24/11 10:03 PM

Replies: 98

06BlueZX14


06BlueZX14's Gravatar

Location: SoCal

Joined: 04/02/09

Posts: 258

RE: Sprocket/Drive Chain Replacement
03/31/14 8:10 PM

I tried a piece of pipe through the wheel and bent the pipe in half.
Then wrapped a piece of 1/2" flatbar in a rag and tried with 3 foot breaker bar.....chipped the wheel powdercoating.

Impact it is.......


2007 Kawasaki ZX-14
2006 Kawasaki ZX-14
2005 Yamaha Vmax
2005 Yamaha R1
2003 Kawasaki EX250
1992 Yamaha FZR
1986 Yamaha Radian
1986 Yamaha Vmax
1978 Honda Gold Wing

Link | Top | Bottom

Rook


Rook's Gravatar

Joined: 03/28/09

Posts: 20579

RE: Sprocket/Drive Chain Replacement
03/31/14 10:17 PM

I think it's better to grind the pins down until you can pry the outer plate off with a screwdriver when removing an old chain rather than using the riveting tool to press the old link out.

I did both. Grind pin heads, press out with chain breaker.

also cycle gear has a sale going on right now omn a chain breaker/rivet kit, says its regular $89, on sale for $29. snagged one up to do the rivets. http://www.cyclegear.com/CycleGear/Accessories/Tools/Multi-Tools/brand/STOCKTON-TOOL-COMPANY/Chain-Breaker-and-Rivet-Tool-Kit/p/36518_00000

I did some questioning at Bikelend and here about what tool to buy for chain rivetting. There were more than a few that told me those smaller rivetters break too easily. That will probably work for rivetting but I'd be very careful about pressing out the old pins. Go with the grinder and screw driver if it feels like you are stressing the tool too much. I got a BIG ol chain tool. I thnk it cost me about 200 but I have seen similar tools for less. Should last a lifetime.

I tried a piece of pipe through the wheel and bent the pipe in half.
Then wrapped a piece of 1/2" flatbar in a rag and tried with 3 foot breaker bar.....chipped the wheel powdercoating.
Impact it is.......
+1 on that! If a 24" won't do it and your lifting the bike up with it, I'd toss that aside and get an impact. Still try the bar through the wheel though---or maybe hang weight off the rear brake lever. I'd rather not twist against the engine that hard with the bike in gear. Damn, that would turn the engine definitely and move the bike. forget it. use an impact.


'08 MIDNIGHT SAPPHIRE BLUE Now Deceased

Link | Top | Bottom

redimp


redimp's Gravatar

Joined: 05/21/14

Posts: 15

RE: Sprocket/Drive Chain Replacement
07/15/14 7:19 PM

I'm going through this now, have sprayed penetrant lube, impact gun, breaker bar and still no go so I came here for ideas.

Rook what I have found easy for safe force application so far is standing on the peg/rear brake pedal and leaning over the bike to pull up the breaker bar and turn the nut. This way the force you are applying is between the bike itself and the nut rather than between the ground and the nut. I hope that makes sense.

Going to try the heat trick next, if still not working I might go buy a 35mm socket and try the outer nut for more torque and less nut stripping.

Link | Top | Bottom

Grn14


Grn14's Gravatar

Location: Montana

Joined: 02/25/09

Posts: 15511

RE: Sprocket/Drive Chain Replacement
07/15/14 9:09 PM

Here's my solution...put NOTHING into those wheel spokes...they're not for levering anything.Get her on a rear stand...put in first.Use a large(LARGE)electric impact wrench....200+foot lbs at least.Get the CORRECT socket!!!!Roll rear wheel forward till she stops in first.Employ impact wrench....One short hard hit.(make sure the washer edges are COMPLETELY flat against the housing.Hit that impact again.And again...short bursts.Then hit her hard and hold....she WILL break free.After you've assembled everything back up...tighten that nut with the impact just TILL IT STOPS...DO NOT KEEP IT TIGHTENING.Fold washer back up.Now...next time she'll break free much easier.NO breaker bars.If it breaks loose with that...you'll likely hit the bodywork....(if your force is counterclockwise going downwards)


The impact is the way to go IMO.I have a Kobalt gun...the big one.You'll need to buy separately the socket however.


You'll need to be VERY aware when using the gun that you don't push the bike over trying to get that socket to stay on the nut...it will take some muscle to keep it on there while trying to loosen.You will have to put your back into it...


* Last updated by: Grn14 on 7/15/2014 @ 9:18 PM *

Link | Top | Bottom

redimp


redimp's Gravatar

Joined: 05/21/14

Posts: 15

RE: Sprocket/Drive Chain Replacement
07/15/14 10:48 PM

My impact gun goes up to 310 Nm (228 ft-lb), it's only a cheap one though. I checked out some other 1/2" drive guns that will do nearly 4x the torque of this thing but they are $250, pretty expensive to remove a single nut. I have already ordered brand new nut and washer to replace with so I will definitely get that thing off one way or another.

I have also unsuccessfully tried snap freezing to -42°C. Borrowing a friends impact driver to try out, here's hoping...

Link | Top | Bottom

redimp


redimp's Gravatar

Joined: 05/21/14

Posts: 15

RE: Sprocket/Drive Chain Replacement
07/15/14 11:39 PM

Well, my friends impact gun definitely has more punch than mine, but alas it still did not budge.

I even put a 5 foot pipe over my breaker bar but can't hold enough rear brake to put full force in and it still won't budge.

I've tried punching the corners of the nut a little bit but don't want to go too crazy with that because of the associated risk to the gearbox and output shaft itself.

I'm almost out of ideas to actually twist the nut off and retain the quality of the nut itself, any suggestions for the cleanest way to cut or otherwise remove the nut without damaging the output shaft or nearby equipment?

Frustration building lol, I have been all day with this stupid thing.

Link | Top | Bottom

Hub


Hub's Gravatar

Joined: 02/05/09

Posts: 13710

RE: Sprocket/Drive Chain Replacement
07/16/14 12:07 AM

Stick with the socket and gun. Follow Grn's short bursts. Yours and your buddy's impact is not powerful enough or we are not over 100psi? Wait for the air pump to stop. The short bursts are max air pressure or the pump comes on.


* Last updated by: Hub on 7/16/2014 @ 12:08 AM *


Tormenting the motorcycling community one post at a time

Link | Top | Bottom

Rook


Rook's Gravatar

Joined: 03/28/09

Posts: 20579

RE: Sprocket/Drive Chain Replacement
07/16/14 7:53 AM

.put NOTHING into those wheel spokes...they're not for levering anything.

OMG, NO! Not if you're working that hard on it. Someone else scraped the paint even with a rag over the swingarm and the wheel spoke. If the nut comes off with a breaker bar without too much force, I'd say go ahead and do the bar between teh spoke and swingarm but if it won't break free, I guess that could cause damage. I better go back and edit a little caution note on that step as soon as I get a chance.


'08 MIDNIGHT SAPPHIRE BLUE Now Deceased

Link | Top | Bottom

Grn14


Grn14's Gravatar

Location: Montana

Joined: 02/25/09

Posts: 15511

RE: Sprocket/Drive Chain Replacement
07/16/14 10:00 PM

I'm curious about the breaker bar with a socket wrench.The socket NEEDS to sit perfectly against the nut base flats...up against the washer and all...firmly throughout the loosening sequence.HOW do you possibly maintain enough inward force to stand back with a breaker bar and still have the socket tightly against the washer?This I just can't picture...I once tried the breaker bar deal....the socket would slip everytime.There's minimal height on those flats.???????


I've done the short bursts...and also longer hits to see if it made any difference...sometimes it would break free quicker holding that trigger...and sometimes the short hits worked well.With the electric gun....it needs no psi to punch it.Kobalt...this one I recommend...it's very strong and heavy.It will break any nut loose...any on this bike.


* Last updated by: Grn14 on 7/16/2014 @ 10:03 PM *

Link | Top | Bottom

Rook


Rook's Gravatar

Joined: 03/28/09

Posts: 20579

RE: Sprocket/Drive Chain Replacement
07/17/14 7:07 AM

The outer flats that take the 34~35mm are awfully short. I'd only use a wrench on those to assist a socket on the 27mm flats. The inner hex that takes the 27mm was high enough for me to use a deepwell on with no problem. The socket probably does cock a little bit when you use a levering handle but I had no problem using a brand new 6 point with a 24 inch breaker bar. My sprocket nut was not that tight but still, tight enough that I could have tilted the bike off the stand.

Looks like you could use a wrench on the large hex, one on the 27 mm, and another wrench on the square portion of the nut. Make sure the bike is braced very well and get three guys to turn on that that thing. You'll def want to replace the nut.


* Last updated by: Rook on 7/17/2014 @ 11:46 AM *


'08 MIDNIGHT SAPPHIRE BLUE Now Deceased

Link | Top | Bottom

hagrid


hagrid's Gravatar

Location: pittsburgh

Joined: 02/16/12

Posts: 2210

RE: Sprocket/Drive Chain Replacement
07/17/14 6:12 PM

Last year when I freshened my final drive I used my pappy's 3/4" drive set.

The ratchet is 36" long and an 1 3/8" is a direct equivalent to 35mm.

I'm a tad leary of using impact driven tools directly on the intermediate drive: needle bearings, precision toofs geometry, and what have you.

I put my transmission in neutral, put a tube of fours (family joke) in the spokes and pushed down. Broke loose before what I expected based upon what I've read on the interwebs.

Not knocking what's working for you guys. Just my perspective.


* Last updated by: hagrid on 7/17/2014 @ 6:14 PM *


Yoshis!! GO NINJEE!!!

Fat chicks at Wal-Mart: NOT RECOMMENDED

Link | Top | Bottom

Grn14


Grn14's Gravatar

Location: Montana

Joined: 02/25/09

Posts: 15511

RE: Sprocket/Drive Chain Replacement
07/17/14 7:24 PM

Glad that worked Hagrid...but I'm still not getting the answer to my question;)...."HOW are you guys applying enough force on the nut(inward) to be able to stand to the side(I'm guessing)and push down(or up)" on the handle?

It would seem from my trying that that it would slip off the nut everytime.

Link | Top | Bottom

hagrid


hagrid's Gravatar

Location: pittsburgh

Joined: 02/16/12

Posts: 2210

RE: Sprocket/Drive Chain Replacement
07/17/14 8:04 PM

I just placed one hand on the ratchet hade, felt for the socket solidly engaging the flats on the nut, and applied some force.

It took a lil' less oomph than a lug nut on an average passenger car from my recollection.

Granted that's using a 3' moment arm.


Yoshis!! GO NINJEE!!!

Fat chicks at Wal-Mart: NOT RECOMMENDED

Link | Top | Bottom

Hub


Hub's Gravatar

Joined: 02/05/09

Posts: 13710

RE: Sprocket/Drive Chain Replacement
07/17/14 8:36 PM

Say it goes something like this:

1. I have the socket, an extension, a breaker bar.
2. I have a long metal rod like my most stout longer screwdriver wedged over the swing arm and thru the brake and sprocket (figure it out).
3. I have my car jack under the extension. Why? Look at my leverage a perfect 90-180° L.
4. I have to vision the bar thru the top swing, locking the wheel.
5. I have my magnetic leveler sitting there at that horizontal move.
6. I have the chain about to take the least amount of tug.
7. I have my blowtorch heating up that nut and once the jack hits the 90...
8. I have to ask you to stepay way from the vehicle give me a breaker bar.


Tormenting the motorcycling community one post at a time

Link | Top | Bottom

Rook


Rook's Gravatar

Joined: 03/28/09

Posts: 20579

RE: Sprocket/Drive Chain Replacement
07/17/14 9:55 PM

."HOW are you guys applying enough force on the nut(inward) to be able to stand to the side(I'm guessing)and push down(or up)" on the handle?

It's no different than removing the rear axle nut. That's 94' lbs. The output sprocket nut is 92' lbs. Yes, the output sprocket nut seems to stick for some people but the process of removing it was no different than removing my axle nut the first time.

Place socket squarely on nut and hold counter-clockwise tension on bar to maintain square fit on flats. Turn counter-clockwise carefully watching the bike does not tip on the stand. I believe placing the breaker bar so it is more or less perpendicular to the floor would be the safest. Sure, the socket probably does have a tendency to pull the socket out of square but that is not a factor unless the the nut is exceptionally tight and then you most likely have other risks like striping the points on the nut. That's why you only use a 6 point, NEVER a 12.

3. I have my car jack under the extension. Why? Look at my leverage a perfect 90-180° L.

Its a case of axial leverage vs radial leverage. Radial is what we want. Axial does zip to turn the nut and only causes the socket to go cockeyed.

A car jack under the socket would ensure the socket stays on the nut squarely. Lever against the jack, not the nut. Adding an extension would drastically increase the axial leverage but with a jack under there, that risk is obviated and all the torque goes toward moving the nut radially. You may well need the extension to get the jack close enough to support the unwanted axial leverage.

7. I have my blowtorch heating up that nut and once the jack hits the 90...

Having no experience with this, I'd be very leery about using a blowtorch but I guess if there is no other way, that is the last expedient. What does that heat do to the metal? Are there rubber parts in there that will melt? FOr me, I'd take a grinder and cold chisel to it before a blowtorch. It would be a painstaking process to cut it off without damaging the threads on the countershaft but I'd sleep better.


* Last updated by: Rook on 7/17/2014 @ 10:07 PM *


'08 MIDNIGHT SAPPHIRE BLUE Now Deceased

Link | Top | Bottom

Hub


Hub's Gravatar

Joined: 02/05/09

Posts: 13710

RE: Sprocket/Drive Chain Replacement
07/17/14 11:29 PM

Its a case of axial leverage vs radial leverage. Radial is what we want. Axial does zip to turn the nut and only causes the socket to go cockeyed.

4. I'd have to vision...
Radius = The swing arm arch = The breaker bar.
Axis = The axle thru the swing arm = It's straight, goes nowhere at both ends. Cannot drop out of the socket. The breaker bar is at the end of the axle in the swing arm. The jack is one swing arm side short of one more jack? We get the idea of how the bike sits upright; the nut is horizontal. You are pressing down so that is going to slip off, you can't hold that kind of vertical to horizontal to the point of seeing that bubble straight vertical. You have the jack near the breaker bar the better. See it yet?

You need to show me X to Y moving off Z. Got the visual we use both The swing of the bar and the planting of a fixed axle? Oh look, the extension bar is twisting, right? So if the metal is distorted, so is that nut being distorted. It's all about the wrinkle you can't see, but the extension bar showed different.

I'd take a grinder and cold chisel to it before a blowtorch.

Rooky, this is one degree away from melting lead. We pass the flame fast around the nut. We don't cherry red it, melt the rubber, smoke the chain lube. No, we think: heat expands. We want the nut's outer heat to sink into the nut, one degree short of moving that output shaft one temp above room temp. So this expansion growth is larger than the shaft's threads. Back to simple science. The basics of the concept, if I spelled the abstract out about how much heat to apply. Make sense?


Tormenting the motorcycling community one post at a time

Link | Top | Bottom

redimp


redimp's Gravatar

Joined: 05/21/14

Posts: 15

RE: Sprocket/Drive Chain Replacement
07/18/14 2:13 AM

Well, I finally had success, borrowed the biggest 3/4" rattle gun from work (They also had a 1" drive that requires a 1" air hose and high pressure to drive it but decided to not go that length yet).

Got home from work, put bike back up on rear stand, butane torch heated outside of sprocket nut for 15 seconds, placed back foot on inside of rear wheel to keep steady and pumped the big mutha rattle gun a single time and the thing popped off in my hand.

So happy at last!

Now time to get to work actually replacing the chain and sprockets.

Thanks all for the suggestions and willingness to help, I appreciate it all!

Link | Top | Bottom

redimp


redimp's Gravatar

Joined: 05/21/14

Posts: 15

RE: Sprocket/Drive Chain Replacement
07/18/14 2:16 AM

Impact gun I had to use was 1350 ft-lbs, 1831 Nm of torque!

Link | Top | Bottom

Rook


Rook's Gravatar

Joined: 03/28/09

Posts: 20579

RE: Sprocket/Drive Chain Replacement
07/18/14 6:41 AM

So this expansion growth is larger than the shaft's threads. Back to simple science. The basics of the concept, if I spelled the abstract out about how much heat to apply. Make sense?

See, some one listens to Turdle.


* Last updated by: Rook on 7/18/2014 @ 6:43 AM *


'08 MIDNIGHT SAPPHIRE BLUE Now Deceased

Link | Top | Bottom

Grn14


Grn14's Gravatar

Location: Montana

Joined: 02/25/09

Posts: 15511

RE: Sprocket/Drive Chain Replacement
07/18/14 8:05 AM

Well...yeah...the AXLE nut has enough bite on it to allow a socket to stay in place...but that sprocket nut....that's not the same;)...but good advice here...the FIRST removal is always very hard.After that...I just take it easy on tightening...One pop with the impact...that's it.

I've been using a LARGE crescent wrench on the rear axle nut for years....works fine.Enough leverage to loosen and tighten perfectly;)


* Last updated by: Grn14 on 7/18/2014 @ 8:08 AM *

Link | Top | Bottom

viperkillertt


viperkillertt's Gravatar

Location: Spokane, WA USA

Joined: 04/08/11

Posts: 159

RE: Sprocket/Drive Chain Replacement
05/21/16 3:56 PM

Thanks Rook for the great write-up. Sadly I dropped a bolt when I had just about finished which landed between the gear and the chain guard which required me to remove the guard. Upon reinstallation of the guard, the bolt on the left side broke its head which has left me in a pickle. It was so strange because it did not even feel like it was tight. I was just using a standard socket wrench.

The former owner of the bike lost the top bolt to the guard and I have been riding it with only 2 bolts for 5 years/30k miles and so I am tempted to just use 2 bolts again instead of figuring out how to remove the broken bolt. If anyone has a recommended solution for removing the bolt, let me know. Thanks!


* Last updated by: viperkillertt on 5/21/2016 @ 4:02 PM *


2007 Black ZX-14, Flies out, Power Commander 3, Broc's 4 into 1 SS Exhaust with Titanium can, Pipercross Air Filter, SpeedoHealer v4, HID Low Beams, Stebel Air Horn, Muzzy Fan, LSL handlebar, Concours seat, front brake SS lines, Buell Ulysses pegs, Carbon Fiber Rear Fender, Throttlemeister Bar ends, and much more.

Link | Top | Bottom

Rook


Rook's Gravatar

Joined: 03/28/09

Posts: 20579

RE: Sprocket/Drive Chain Replacement
05/21/16 5:56 PM

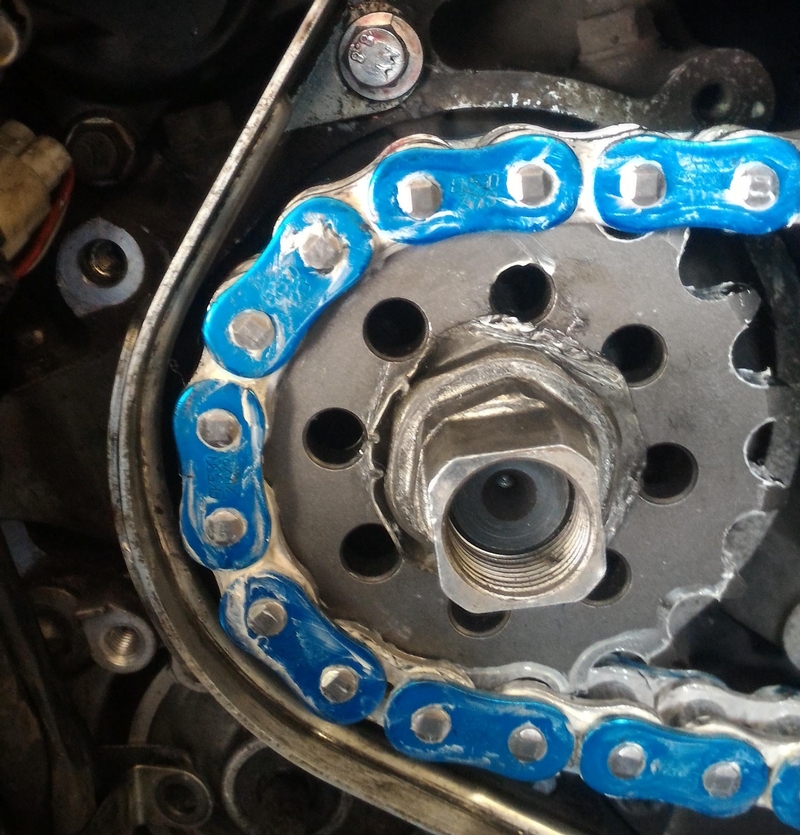
I see it. That sucks and i know how hard it sucks because the same thing happened to me installing rotor bolts in my CZ rim. I got it out by using a steel scribing tool with the point placed against an edge in the portion left in the hole. I used a hammer to tap the bolt counter clockwise. It was a lengthy process. You are in luck because the threaded portion is close to the top of the hole. Looks like there is no sharp edge to catch the point but you could try that small divot at 6 o'clock. Careful not to jab the threads in the engine case.

If that does not work, go to hardware store and try a small reverse drill bit. Tap a center punch and sometimes the bolt will spin out when the bit catches. Maybe it would be best to first drill a shallow hole to insert the reverse bit. That would keep the reverse bit from walking which it is sure to do

Or go to hardware store again and get an easy out. Probably the best way to do it if you're gonna drill anyway. The only thing that could go wrong is if you don't drill the pilot hole off center and chew up the threads in the case. Then you try a thread cleaner tap. If the threads are damaged and loose from fixing, I'm sure blue loktite would kepp the screw in. Or if you want to go all out on damaged threads, redrill and retap and go to next bigger screw.


.....or just leave the chain guard off. I did. All it does is catch flung grease.. Maybe it would prevent the chain from wrapping around the engine sprocket if it fell off the rear sprocket.

If you don't want to do it, a good mech could probably get it out for $50. Might be better to leave it fresh if this looks like it is going to be a real tough job. You don't want to futz it up for the mech by drilling off center or marring up the smooth break where they need to drill. Then it will become a big job for them.

Sorry you had this misfortune. I know what a pain it is. You'll get it out. Consider that the shop probably would have just put the chain guard back on without the bolt. or maybe not put the chain guard on and threw it in the trash.


* Last updated by: Rook on 5/21/2016 @ 6:12 PM *


'08 MIDNIGHT SAPPHIRE BLUE Now Deceased

Link | Top | Bottom

Rook


Rook's Gravatar

Joined: 03/28/09

Posts: 20579

RE: Sprocket/Drive Chain Replacement
05/21/16 5:58 PM


'08 MIDNIGHT SAPPHIRE BLUE Now Deceased

Link | Top | Bottom

Rook


Rook's Gravatar

Joined: 03/28/09

Posts: 20579

RE: Sprocket/Drive Chain Replacement
05/21/16 8:44 PM

dammit, that would be one tough lil beotch to drill. eighth inch diameter, 1/16 drill bit is probably going to be the smallest reverse bit you will find. Also not in a good spot to work with hammer and scribe. Decisions, decisions. I know how this goes. Hope your not losing sleep. Let me know what you think you might do and I probably will have some tips/ideas.

Chain looks COOL!

so I am tempted to just use 2 bolts again instead of figuring out how to remove the broken bolt.

Or do that.

Another idea: They do make threaded plugs that screw in after boring the hole larger to accept the plug. It's a threaded plug with a threaded hole. Basically, you're boring out the old odl hole and replacing it with a new chunk of metal with the right sized/pitch hole. They are by the easy outs at the HW store. That's the final solution if all else fails. There's nothing that can't be fixed. Mechanics do this stuff all the time. No big deal to a good mech.


* Last updated by: Rook on 5/21/2016 @ 8:52 PM *


'08 MIDNIGHT SAPPHIRE BLUE Now Deceased

Link | Top | Bottom

viperkillertt


viperkillertt's Gravatar

Location: Spokane, WA USA

Joined: 04/08/11

Posts: 159

RE: Sprocket/Drive Chain Replacement
05/22/16 4:31 PM

I bought an ez out, which is not very easy. I started grinding a nice center hole using my dremel but after about 20 minutes I felt that it was not worth possibly making it worse. I decided to just use 2 of the 3 bolts and put a locking washer on the top. It has been run with only 2 of the 3 bolts for the past 5 or more years and so I feel pretty safe with it. I also used red thread locker on both bolts. Anyone have thoughts about using a locking washer?


2007 Black ZX-14, Flies out, Power Commander 3, Broc's 4 into 1 SS Exhaust with Titanium can, Pipercross Air Filter, SpeedoHealer v4, HID Low Beams, Stebel Air Horn, Muzzy Fan, LSL handlebar, Concours seat, front brake SS lines, Buell Ulysses pegs, Carbon Fiber Rear Fender, Throttlemeister Bar ends, and much more.

Link | Top | Bottom


Welcome to zx14ninjaform.com!
 
New Topic Reply
Next Page

Page: 1 2 3 4

Previous Page

New Post

Please login to post a response.