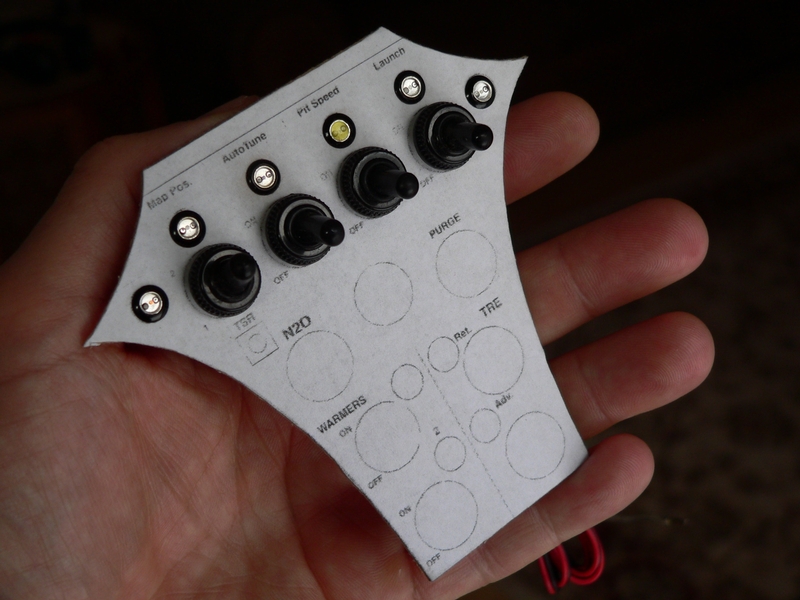
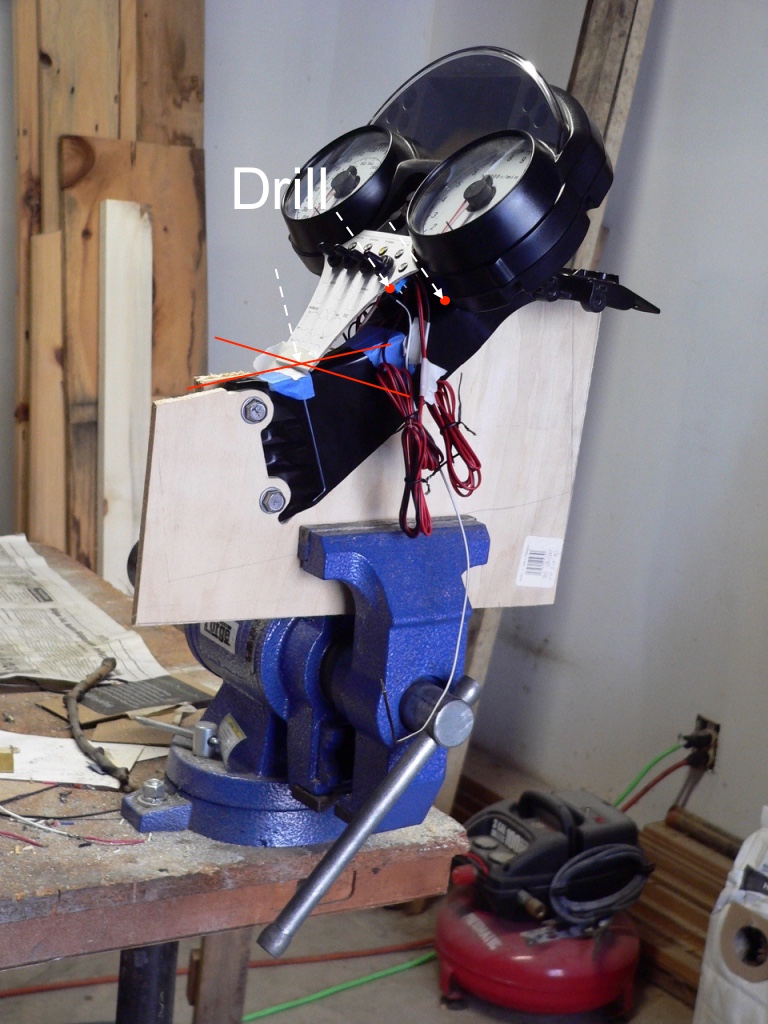
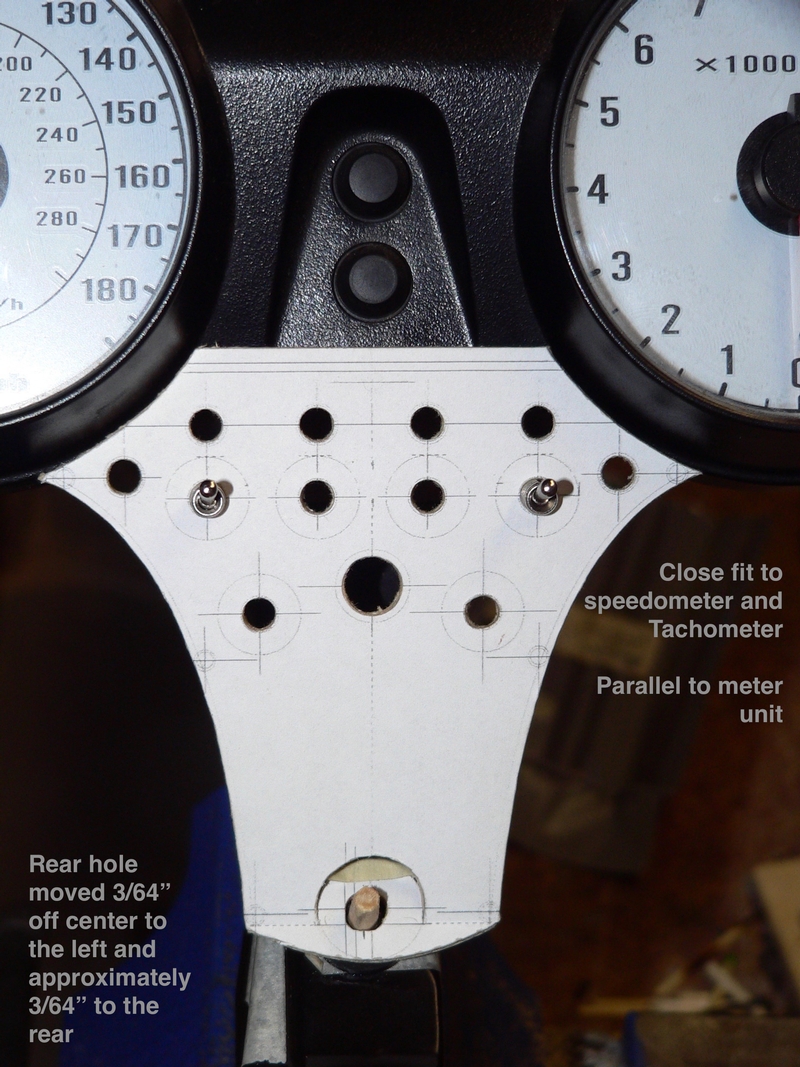
Move Close
Welcome to zx14ninjaform.com!

You are not logged in.
New Topic Reply
Next Page

Page: 1

Previous Page

Thread: COFFINLID/COFFINBOX SWITCH PANEL

Created on: 05/20/18 03:07 PM

Replies: 10

Rook


Rook's Gravatar

Joined: 03/28/09

Posts: 20589

COFFINLID/COFFINBOX SWITCH PANEL
05/20/18 3:07 PM

I sort of started talking about this last winter and it has jumped to two threads before I decided I might as well start a thread that is actually about it instead of supposed to be about something else.

Starts with my questions about switches 2/3 down this page:

Where to find REALLY small toggle switches?

Continues over to this thread about lightweight meter brackets:

LIGHTWEIGHT METER BRACKET

...in the meantime I started this thread DJ switch inputs

and ends up here where I will conclude the process of developing this thing.

Mocking up and test fitting:

The final test fit. This will probably fit a tiny bit closer to the meter bracket and meter unit once it is bolted down on rubber dampers. I have everything represented by 1/16" cardboard here and the bolts are represented by dowels RTVed to the meter bracket.

Awful damn close. The upper row of switches are for the DJ network features. The lower row of switches are supposed to be for nitrous. They clear but I'm not sure I will ride around all the time with the NOS wires hooked up. Hate to have them come on by accident. I have safety switch covers planned for the future. Also, there will be a box to cover the sides and below the switch panel someday and the ignition will be removed and replaced with a button. That will free up all the space I need for more switches!


* Last updated by: Rook on 8/3/2018 @ 6:56 PM *


'08 MIDNIGHT SAPPHIRE BLUE Now Deceased

Link | Top | Bottom

Rook


Rook's Gravatar

Joined: 03/28/09

Posts: 20589

RE: COFFINLID/COFFINBOX SWITCH PANEL
08/03/18 7:48 PM

The final test fit.

Well not exactly. Sometimes being a slowass really pays off. I discovered that the meter bracket is very asymmetrical and if you try to bolt a symmetrical thing onto it symmetrically, you're in for trouble.

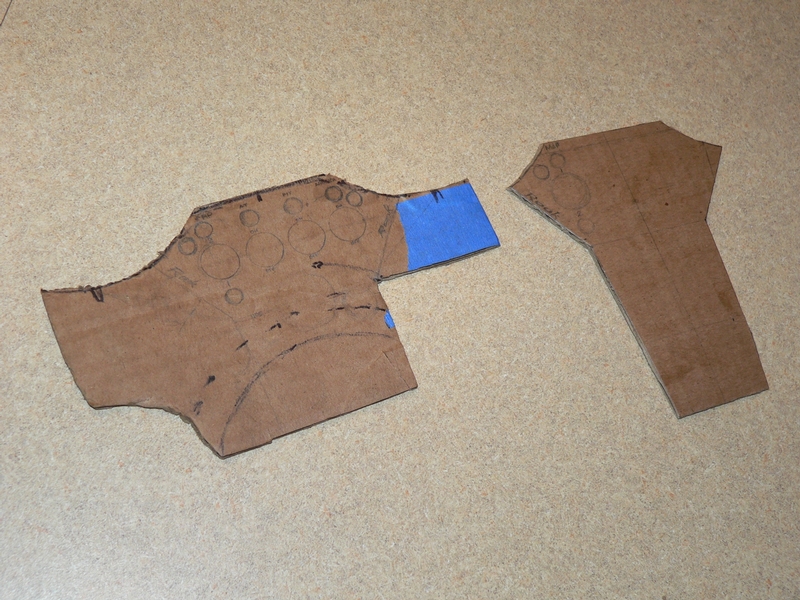
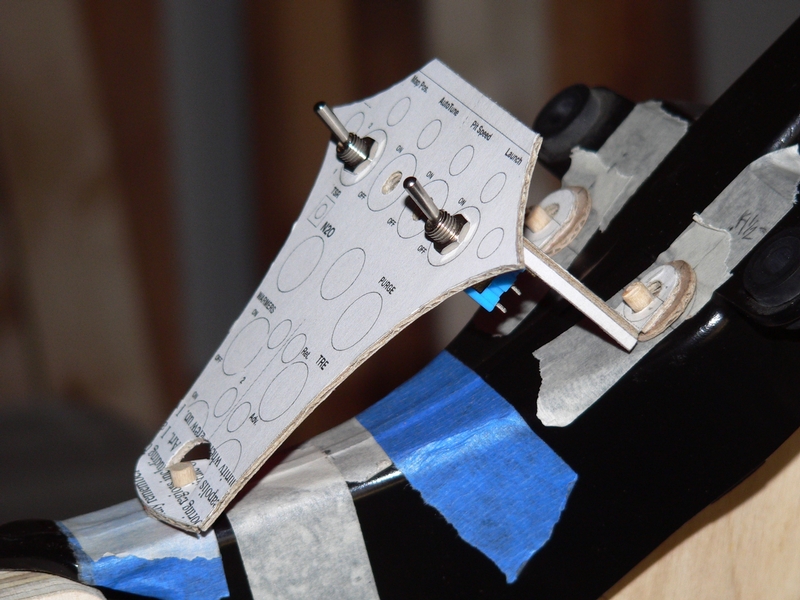
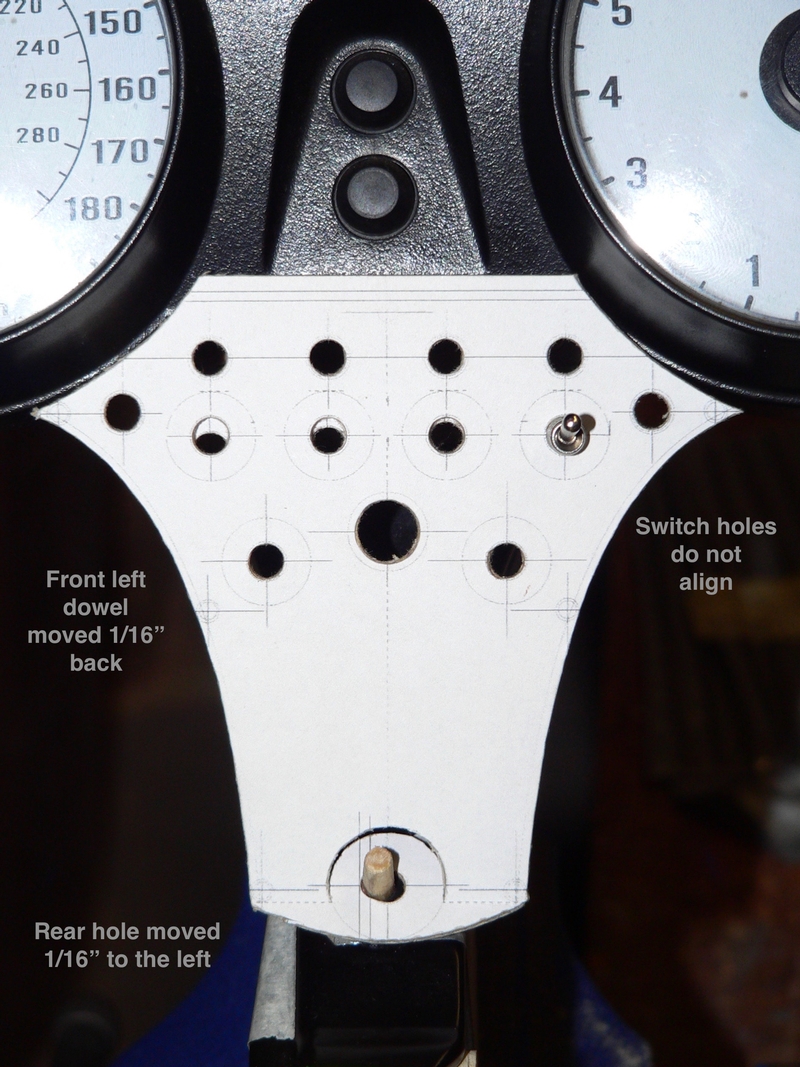
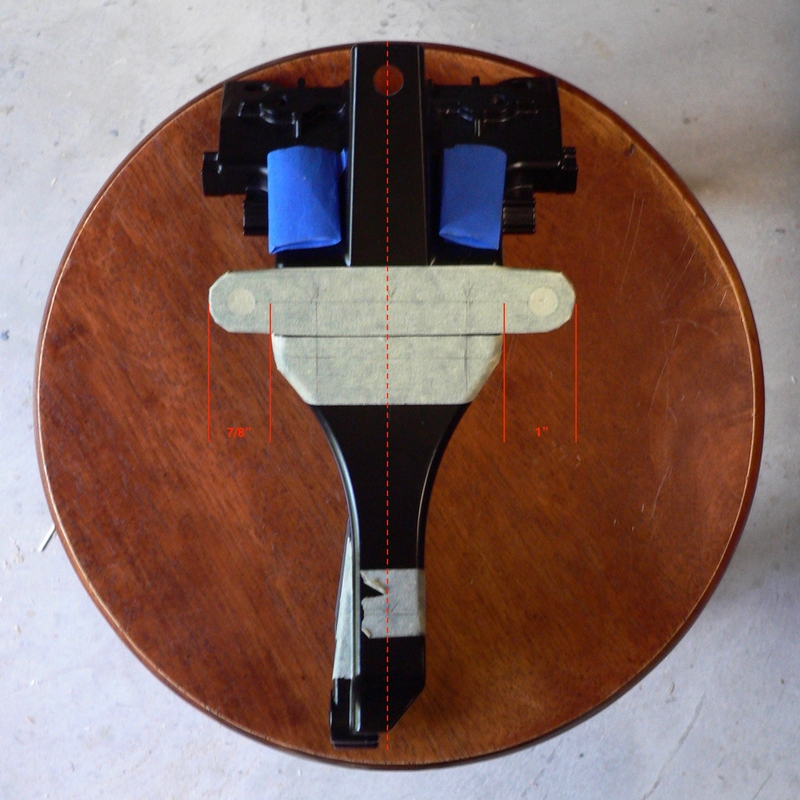
It all started with the OEM bracket and the initial 3 or 4 mockup plates. I was very careful drawing and cutting all of them but from the first one, I noticed there was always a gap to theRH side by the tachometer and the point dipped down noticeably. So I decided I would just carve the plate out carefully to make sure it fit uniformly on both sides. Afterall, if the boltholes are centered and square, it should fit halfway decent, right? But it's 3 mockups later and they're all doing the same thing. Something is up here.

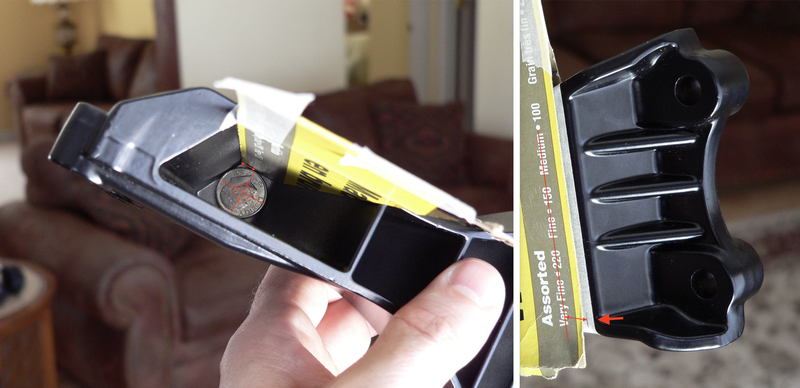
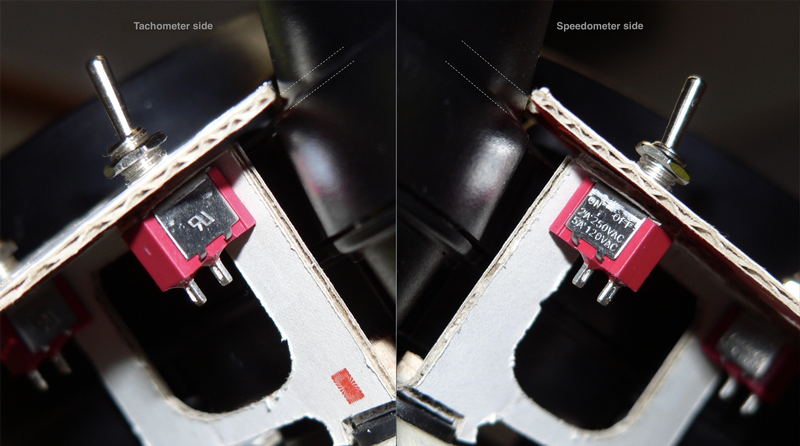
I noticed long ago the contours below either tab of the meter unit mount are not symmetrical. The "shoulders" are shaped differently for no apparent reason other than the guy who made the part didn't have time or care enough to make it look perfect. This got me thinking what else might be "a little off."

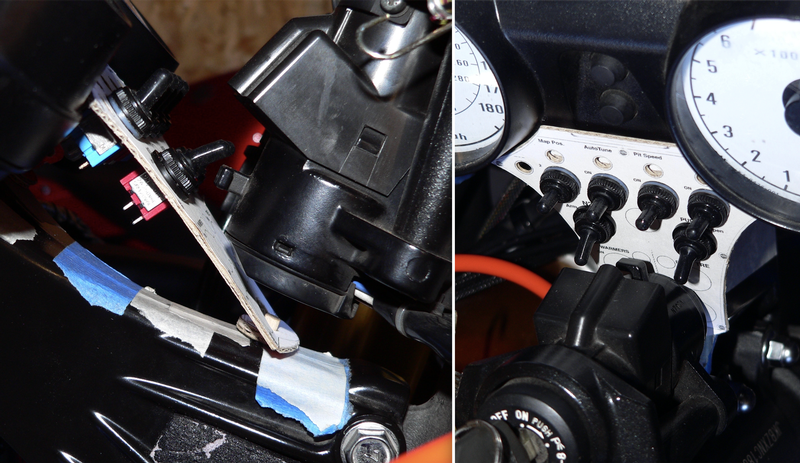
So I measured and sure enough, the meter unit mounts are different lengths. The whole meter unit is shifted over to the RH side 1/16". That partially explains the reason for the gap on the RH side. I have been centering the plate to the meter bracket but the meter unit is not centered.

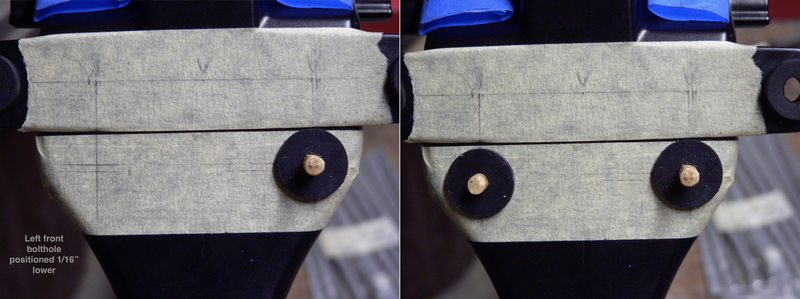
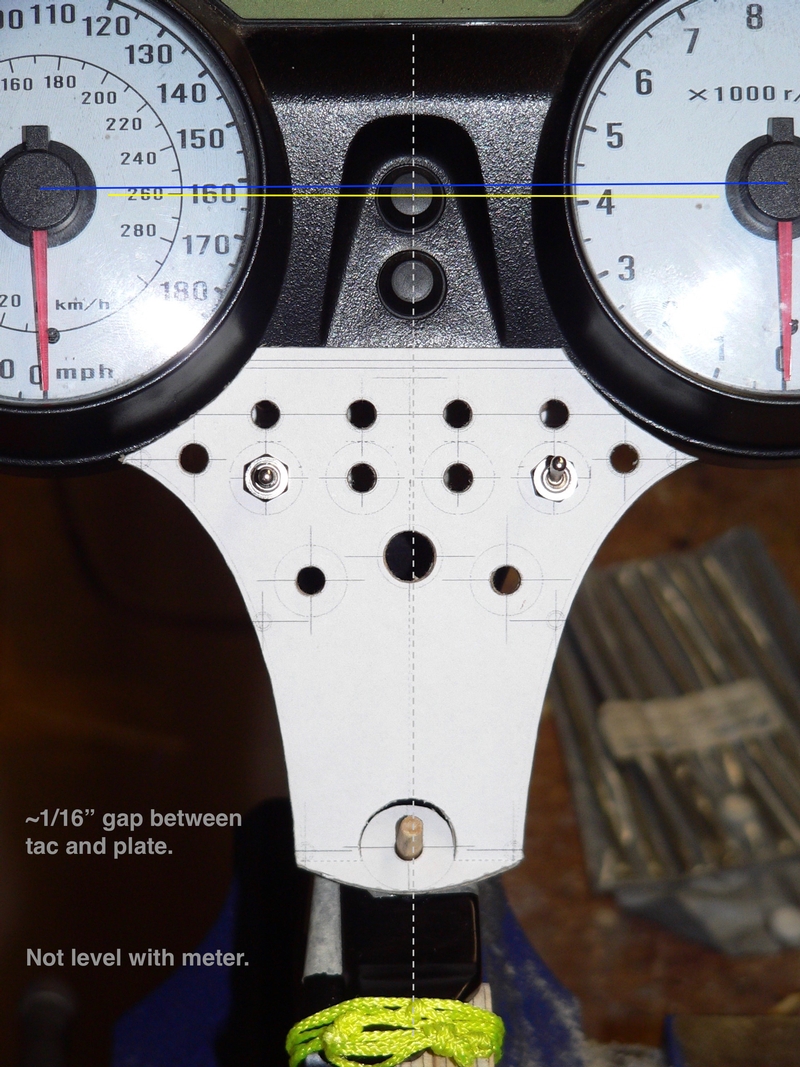
I also suspect the horizontal axes of the mounting bungs are not horizontal. I've had to move the LH bolthole position down both times I glued test pegs to the meter bracket. I can see the switch plate is not level. That is not very objectionable compared to the gap on the right but it's further indication the meter unit is not sitting perfectl perpendicular the the meter bracket. The plate mounting bracket leg is also almost touching the meter unit case on the left. The RH leg has plenty of clearance. The meter unit can't be level. I've done this twice now measuring over and over and the same issues arose both times.

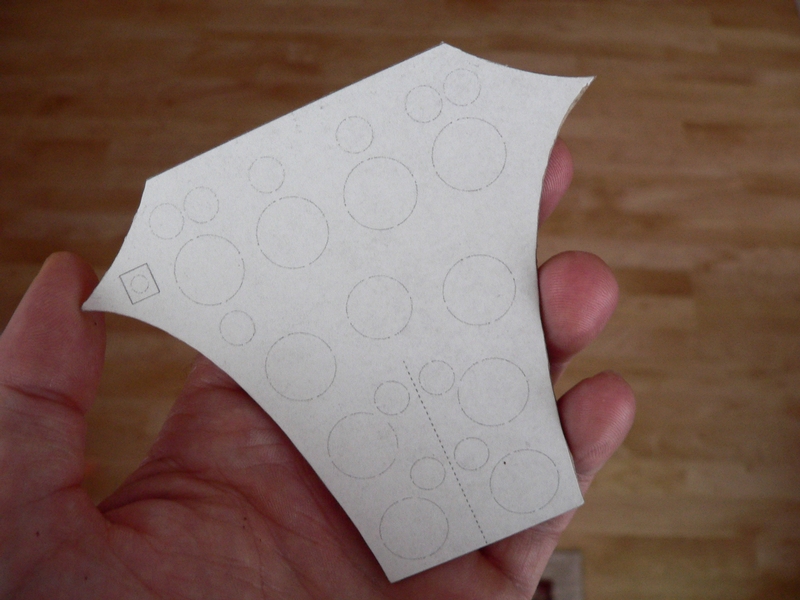
The obvious solution? Drill the holes off center! Just swing the rear mount of the switch plate over to the right. --nope. The neck of the meter bracket where the rear bolthole is is less than an inch wide. I don't want to drill off center there. Not only that, the inside of the meter bracket where the nut will go to fasten the bolt is very narrow. This hole has to be perfectly centered or the nut rubber dampener and washer won't fit inside that little tunnel they're supposed to go in.

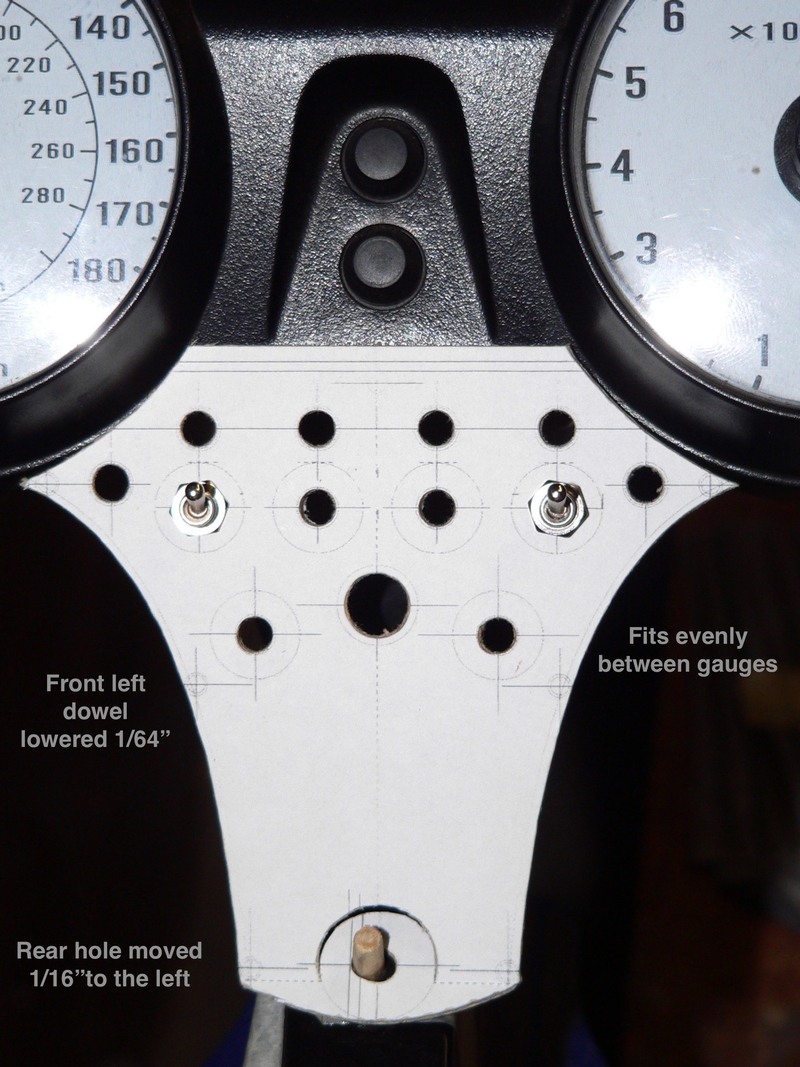
So looks to me like I might get this perfect by shifting the rear bolthole in the plate over to the left 1/16" to compensate for the 1/8" difference in meter mount tabs length. This will bring the center rear of the switch plate inline with the center of the meter unit. Then I'll drop that LH front bolthole about a sixteenth inch to accommodate the off center hole in the rear mount. That will also bring the top of the plate parallel to the meter unit, lift up that drooping point by the tac and open clearance between the left leg of the switch plate bracket and the the meter unit case. I'm sure I will also need to add about a sixteenth inch of plate on the right to totally fill the gap by the tac. This means redrawing the whole thing to get all the holes centered with the meter unit. I could almost do that in my sleep by now.


* Last updated by: Rook on 8/3/2018 @ 7:56 PM *


'08 MIDNIGHT SAPPHIRE BLUE Now Deceased

Link | Top | Bottom

Rook


Rook's Gravatar

Joined: 03/28/09

Posts: 20589

RE: COFFINLID/COFFINBOX SWITCH PANEL
08/04/18 10:48 PM

i moved the mounting points around a bit to try to even up the fitment of the plate with the gauges. Man, a sixteenth inch looks awful low.

I also moved the rear bolthole in the plate to the left a sixteenth inch. Looks better but now the switch holes don't match up to the holes in the front bracket. A sixteenth inch was indeed too low.

I moved the LH dowel up 1/32" and it was still to low. I could see it was not parallel to the meter unit case. I moved it up about 1/64" which to me, seems like that is getting to be negligible drawing lines without a square. I sited it up to the meter unit case and it looked perfect. Both rubber washers are just kissing the bottom edge of the meter unit mount.

Switch holes line up, good clearance between the bracket legs and meter unit case on both sides, The plate fits next to the gauges symmetrically on both sides. I may add a thirty-second inch on the right because it does look like the the gap is just a bit wider on the right. Those points on the sides seem very even though. That was main problem.

What I see now is that rear mount hole could now be moved back about a sixteenth inch. That will push the top edge more snuggly between the gauges so the curved gap is even top to bottom on both sides. It's not supposed to touch the gauges but it should be close enough to look like a part of the meter unit. Moving the hole back will also push the plate forward and gain some clearance with ignition cylinder. It just barely clears. see pic above.

So now that I got the plate centered with the meter unit by moving the back a sixteenth inch to the right, I hope the RH fork tube will clear it. I think it will there was more clearance at full lock on the right than the left which tells me there's something about that meter bracket off center. Everything is always having a bit more of a gap on the right.


* Last updated by: Rook on 8/4/2018 @ 10:56 PM *


'08 MIDNIGHT SAPPHIRE BLUE Now Deceased

Link | Top | Bottom

Rook


Rook's Gravatar

Joined: 03/28/09

Posts: 20589

RE: COFFINLID/COFFINBOX SWITCH PANEL
08/05/18 8:02 PM

Last of the test fit pics, I hope. I moved the hole down toward the back about 3/64" and this pushed the top edge up nice and close to the gauges. It was too close to the RH side now so I moved the hole back 3/64" from center. This is about as close to perfect as I can get it.

If I was really picky, I'd deal withe fact the plate rides a little higher above the rim of the speedo than it does the tac. It's possible the horizontal axis of the mount the meter unit bushings are in is not parallel to that of the surface the switch plate is mounted to. It could even have somethingto do with a difference in the thickness of the rubber the meter unit is mounted in. I'mnot going to worry about it. This might vary from one bike to another and it doesn't hurt the looks. Nobody would notice but me.


'08 MIDNIGHT SAPPHIRE BLUE Now Deceased

Link | Top | Bottom

jonasboston


Joined: 07/01/21

Posts: 1

RE: COFFINLID/COFFINBOX SWITCH PANEL
07/02/21 3:03 AM

Thank you for sharing this coffinbox switch panel here. This is great work, and I will buy dissertation online now. I think this will help me out massively, and it's what I need right now.

Link | Top | Bottom

Rook


Rook's Gravatar

Joined: 03/28/09

Posts: 20589

RE: COFFINLID/COFFINBOX SWITCH PANEL
07/02/21 12:22 PM

Good luck with that dissertation. If I ever get the 14 running again, I'll be back on the Coffinbox switch panel someday.


'08 MIDNIGHT SAPPHIRE BLUE Now Deceased

Link | Top | Bottom

CoolBrzBlu


CoolBrzBlu's Gravatar

Location: Texas

Joined: 05/19/16

Posts: 384

RE: COFFINLID/COFFINBOX SWITCH PANEL
07/15/21 9:46 AM

Gotta love spam.. :/


2016 ZX14R SE, 2007 ZX10R SE, 2018 z900rs

Link | Top | Bottom

CarolannEagan


Joined: 09/08/21

Posts: 1

RE: COFFINLID/COFFINBOX SWITCH PANEL
09/22/21 6:28 AM

Plaza experience on your article even when working with take note of sole sole a touch of product submits. Peaceful technique for not too distant future, Now i'm book-marking today reach fashions carryout comes along gone. seo marketing packages

Link | Top | Bottom

howard


Joined: 10/11/21

Posts: 1

RE: COFFINLID/COFFINBOX SWITCH PANEL
10/11/21 8:57 AM

Well, if this is helpful, then you can buy a speech paper online and receive a great result too.

Link | Top | Bottom

robert


Joined: 10/26/21

Posts: 1

RE: COFFINLID/COFFINBOX SWITCH PANEL
10/26/21 1:20 AM

Looks like a custom IB extended essay mechanism a bit. Have you heard of it?

Link | Top | Bottom

Rook


Rook's Gravatar

Joined: 03/28/09

Posts: 20589

RE: COFFINLID/COFFINBOX SWITCH PANEL
10/28/21 10:49 PM

nope. I didn't click it either.


'08 MIDNIGHT SAPPHIRE BLUE Now Deceased

Link | Top | Bottom


Welcome to zx14ninjaform.com!
 
New Topic Reply
Next Page

Page: 1

Previous Page

New Post

Please login to post a response.