Move Close
Welcome to zx14ninjaform.com!

You are not logged in.
New Topic Reply
Next Page

Page: 1 2 3

Previous Page

Thread: Check their work! ... and Question

Created on: 11/16/15 09:52 AM

Replies: 60

extrapolator


extrapolator's Gravatar

Location: N Cent FL

Joined: 08/11/14

Posts: 1826

Check their work! ... and Question
11/16/15 9:52 AM

Don't trust 'em!

If you read my ride report from my recent NC Tail of the Dragon ride you may recall that I wore out my OEM tires during that ride and had to get new ones in Greenville SC.

So, I got the new tires installed, paid and literally rode the 440 miles straight back to FL from there, stopping only for gas and dinner. Since then I've ridden the bike twice: Once to local bike night, about 40 miles, and then yesterday about 130 miles round trip to the coast for lunch.

Soooooo ... I get home yesterday afternoon, and while washing the bugs off the bike I notice that the outer right-side pinch bolt on the bottom the fork is sticking waaay out. It was easy to turn with just my fingers, so I un-screwed it ... about 2 threads worth ... and it came right out in my hand.

Maybe it's too much to expect the pinch bolts to stay put for 610 miles? Or did they F up???

At least nothing bad happened. And, actually it's kinda a good ... since now I'm gonna go over the rest of their 'work'.

So the question: I've done some minor tinkering on my bikes, adjust the chain, brake pads, OK very minor, but I've never removed the front wheel from a bike. Can you point me to directions for that?


=x+rap01a+0r

Link | Top | Bottom

Danno


Danno's Gravatar

Location:

Southwestern Illinois

Joined: 12/18/11

Posts: 2142

RE: Check their work! ... and Question
11/16/15 11:03 AM

If you have a centerstand, you can suspend the front end from the ceiling with tie-downs or block up under the engine to remove the front wheel. With no centerstand, you'll need a front stand that props under the steering head or you can jack and block under the engine to suspend the front wheel. With a c-tand, the rear wheel can be removed, but to lift the front and block it, weight has to be put on the rear of the bike.

Sorry, I see you have the factory centerstand. Makes many maintenance tasks much easier. If you block it up, make sure your blocking is very stable before you remove the front wheel. Suspending by straps to the handlebars is quite a bit safer.


* Last updated by: Danno on 11/16/2015 @ 11:12 AM *


'07 CPB Blue; ZGST windscreen with MRA X-screen adjustable spoiler, tube bar adaptor, PC III, ATRE,BMC air filter, modified stock seat with 2nd Look cover,Scorpion Flame Ti slip-ons, Galfer rotors front and rear, braided-stainless lines, C-F 10R front fender, C-F hugger, C-F inner fairing panels, painted foreman's fins with faux C-F inlay, polished rim lips wired for heated gear and accessories, Givi V35 side bags and E41 topcase with SW-Motech qd mounts

Link | Top | Bottom

Grn14


Grn14's Gravatar

Location: Montana

Joined: 02/25/09

Posts: 15511

RE: Check their work! ... and Question
11/16/15 11:40 AM

Good advice Danno...I'd just add...do all the loosening of bolts BEFORE raising the front.Break em loose I mean...same when retightening...snug em up...then lower the frontend down...for the final tightening.Unless of course you feel confident you can maintain the axis of the bike while torqueing things.The pinch bolts HAVE to be tightened all the way in with the frontend on the ground anyway.AND in a particular method...see the manual in 'front wheel removal' section.


* Last updated by: Grn14 on 11/16/2015 @ 11:41 AM *

Link | Top | Bottom

extrapolator


extrapolator's Gravatar

Location: N Cent FL

Joined: 08/11/14

Posts: 1826

RE: Check their work! ... and Question
11/16/15 12:09 PM

Thanks guy. Yes, I have the OEM centerstand, and have no problem supporting the bike safely / adequately. I've got a detached garage with open trusses, and a bunch of ratchet straps, so I can 'hang' the front end from there that way.

I was really asking for step-by-step instructions for front wheel removal, and torque figures ... and I see GRN pointed me to it - Thanks GRN. Didn't realize that would be in the manual; Lookin' for it now.


* Last updated by: extrapolator on 11/16/2015 @ 12:15 PM *


=x+rap01a+0r

Link | Top | Bottom

pegscraper


Location: UK

Joined: 05/04/12

Posts: 439

RE: Check their work! ... and Question
11/16/15 12:23 PM

If you have the manual then you're good to go. Just make a point of getting the tyre rotation correct when you refit the wheel as it will go in the wrong way round. Ask me how I know!

AS for the loose pinch bolts you found, I've had similar issues in the past with dealer/garage work. I do most of my own spannering these days but if I do have ANY work done on the bike by ANYONE else I ALWAYS double check it. JMO

Link | Top | Bottom

Maddevill


Maddevill's Gravatar

Location: Hayward, CA

Joined: 04/23/11

Posts: 2656

RE: Check their work! ... and Question
11/16/15 2:49 PM

For sure they left the bolt loose. They don't usually loosen on their own.
For front wheel removal. After getting the bike on a stand, loosen the pinch bolts on the axle nut side ONLY.
Then loosen the axle nut. Then continue with the rest of the removal. You'll have to remove the calipers to get the wheel off and may have to remove the front fender bolts so you can push the fender up enough to work the wheel out from under it. Keep track of the spacers. On the 06 the front allen socket size is 22mm. I'm not sure if it's the same for the later models.
Have fun.

Mad


Owner of KNGKAW.

Link | Top | Bottom

Grn14


Grn14's Gravatar

Location: Montana

Joined: 02/25/09

Posts: 15511

RE: Check their work! ... and Question
11/16/15 2:59 PM

"make a point of getting the tyre rotation correct when you refit the wheel"...most definitely.Arrow pointing forward at the top of the wheel travel.Might help to draw a small arrow on the Disc there...the HUB will have one stamped into the wheel also.

Link | Top | Bottom

extrapolator


extrapolator's Gravatar

Location: N Cent FL

Joined: 08/11/14

Posts: 1826

RE: Check their work! ... and Question
11/16/15 3:43 PM

A 22mm allen socket ... sheesh who has one of those?! Oh, I guess some of you guys do! ... and SHOPS, you know, like the one I PAID to use theirs, and their other tools, thoroughly so the bike would stay together.

I'll investigate this thing further tonight.

Thanks all.


=x+rap01a+0r

Link | Top | Bottom

extrapolator


extrapolator's Gravatar

Location: N Cent FL

Joined: 08/11/14

Posts: 1826

RE: Check their work! ... and Question
11/16/15 3:45 PM

BTW I emailed the shop, sent them a friendly note that they left the bolt very loose, that it was about to fall out. They're closed on Mondays. My email was very pleasant, and I asked for nothing ... Interested to see if I get a response of any kind.


=x+rap01a+0r

Link | Top | Bottom

VicThing


VicThing's Gravatar

Joined: 07/17/14

Posts: 2361

RE: Check their work! ... and Question
11/16/15 5:18 PM

Those bolts have a sequence, and my guess is they only tightened them once and probably didn't use a torque wrench. Tighten each bolt, and repeat. Don't do that, they'll go loose. Tighten to 15 ft lbs.

I'm so glad I work on my own shit these days. I'm sure at some point I'll fubar something up... but at least it'll be me and I'll know about it instead of finding out 3 months later 5 bolts holes are stripped out.

Link | Top | Bottom

Grn14


Grn14's Gravatar

Location: Montana

Joined: 02/25/09

Posts: 15511

RE: Check their work! ... and Question
11/16/15 6:58 PM

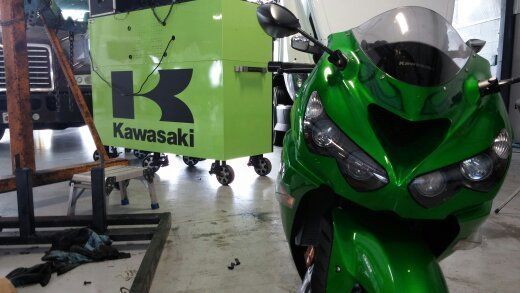
This is what I bought..


* Last updated by: Grn14 on 11/16/2015 @ 6:58 PM *

Link | Top | Bottom

Danno


Danno's Gravatar

Location:

Southwestern Illinois

Joined: 12/18/11

Posts: 2142

RE: Check their work! ... and Question
11/16/15 7:42 PM

I haven't had a bike in the shop for over 40 years because every time I did before that, some moron left something half-assed loose or not properly assembled. I know of many others who have gone down the road with something falling off, lucky to have made it somewhere alive and in one piece. For what shops charge per hour, they should do a top-notch job of servicing your machines. Instead they pay some pinhead 10% of their hourly rate and foist shit off on their customers. Might as well do it yourself.


'07 CPB Blue; ZGST windscreen with MRA X-screen adjustable spoiler, tube bar adaptor, PC III, ATRE,BMC air filter, modified stock seat with 2nd Look cover,Scorpion Flame Ti slip-ons, Galfer rotors front and rear, braided-stainless lines, C-F 10R front fender, C-F hugger, C-F inner fairing panels, painted foreman's fins with faux C-F inlay, polished rim lips wired for heated gear and accessories, Givi V35 side bags and E41 topcase with SW-Motech qd mounts

Link | Top | Bottom

Hub


Hub's Gravatar

Joined: 02/05/09

Posts: 13718

RE: Check their work! ... and Question
11/16/15 10:17 PM

I've never removed the front wheel from a bike. Can you point me to directions for that?

I found a tool kit spark plug tool was stamped to the size of the hex of the axle, that or tool-up as Grn has shown. I glued in some mm nut size so the walls wouldn't twist.

1. 15ftlbs for the lower pinch or axle bolts. Yeah, the lose one.
2. 22ftlbs for the lower crown pinch bolts. Alternate up to the final number.
3. 15ftlbs for the upper crown pinch bolts. Go back and double check all 10 bolts.
4. 25ftlbs for the calipers.
5. 94ftlbs for the axle.

6. Axle comes out right side. Loosen right lower pinchers only. Remove axle. The front is raised up where you can just drag the front wheel, axle slides out like butter or something is up [too high]. Clean and lube whole axle with grease and set aside on a paper towel. Threads need to be clean and not banged around at that end.

7. Caliper bolts are removed and the calipers are rocked back and forth until they cock out of the disc and rim or the pucks are not sunk deep enough. Hang calipers with bungee cords off the hand grips.

8. The plastic rings that hold the hoses in are a one hit wonder. Wonder if you should even bother with them? So this is where the front fender bolts are removed and you'll have to work the wheel out with a little finesse; lifting the front of the fender and roll the wheel out. Basically you are done.

9. The whole point to removing the wheel is to run that front axle back in and see how the forks line up? So before you grease it up, the axle is going to show you how only one fork needs to move up or down to line up the threads basically. Your index and thumb should spin that puppy in. The axle on the right side is sleeved some, so this is a guide more or less. The axle has to slide in as one into the left fork. The spin begins. So when the wheel is sent back in you are not fighting the fork, you are fighting a cocked wheel needing to be lined up more, that or the bike moved lower.

10. The axle is torqued, the calipers are on, the fender is bolted back on and tight; the axle pinchers are next; the caliper bolts are last. Two ways of watching the axle-to-fork fall into its own static setting. One would push down on the forks and let the legs spread in/out before the pinch. The other is to keep the wheel off the ground to spin. Slam on the brakes and let the discs to legs find their way, then set the axle pinch on the right fork. The caliper bolts were hand tight so they find their own float as well. The caliper bolts are the last to be torqued down.

Recap:
If you are going to go thru the motions set the fucker up then. No shop is going to take the time to go thru this kind of hand built setup. If you have a 'the touch,' meaning, twisted enough hardware in your time, you can tighten this bike with a hex handle set, the spark plug tool at the axle and all.


Tormenting the motorcycling community one post at a time

Link | Top | Bottom

extrapolator


extrapolator's Gravatar

Location: N Cent FL

Joined: 08/11/14

Posts: 1826

RE: Check their work! ... and Question
11/17/15 10:22 AM

Thanks Hub! I'll try to follow the steps you listed.

And ... that SC shop called me here in FL to apologize and thank me for letting them know, so they can let their tech know. What I didn't bother telling them was that I had to buy a torque wrench and allen sockets. I already have allen wrenches, but not sockets. And I already have a torque wrench, but it's the beam type which I don't trust at small torque values, and kinda don't trust even at higher values since I'm pushin' the hell out of the wrench, sometimes in awkward positions, and trying to accurately read its scale at the same time. Just can't be very precise.


=x+rap01a+0r

Link | Top | Bottom

jimmymac


jimmymac's Gravatar

Location:

K.C. MO Northland

Joined: 07/02/14

Posts: 454

RE: Check their work! ... and Question
11/17/15 3:08 PM

On the pinch bolts, you want to go back and forth between them until your torque wrench clicks on both of them without turning. When you torque one, the other gets looser until they are both the same.

Take it from me, not a dumbass carpenter.


Let's roll

Link | Top | Bottom

Hub


Hub's Gravatar

Joined: 02/05/09

Posts: 13718

RE: Check their work! ... and Question
11/17/15 3:29 PM

No prob.

but it's the beam type

That's what I use. Yes, contortions are part of the tightening sequence. Unless you can tell by hand?

Next time you watch some motogp pit, watch the tools they use. They are T-handles. The torque wrench is for the axle. Other than that, they spin and tighten by hand.


Tormenting the motorcycling community one post at a time

Link | Top | Bottom

Rook


Rook's Gravatar

Joined: 03/28/09

Posts: 20589

RE: Check their work! ... and Question
11/17/15 5:22 PM

^^^^^^^^


'08 MIDNIGHT SAPPHIRE BLUE Now Deceased

Link | Top | Bottom

extrapolator


extrapolator's Gravatar

Location: N Cent FL

Joined: 08/11/14

Posts: 1826

RE: Check their work! ... and Question
11/17/15 6:36 PM

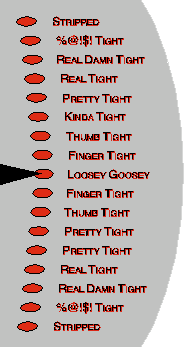
Manual calls for 15 ft-lbs for the pinch bolts. I'll use my new torque wrench, but curious ... is 15 ft-lbs "Pretty tight", "Real tight", or "Real damn tight"??

Surely it can't be "Kinda tight" .... nor "%@!$! tight".


=x+rap01a+0r

Link | Top | Bottom

Grn14


Grn14's Gravatar

Location: Montana

Joined: 02/25/09

Posts: 15511

RE: Check their work! ... and Question
11/17/15 7:36 PM

Well...15 ft-lbs is just that...you can 'decide' whether it feels as you mentioned.I'd stick at that tightness though.If you feel you can 'get it' with a hand tightening...that's okay too I guess.I don't use any torque wrenches on my bolts.I normally tighten stuff down to just where it snugs down and gets tight...(except well-nuts)...course,my 'method' IS subject to 'going a bit too far'...and possibly stripping something...but it hasn't happened...yet.I know these threaded fasteners in the frame and such ARE 'soft'...so I don't crank real hard at the very last...I kinda 'know' when to stop.

If you remove these bolts...lots of times they 'snap free' when you're trying to loosen(felt like the bolt snapped along the shank in there).I try to pay close attention when that snap occurs and how much pressure I'm applying at that time to loosen.I try to replicate that when tightening.BUT NOT ALWAYS.Replicate the tightness...not the snapping;)


* Last updated by: Grn14 on 11/17/2015 @ 7:40 PM *

Link | Top | Bottom

cruderudy


cruderudy's Gravatar

Location: AMR

Joined: 08/15/12

Posts: 1963

RE: Check their work! ... and Question
11/17/15 8:04 PM

The torque spec on the bolts in this clamping application are designed to keep the bolt in tension and maintain preload over the range of load conditions the bolted joint will see in use. If you exceed the torque spec the applied load to the bolt can potentially exceed the yield strength of the bolt. It probably will not fail right away but could in the future. Alternate is to use lock wire fasteners and the lock wire will keep them from backing out and maintain the preload, or torque stripe the bolt head to the mount surface with epoxy to monitor the bolt position.

Torque to spec and be happy!


Perfectly Set up '06 dead and gone
New BBW '14 14R

Link | Top | Bottom

extrapolator


extrapolator's Gravatar

Location: N Cent FL

Joined: 08/11/14

Posts: 1826

RE: Check their work! ... and Question
11/17/15 10:28 PM

Tks again guys. Note that I did say I'd use my new torque wrench. And I was referring to Hub's graphic with the tightened 'names'.


=x+rap01a+0r

Link | Top | Bottom

Grn14


Grn14's Gravatar

Location: Montana

Joined: 02/25/09

Posts: 15511

RE: Check their work! ... and Question
11/18/15 8:24 AM

Torque wrench tightening is ALWAYS the best way to do any of this.I don't want to sound like I'm bypassing this or saying anyone should do it how I do it.If someone feels they need to use the wrench....that's great.They should.

The rear axle nut is an example.The book calls for a particular torque on that.I've never used a tQ wrench as per the book.What I did do...is mark the nut on the flange and a small mark into the axle end(threaded end).I make sure the axle is installed the same everytime...then I tighten up the nut and get the mark at the same place each time.This has worked for me.Is it exactly on the factory TQ spec?If not...it's damn close.I did this marking thing when the bike was new and at the factory specs.You can't do this of course with every bolt and screw on there.

Link | Top | Bottom

jimmymac


jimmymac's Gravatar

Location:

K.C. MO Northland

Joined: 07/02/14

Posts: 454

RE: Check their work! ... and Question
11/18/15 8:55 AM

Every time you torque a fastener, you stretch it. The more times you stretch it, the longer it gets.
Maybe not enough to tell by looking at it, but enough to change the torque value.

I've invested over $1,000 in torque wrenches just to work on my bikes at home, so your bet your sweet ass I use them.
http://zzrbikes.com/gallery2/main.php?g2_view=core.DownloadItem&g2_itemId=90771&g2_serialNumber=4&g2_GALLERYSID=1fbababd2ca69eb3b581b808b3f56cf8


Let's roll

Link | Top | Bottom

Grn14


Grn14's Gravatar

Location: Montana

Joined: 02/25/09

Posts: 15511

RE: Check their work! ... and Question
11/18/15 11:20 AM

Yep...I understand that process.I know this can and does occur.If I was removing bolts and such on a regular basis...(not stuff like well-nuts)...I would use a TQ wrench everytime.Usually...I can feel when the fastener is needing a bit more.Which is what you're talking about.So I gently add a tiny bit more.BUT...that can lead to overtightening...granted.Even possible shearing.A torque wrench will DEFINITELY stop that from happening.Like I said though...all my bolts(like the clamping bolts and such)I've marked with a chisel(tiny mark just to be able to see it).And I align those with the part they're going into(marked as well).It's not 'perfect' tq wise.I've never had one strip out though or come loose.Maybe I just got lucky?I always line those marks up with the final tightening.I'm not above adding a tiny bit of threadlocker either..which I've done many times.


* Last updated by: Grn14 on 11/18/2015 @ 11:23 AM *

Link | Top | Bottom

VicThing


VicThing's Gravatar

Joined: 07/17/14

Posts: 2361

RE: Check their work! ... and Question
11/18/15 5:20 PM

Grn I will say there maybe something to the castle nut aligning with the holes as being pretty close to the right value. In fact mine lines up so consistently I can tell by where the nut stops if the alignment is off!

But I stick with torque wrenches. They're not that expensive for good quality ones (CDI/Snap-on ~90-$150 on amazon) a couple of those and you're all set for every applicaiton on your bike (30-250 in/lbs, 10-100 ft lbs). I also have a cheap 1/2 HF that I use for lugs and axles unless i have the CDI out.

Link | Top | Bottom


Welcome to zx14ninjaform.com!
 
New Topic Reply
Next Page

Page: 1 2 3

Previous Page

New Post

Please login to post a response.