You are on the right track. Yes those three bolts in each of the dash panels are first.
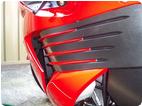
But Right on the insider most section of each dash panel, (closest to the rider, on each side of the tank cover), are two very brittle little tabs that are very hard to get out of the tank pads slots they are in without breaking. Those come upward, and snap out of the slot in the tank cover. And when you do pop them up and out, do so as gently as you possibly can. (see the 6:25 mark of the video link for where these are, but I chose not to snip em off with pliers, as this guy suggests!)
Once you get that snapped out, then the front ends of these fairing pieces come inward, towards the guages in order for their outter most tabs to slide out from under the side fairing edge they are underneath.
Once you get the dash/upper fairings out, the tank pad is next, and that ba**tard ALSO has some very brittle grommet knobs that are so easy to bust off if you are not ultra aware of them and how to get them apart.
But first things first; your dash panels..
This will help you some as for the order of part removal and where the screws are. But this don't tell you where everything is, best I can remember.
http://www.youtube.com/watch?v=2Iw8JSVZ-H0
Its all like a very brittle puzzle, so read up as much as you can on all the different pieces before pulling or pushing in any direction.
The first three pieces in order are:
1 Dash panels (Brittle tabs on each side of the tank pad in tight slots)
2 Tank Pad (has two very brittle grommet tabs that have knobs from the big piece (the mid fairing) that are easy as HELL to break off)
3 Foreman Grills (rear parts snaps out of grommets then once that's free and clear, the front comes gently back towards the rear)
Hope this helps. Be careful, and don't tug on anything you are unsure of.
* Last updated by: ZX14MAN64 on 4/6/2013 @ 9:28 PM *